Introducing Vector Graphics and Inkscape
SVG (Scalable Vector Graphics) is an open W3C standard for describing two-dimensional graphics in a different way than traditional computer images, which are all bitmaps of some kind. A bitmap or raster graphic is, ignoring compression and other optimization techniques, simply one long list of all the pixels constituting an image, each one described in as much detail as possible—exact color, transparency and so on.
Instead, a vector graphics file contains a series of pseudo-mathematical instructions—such as draw a straight line from this to that coordinate, create a rectangle of this size, rotate it 47 degrees clockwise or fill it with red. The grandfather of vectorial formats is PostScript.
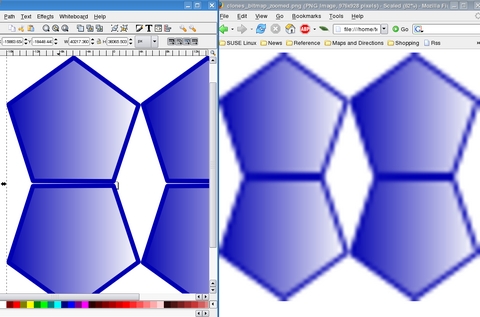
The first and main benefit of this alternative method is being completely separate from the capabilities of the physical display, be it a computer monitor or a piece of paper. More exactly, although it is still (obviously) impossible to see an ultra-crisp image on a low-resolution monitor or printer, a vector graphic has no intrinsic resolution nor limits to it. Vector graphics can be zoomed, shrunk or rotated as much as you wish or as many times as you wish without any degradation, even when printed. For an example, take a look at Figure 1, which shows two zoomed versions of the same drawing side by side, a raster drawing and a vector drawing. The vector one, on the left, is much crisper than the other, isn't it?
Another big plus of vector image files is that, because they are sequences of instructions, the size of the image does not affect that of the file, saving both disk space and download time on slow connections.
Last but not least, creating or processing “a series of commands” is a task that can be delegated to a computer program easily and efficiently. SVG files can be mass-generated or modified in almost any way without human intervention. The SVG 1.1 specification also describes 16 filter primitives that make it possible to obtain very complex objects as well as highly realistic effects.
The main reason the world hasn't gone all vectorial yet is that bitmaps remain much better at reproducing the subtle differences in color and contrast that are present in photographs. Vector graphics, however beautiful, are “synthesized”, and it often shows. In spite of this, they remain extremely useful and are becoming more and more common among GNU/Linux desktops.
The most basic GUI-based vector graphics tools for Linux is Figurine, which uses the same file format as the venerable Xfig, and Dia. A much more promising application is Karbon 14, the vector graphic component of KOffice. These days, however, the easiest way to get started with vector graphics on Linux is Inkscape, because of its larger on-line documentation (see Resources) and a wider, more active user and developer community. So, let's see how to start producing vector graphics with Inkscape.
The Inkscape main window, shown in Figure 2, is pretty crowded. Right below the main menu is a row of shortcuts to the most commonly used commands, followed by a drawing-tool-dependant control bar. If you need to cooperate with other users, sharing not only text but graphic information, fire up the Pedro Xmpp client available (if your distribution included it and all its dependencies) under the Whiteboard menu. Two handy buttons with a wrench icon on the top-right corner give fast access to global Inkscape preferences and to those of the current document. The drawing tools are mapped to buttons on the right side—that's where you go to create rectangles, spirals, polygons, circles, stars and lines of any possible shape. All these objects have separate panes and control bars where you can set anything from the number of turns in a spiral to the points in a star. Finally, a bottom bar displays a color palette and some status information.
The first thing to do after you click on File→New is decide the geometric format of your drawing. There are several choices—from several DVD covers to desktop wallpapers—at all the standard computer and HDTV resolutions plus desktop icons, business cards and more.
To add objects to a drawing, you either can use the shape-related tools on the left or draw from scratch with the pencil, pen and calligraphy tools. Tools in the second group all draw paths defined by nodes. Existing paths can be modified with the node tool, which is the button right below the one with the arrow. After activating that tool, nodes are shown as small diamonds and can be deleted or moved around. To select all and only the nodes you want as quickly as possible, use the mouse wheel. Scrolling it up selects nodes starting with those nearest to the cursor; scrolling down deselects them. You also can smooth whole paths (Path→Simplify) as well as join or break them.
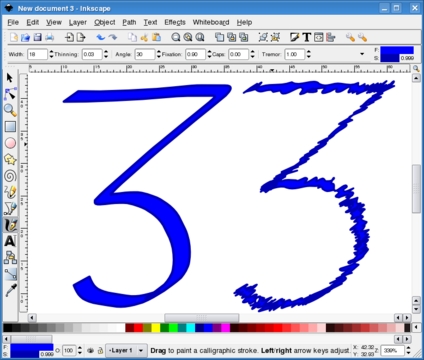
The tool for writing or anything else that must be drawn by hand with a mouse or a graphic tablet is the calligraphy pen, which is associated with the nib icon. There are several options for changing the appearance of the pen strokes and their general behavior in order to achieve a more realistic or personal look. Figure 2 shows the number three drawn with tremor values of 0 (on the left) and 1.00 (on the right).
Once you have created or imported an object, you can modify its appearance in many ways, thanks to the Inkscape filters, which can do things as different as fractalization, saturation adjustment and Gaussian blur. The latter is used to adjust a blur setting for an object.
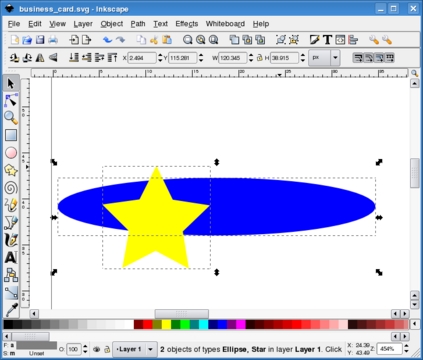
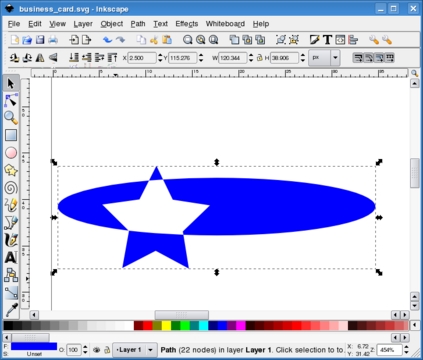
Paths and objects can be combined very quickly with boolean operations, such as intersection, union, difference, exclusion and others. Simply select the objects to combine and choose the desired operation from the Path menu. Figures 3 and 4 show what you get when you intersect an oval and a star.
Solid colors can be dull, don't you agree? The fact that vector drawings are generated through computer instructions doesn't mean that their components must all be in solid colors. To create smooth color transitions (that is, gradients) from one side of an object to another, select it and open the Fill and Stroke dialog from the Object menu. That window allows you to apply several gradient types and place the corresponding stops—the exact start and end points between which the color transition must take place. Gradients can be applied to any object, including text.
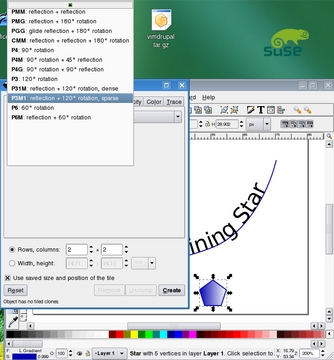
Inkscape has buttons or menu entries to copy, paste and duplicate objects. Sometimes, however, what you want is a clone. Inkscape clones are special copies of an object that can be moved around, scaled or rotated at will but remain linked to it. By this we mean that any change to the original is applied to all its clones automatically. If you press Shift-Alt-D, a clone is detached from its ancestor and becomes a fully independent object. Clones can be tiled (Edit→Tile) to create patterns with many kinds of symmetrical or pseudo-random layouts. Reflection, rotation, radial placement and row and column shifting are only a few of the available choices, as shown in Figure 5.
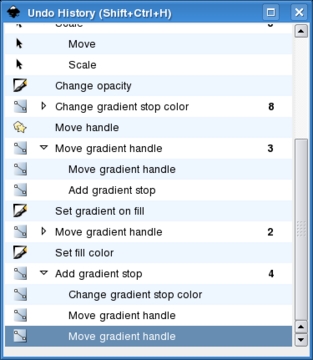
One great thing in Inkscape is its Undo History. Not only can you undo all the changes you have made to a file, but they also are displayed in a nested mode, as shown in Figure 6, which makes it much quicker to go back right to the point you wanted.
Inkscape can convert drawings or parts of drawings to PNG bitmaps. Select File→Export as Bitmap, and remember to choose the right resolution; the default is 90dpi. Besides its native SVG file format, Inkscape also can save your masterpieces in several special formats, including PovRay, LaTeX, encapsulated PostScript, Adobe Illustrator 8, AutoCAD Dxf and OpenDocument drawings.
On the opposite side—importing already-existing graphics—a really neat feature of Inkscape is the capability to generate drawings from LaTeX formulas. Most people, however, will find it much more useful to “trace” JPEG, PNG or GIF images—that is, to convert them to vectorial format. Some advanced Inkscape users even trace the bitmaps that they generated from original vector drawings. The reason for doing this is that the unavoidable degradation may be exactly what is missing to make your work look more realistic.
Normally, if the starting bitmap is simple, the traced version is pretty good. Tracing something as complex as a photograph is theoretically possible, but in practice, the process is often so complex that it greatly slows down Inkscape or simply halts it, depending on the computer. This said, there are many different ways to trace bitmaps with Inkscape. To try them, import a bitmap, select it and then click on Path→Trace Bitmap. In the tracing pane, you'll then be able to generate one or more vectorial paths, starting, for example, from the colors or the levels of brightness of the original image.
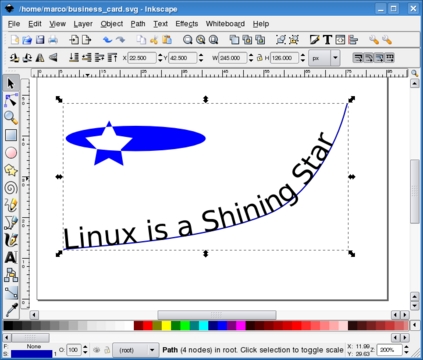
The big button with the capital A lets you create text objects. So far, this is nothing special. What is great though is the possibility to make text follow any line (Figure 7). Select both the text and the line while pressing the Shift key, then select Text→Put on Path in the top menu.
As far as fonts are concerned, Inkscape can use any font available on your computer. Therefore, if you aren't careful, your SVG file will not be portable. The real solution would be to use only fonts that are available on all platforms for all the files you need to distribute. When this isn't possible, such as when the text is a company slogan that can be only in the corporate-approved font, you can convert it to a vectorial path (Path→Object to Path). Note that this increases the file size and above all is a one-way process. The obvious workaround is always to keep a master copy with the actual text and distribute only the one with the path.
Sentences take different amounts of space in a graphic depending on the language in which they are written. We already mentioned that a big advantage of SVG is that it can be generated or processed automatically. Combining these two facts, it is easy to see that you can generate and maintain, with minimum effort, many versions of the same banner, diagram or any other graphic that includes text, each in a different language. The only thing to keep in mind is always to leave enough space around that text to make sure that it fits no matter what the language is. After that, follow the procedure described on the “Creating International Graphics” Web page (see Resources).
The SVG standard is another application of eXtensible Markup Language (XML). If you view a file created with Inkscape at the command line or in any text editor, instead of incomprehensible binary sequences, you'll find something like this:
<?xml version="1.0" encoding="UTF-8" standalone="no"?>
<!-- Created with Inkscape (https://www.inkscape.org/) -->
<svg
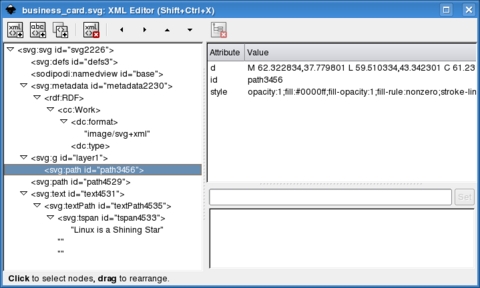
and lots of other very verbose, but plain ASCII text—terribly ugly but still editable by hand in an emergency or processable by a script. What if you have lots of logos and clip-art files, all with the names and official color of your company, and then either the name or the color changes? If all the files are in SVG, you simply can replace the right strings with awk, sed, Perl or any other scripting language. To do the same thing on one single file inside Inkscape, click on the <> bracket buttons or press Shift-Ctrl-X to launch the Inkscape XML editor. Figure 8 shows how the XML tree of the “Linux is a Shining Star” business card looks in this editor. Path # 3456 is the oval/star shape combo from Figure 7. With this editor, it is possible to change almost anything in the current file, including SVG features for which there are still no graphical tools. Another reason to use the editor is that every change you make in it immediately applies to the actual graphic in the main Inkscape window. Speaking of structured documents, selecting File→Document Metadata in Inkscape opens a pane where you can set the Dublin core entities or the license of the current file.
Although Inkscape obviously is intended primarily as a GUI application, it can be used for doing SVG processing on the command line as well. Here are some examples straight from the man page:
inkscape filename.svg -p '| lpr' — Print an SVG file.
inkscape filename.svg --export-png=filename.png — Export an SVG file into PNG.
inkscape filename.svg --export-eps=filename.eps --export-text-to-path — Convert an SVG document to EPS, converting all texts to paths.
inkscape --query-id=zoom_in -X /usr/share/inkscape/icons/icons.svg — Find the x position of the zoom-in icon in the default icon file on a Linux system.
inkscape filename.svg --query-width --query-id text1555 — Query the width of the object with id=``text1555''.
The screenshots and the text of this article refer to Inkscape 0.45 on SUSE 10.1. The official Inkscape road map tells us that the most interesting things in the near future should be PDF import/export and Visio support in version 0.47, followed by the authoring of simple animations in Inkscape 0.48. Version 0.50 should include SVG Mobile support. The plan also includes switching parts of the display engine to Cairo, up to the point where Inkscape can use the hardware-accelerated back end of that library. As you can see, there are a lot of reasons to try Inkscape today and keep an eye on it in the coming months.
Resources
Creating High-End 2-D Graphics Using XML: luxor-xul.sourceforge.net/talk/jug-nov-2002/slides.html
Cairo: cairographics.org
Librsvg: librsvg.sourceforge.net
Figurine: figurine.sourceforge.net
Dia: www.gnome.org/projects/dia
Karbon: www.koffice.org/karbon
Inkscape: www.inkscape.org
Inkscape Source Code Architecture: inkscape.org/doc/architecture.png
Inkscape Wiki: wiki.inkscape.org/wiki/index.php/Inkscape
Inkscape User Documentation: inkscape.org/doc/index.php
Inkscape User Manual: www.angelfire.com/mi/kevincharles/inkscape/index.html
A Guide to Inkscape: tavmjong.free.fr/INKSCAPE/MANUAL/html/index.php
Inkscape Roadmap: wiki.inkscape.org/wiki/index.php/Roadmap
How to Use Inkscape's New Blur Filter: www.redhatmagazine.com/2007/02/27/the-open-palettehow-to-use-inkscapes-new-blur-filter
Creating International Graphics: andy.brisgeek.com/archives/45
Outlining Fonts: ruphus.com/blog/2006/05/19/five-steps-of-inscape-outlining-fonts
Inkscape Text Tricks: www.ffnn.nl/pages/articles/media/inkscape-text-tricks.php
Vector Clip-Art Collection: www.clipartlab.com
Marco Fioretti is a hardware systems engineer interested in free software both as an EDA platform and, as the current leader of the RULE Project, as an efficient desktop. Marco lives with his family in Rome, Italy.


