Build Your Own Internet Radio Receiver
Tune in to communities around the world with the push of a button.
When I get home at night, I like to tune into the world with the push of a button. I've lived in lots of different places—from Dunedin, New Zealand, to Santa Fe, New Mexico—and in each town, I've come to love a radio station (usually a community radio station) that embodies the spirit of the place. With the push of a button, I can get a bit back in sync with each of these places and also visit new communities, thanks to internet radio.
Why build your own internet radio receiver? One option, of course, is simply to use an app for a receiver. However, I've found that the most common apps don't keep their focus on the task at hand, and are increasingly distracted by offering additional social-networking services. And besides, I want to listen now. I don't want to check into my computer or phone, log in yet again, and endure the stress of recalling YAPW (Yet Another PassWord). I've also found that the current offering of internet radio boxes falls short of my expectations. Like I said, I've lived in a lot of places—more than two or four or eight. I want a lot of buttons, so I can tune in to a radio station with just one gesture. Finally, I've noticed that streams are increasingly problematic if I don't go directly to the source. Often, streams chosen through a "middle man" start with an ad or blurb that is tacked on as a preamble. Or sometimes the "middle man" might tie me to a stream of lower audio quality than the best being served up.
So, I turned to building my own internet radio receiver—one with lots of buttons that allow me to "tune in" without being too pushy. In this article, I share my experience. In principle, it should be easy—you just need a Linux distro, a ship to sail her on and an external key pad for a rudder. In practice, it's not too hard, but there are a few obstacles along the course that I hope to help you navigate.
My recipe list included the following:
- A used notebook with an ultra low voltage (Core 2 Duo) processor.
- An audio interface with an optical TOSLINK.
- pyradio: an open-source Python radio program.
- An external keypad.
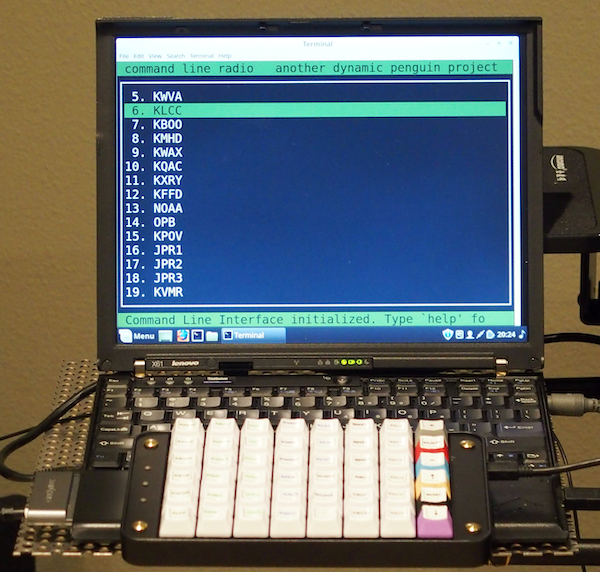
Figure 1. My Hardware Setup
Why a notebook and not a Raspberry Pi or ship of a similar ilk? Mostly due to time—my time in particular. It's not too hard to find a high quality notebook about ten years old for about $50, so the cost is really not that different, and I find the development platform to be much quicker.
In particular, I used the site ThinkWiki to research the Linux support of Thinkpads. On eBay, I found that the least expensive units often were sold without HDD—which is just fine with me, since I wanted a small SSD to keep the computer (whose main tasks is audio) quiet. I settled on a Thinkpad X61, but any notebook from that era will have more than enough oomph, and generally much more than any low-cost single-board computer option.
I wanted an optical audio link, a TOSLINK, and again, ThinkWiki is an excellent resource for looking into issues like driver support. I went with a used Soundblaster Audigy Cardbus sound card (because the system also doubles as an audio server for my FLAC recordings), which was a bit more pricey, but to save a few bucks, you can pick up a USB to TOSLINK converter on eBay for ~$10. My fondness for TOSLINK is due to its inherent electrical isolation that minimizes the chance of any audio hums from ground loops. And heck, I just think communicating by light is cool.
The other big piece of hardware is the keypad. To prototype, I just grabbed a wireless numeric pad with 22 keys, but for the final project, I spent a little more for a dedicated 48 key pad (Figure 2). The wireless keypad, of course, has the advantage that it can act as a remote control I can carry around the room when switching stations.
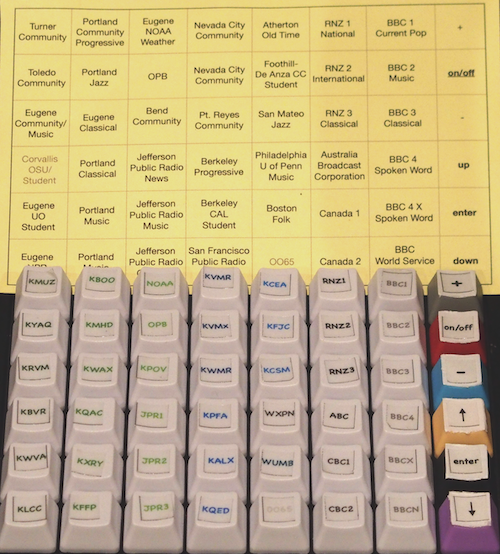
Figure 2. Dedicated 48 Key Pad
After getting all the pieces together, the next step is to install your favorite distro. I went with Linux Mint, but I'll probably try elementary for the next iteration.
The main piece of code is pyradio, which is a Python-based internet radio turner. The install is simple with snap:
$ sudo apt install snapd
$ sudo snap install pyradio
You'll also need a media player, such as VLC or MPlayer.
I always need to look for where stuff gets dropped, for that I use:
$ cd /
$ sudo find . -name pyradio
In this case, I found the executable at /snap/bin/pyradio.
Like Music on Console (MOC), pyradio is a curses-based player. I find myself reverting to curses interfaces these days for a few reasons: nostalgia, simplicity of programming and an attempt to shake free of the ever-more clogged browser control interfaces that once held the promise of a universal portal, but have since become bogged down with push "services"—that is, advertising.
If you have not done any previous curses programming, check out the recent example provided by Jim Hall of using the ncurses library in Linux Journal. Take a look at the pyradio GitHub repository if you run into any installation issues. You also can build pyradio from source after cloning the repository with the commands:
$ python setup.py build
$ python setup.py install
You don't really need to know much, if any, Python beyond the two simple
commands above to get running from source. Also, depending on your setup,
you may need to use sudo with the commands above.
If all goes well, and after adding /snap/bin to your path, issuing the command:
$ pyradio
will bring up a screen like that shown in Figure 3.
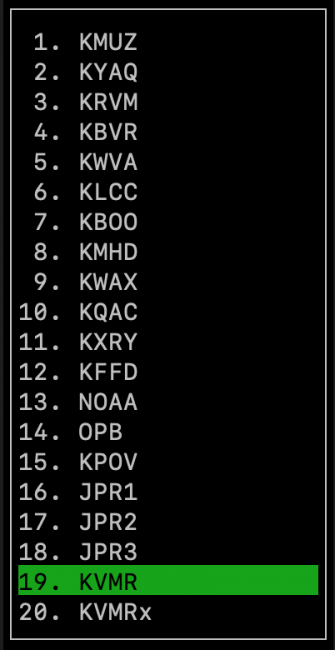
Figure 3. pyradio Screenshot
You drive pyradio with a few keyboard-based commands like the following:
- Up/Down/j/k/PgUp/PgDown — change station selection.
- g — jump to first station.
- <n>G — jump to nth/last station.
- Enter/Right/l — play selected station.
- r — select and play a random station.
- Space/Left/h — stop/start playing selected station.
- -/+ or ,/. — change volume.
- m — mute.
- v — save volume (not applicable for vlc).
- o s R — open/save/reload playlist.
- DEL,x — delete selected station.
- ? — show keys help.
- Esc/q — quit.
Some of those commands will change after you do the keypad mapping.
Next, you'll want to add your own station list to the mix. For that, I search for the file stations.csv with the command:
$ sudo find . -name stations.csv
And see that snap put the file at:
$ /home/[user_id]/snap/pyradio/145/.config/pyradio/stations.csv
Open stations.csv with an editor and replace the default stations there with your own selection. For instance, some of my entries look like this:
KMUZ,   https://70.38.12.44:8010/
KVMR,   https://live.kvmr.org:8000/aac96.m3u
RNZ1,   https://radionz-ice.streamguys.com:80/national.mp3 etc ...
The syntax is as straightforward as it looks. The field separator is a comma, and the first field is any text you want, presumably describing the station. I just use the call sign. The second field is a link to the stream. And this is where you face the first obstacle. Finding all the streams you want can be a bit tedious, particularly if you want to go directly to the source and not a secondary link from an aggregator website. Also, once upon a time, there were just a few encoding formats (remember .ram?), but now there are a multitude of formats and proprietary services. So identifying a good URL for the stream can be a bit of a challenge.
I start by going directly to the station's website, and if you are lucky, it will provide the URL for the given stream. If not, you need to do a bit of hunting. Using the Google Chrome browser, pull up the page View→Developer→Developer Tools. On the left part of the screen is the web page and on the right are a few windows for Developers. Click the menu labeled Network, and then start the audio stream. Under the "Network" window, step through the column labeled "Name". You should see the "Request URL" appear on the right, and you want to take notice of any link that could lead to the audio stream. It will be the one with a lot of packets bouncing to and fro. Copy the URL (and the IP number at "Request IP"), and then test it out by pasting the URL or IP:PORT number into the address box in the a browser. The URL might cause the start of the audio stream, or it might lead to a file that contains information—like a Play LiSt File (.pls file)—used to identify the stream.
For a specific example, consider the KMUZ (a community radio station in Turner, Oregon). I first go to KMUZ's home page at the URL, KMUZ.org. I note the "Listen Live" button on the home page, but before running the stream, I open the "Network" window in "Developers Tools". When that window is open, I click the "Listen Live" button, and search through the names in Requested URLs and see https://sc7.shoutcaststreaming.us:8010/ with IP number and port, 70.38.12.44:8010.
Pasting either of those identifiers into the URL box of the browser, I find the stream is from (a proprietary service) Shoutcast, which provides a Play LiSt file (.pls). I then open the playlist file with an editor (.pls are ascii files) to confirm that the IP/Port is the stream for listening to KMUZ.
Note two things. First, there are a lot formats/protocols in use to create a stream. You might find an MP3 (.mp3) file during your hunting, a multimedia playlist file (.m3u), an advanced audio encoding (.aac) or just a vanilla URL. So, getting a link to the stream you want requires some hunting and pecking. Second, if there is a preamble to the stream, you can usually avoid that by waiting for the stream to pass to the live broadcast, and then grab the live stream. That way, you won't need to listen to the preamble the next time you start the station. Your choice of audio player (VLC, MPlayer or similar) needs to be able to decode whatever formats you end up with for your particular group of radio stations.
The other place you might run into difficulties is mapping the keys on the keypad. That, of course, depends on the specific keypad you use. If you are lucky, the keypad is documented. If not, or to double-check the map, use a program to capture the keycodes as you press each key. Here is a Python program to find the keycodes:
from msvcrt import getch
while True:
   print(ord(getch()))
The other small piece of coding you need to do is point each keypress to a station. Locate the radio.py program in the same directory as the stations.csv. Edit the Python script so that each keypress causes the desired action. For instance, the streams in the station.csv are indexed by pyradio from 1 to N. If the first station in the list is KMUZ, and the keycode for the key you want to use is "h", then add or modify the radio.py script to include the snippet:
if char == ord('h'):
   self.setStation(1)
   self.playSelection()
   self.refreshBody()
   self.setupAndDrawScreen()
The functions/methods you will use are clearly labeled, such as
the playSelection method above. So you really don't need any
detailed knowledge of Python to make these changes. Make sure though that any
changes do not conflict with other assignments of the keycode within the
script. Functions, such as "mute", can be reassigned with the snippet:
if char == ord('m'):
   self.player.mute()
   return
Whatever changes you make though, try to keep the program usable from the notebook keyboard, so you still can do basic operations without the external keypad.
And that's just about it. Every good program, however, should have one
kludge so as not to offend the gods. I wanted the pyradio program
to run automatically after booting, and for that, I put a ghost in the
machine. There are more natural ways to run pyradio at boot, but I like
a rather spooky way using a shell script at login with xdotool:
sleep 0.2
xdotool mousemove 100 100 click 1
xdotool type "pyradio"
xdotool key KP_Enter
xdotool lets you script keyboard and mouse inputs to run as if you
were actually typing from the keyboard. It comes in quite handy for
curses programs.
Finally, I would be remiss if I didn't recommend a good radio show. My favorite at the moment is Matinee Idle on Radio New Zealand National, which plays a few times a year during holidays. It's like College Radio for the over 50 set.


