Running GNOME in a Container

Containerizing the GUI separates your work and play.
Virtualization has always been a rich man's game, and more frugal enthusiasts—unable to afford fancy server-class components—often struggle to keep up. Linux provides free high-quality hypervisors, but when you start to throw real workloads at the host, its resources become saturated quickly. No amount of spare RAM shoved into an old Dell desktop is going to remedy this situation. If a properly decked-out host is out of your reach, you might want to consider containers instead.
Instead of virtualizing an entire computer, containers allow parts of the Linux kernel to be portioned into several pieces. This occurs without the overhead of emulating hardware or running several identical kernels. A full GUI environment, such as GNOME Shell can be launched inside a container, with a little gumption.
You can accomplish this through namespaces, a feature built in to the Linux kernel. An in-depth look at this feature is beyond the scope of this article, but a brief example sheds light on how these features can create containers. Each kind of namespace segments a different part of the kernel. The PID namespace, for example, prevents processes inside the namespace from seeing other processes running in the kernel. As a result, those processes believe that they are the only ones running on the computer. Each namespace does the same thing for other areas of the kernel as well. The mount namespace isolates the filesystem of the processes inside of it. The network namespace provides a unique network stack to processes running inside of them. The IPC, user, UTS and cgroup namespaces do the same for those areas of the kernel as well. When the seven namespaces are combined, the result is a container: an environment isolated enough to believe it is a freestanding Linux system.
Container frameworks will abstract the minutia of configuring namespaces away from the user, but each framework has a different emphasis. Docker is the most popular and is designed to run multiple copies of identical containers at scale. LXC/LXD is meant to create containers easily that mimic particular Linux distributions. In fact, earlier versions of LXC included a collection of scripts that created the filesystems of popular distributions. A third option is libvirt's lxc driver. Contrary to how it may sound, libvirt-lxc does not use LXC/LXD at all. Instead, the libvirt-lxc driver manipulates kernel namespaces directly. libvirt-lxc integrates into other tools within the libvirt suite as well, so the configuration of libvirt-lxc containers resembles those of virtual machines running in other libvirt drivers instead of a native LXC/LXD container. It is easy to learn as a result, even if the branding is confusing.
I chose libvirt-lxc for this tutorial for a couple reasons. In the first place, Docker and LXC/LXD already have published guides for running GNOME Shell inside a container. I was unable to locate similar documentation for libvirt-lxc. Second, libvirt is the ideal framework for running containers alongside traditional virtual machines, as they are both managed through the same set of tools. Third, configuring a container in libvirt-lxc provides a good lesson in the trade-offs involved in containerization.
The biggest decision to make is whether to run a privileged or unprivileged container. A privileged container uses the user namespace, and it has identical UIDS both on the inside of the container as on the outside. As a result, containerized applications run by a user with administrative privileges could do significant damage if a security hole allowed it to break out of the container. Given this, running an unprivileged container may seem like an obvious choice. However, an unprivileged container will not be able to access the acceleration functions of the GPU. Depending on the container's purpose—photo editing, for example—that may not be useful. There is an argument to be made for running only software you trust in a container, while leaving untrusted software for the heavier isolation of a proper virtual machine. Although I consider the GNOME desktop to be trustworthy, I demonstrate creating an unprivileged container here so the process can be applied when needed.
The next thing to decide is whether to use a remote display protocol, like spice or VNC, or to let the container render its contents into one of the host's virtual terminals. Using a display protocol allows access to the container from anywhere and increases its isolation. On the other hand, there is probably no additional risk from the container accessing host hardware than from two different processes running outside a namespace. Again, if the software you are running is untrustworthy, use a full virtual machine instead. I use the latter option of libvirt-lxc accessing the host's hardware in this article.
The last consideration is somewhat smaller. First, libvirt-lxc will not share /run/udev/data through to the container, which prevents libinput from running inside it (it's possible to mount /run, but that causes other problems). You'll need to write a brief xorg.conf to use the input devices as a result. Should the arrangement of nodes under the host's /dev/input directory ever change, the container configuration and xorg.conf file will need to be adjusted accordingly. With that all settled, let's begin.
Prepare the Container Host
A base install of Fedora 29 Workstation includes libvirt, but a couple extra components are necessary. The libvirt-lxc driver itself needs to be installed. Let's use the virt-manager and virt-bootstrap tools to accelerate creation of the container. There are also some ancillary utilities you'll need for later. They aren't necessary, but they'll help you monitor the container's resource utilization. Refer to your package manager's documentation, but I ran this:
sudo dnf install libvirt-daemon-driver-lxc virt-manager
 ↪virt-bootstrap virt-top evtest iotop
Note: libvirt-lxc was deprecated as Red Hat Enterprise Linux's container framework in version 7.1. It's still being developed upstream and available to be installed in the RHEL/Fedora family of distributions.
Before you create the container though, you also need to modify
/etc/systemd/logind.conf to ensure that getty does not start on the virtual
terminal you would like to pass to the container. Uncomment the
NautoVTs
line and set it to 3, so that it will only start ttys on the first three
terminals. Set ReserveVT to 3 so that it will reserve the third vt
instead of the sixth. You'll need to reboot the computer after modifying
this file. After rebooting, check that getty is active only on ttys 1
through 3. Change these parameters as your setup requires. The modified
lines of my logind.conf file look like this:
AutoVTs=3
ReserveVT=3
Prepare the Container Filesystem
You can create the container's filesystem directly through virt-manager, but a couple tweaks on the command line are needed anyway, so let's run virt-bootstrap there as well. virt-bootstrap is a great libvirt tool that downloads base images from Docker. That gives you a well maintained filesystem for the distribution you'd like to run in the container. I found that on Fedora 29, I had to turn off SELinux to get virt-bootstrap to run properly. Additional packages will have to be added to the Docker base image (such as x.org, and gnome-shell), and some systemd services will have to be unmasked:
sudo setenforce 0
mkdir container
virt-bootstrap docker://fedora /path/to/container
sudo dnf --installroot /path/to/container install xorg-x11-server-Xorg
xorg-x11-drv-evdev xorg-x11-drv-fbdev gnome-session-xsession xterm
net-tools iputils dhcp-client passwd sudo
sudo chroot /path/to/container
passwd root
#unmask the getty and logind services
cd /etc/systemd/service
rm getty.target
rm systemd-logind.service
rm console-getty.service
exit
# make sure all of the files in the container are accessible
sudo chown -R user:user /path/to/container
sudo setenforce 1
Note: there are a number of alternative ways to create the operating system filesystem. Many package managers have options that allow packages to be
installed into a local directory. In dnf, this is the
installroot option. In
apt-get, it is the -o Root= option. There is also an alternate tool that
works similar to virt-bootstrap called
distrobuilder.
Create the Container
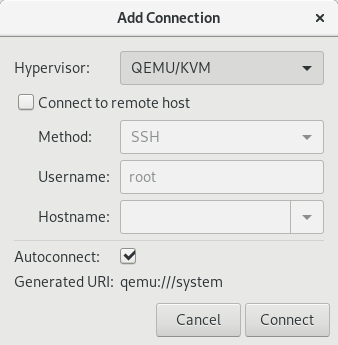
When you open virt-manager, you'll see that the lxc hypervisor is missing. You add it by selecting File from the menu and Add Connection. Select "LXC (Linux Containers)" from the drop-down, and click Connect. Next, return to the File menu and click New Virtual Machine.

Figure 1. Add the libvirt-lxc driver to virt-manager.
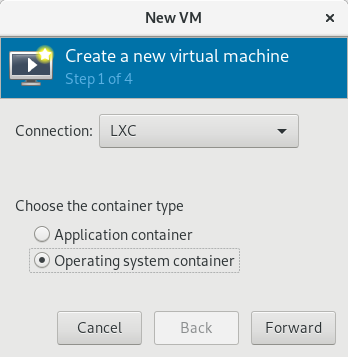
The first step in making a new virtual machine/container in virt-manager is to select the hypervisor under which it will run. Select "LXC" and the option for an operating system container. Click Next.

Figure 2. Make sure you select Operating System Container.
virt-bootstrap already has been run, so give virt-manager the location of the container's filesystem. Click Next.
Give the container however much CPU and memory is appropriate for its use. For this container, just leave the defaults. Click Next.
On the final step, click "Customize configuration before install", and click Finish.
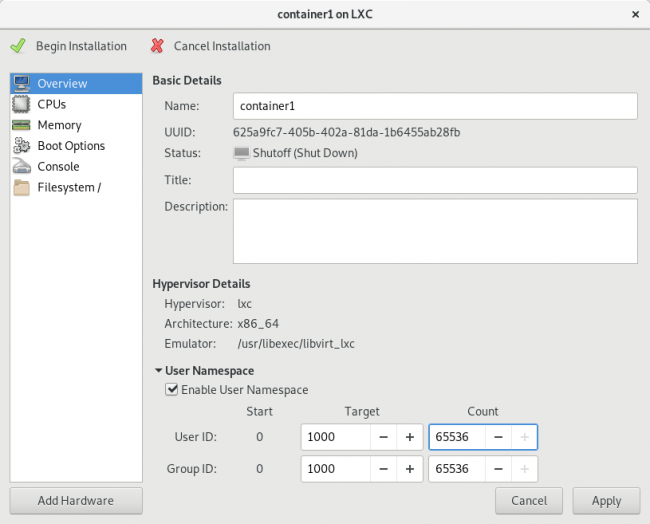
A window will open allowing you to customize the container's configuration. With the Overview option selected, expand the area that says "User Namespace". Click "Enable User Namespace", and type 65336 in the Count field for both User ID and Group ID. Click apply, then click "Begin Installation". virt-manager will launch the container. You aren't quite ready to go though, so turn off the container, and exit out of libvirt.

Figure 3. Enabling the user namespace allows the container to be run unprivileged.
You need to modify the container's configuration
in order to share the
host's devices. Specifically, the target tty (tty6), the loopback tty
(tty0), the mouse, keyboard and framebuffer (/dev/fb0) need entries
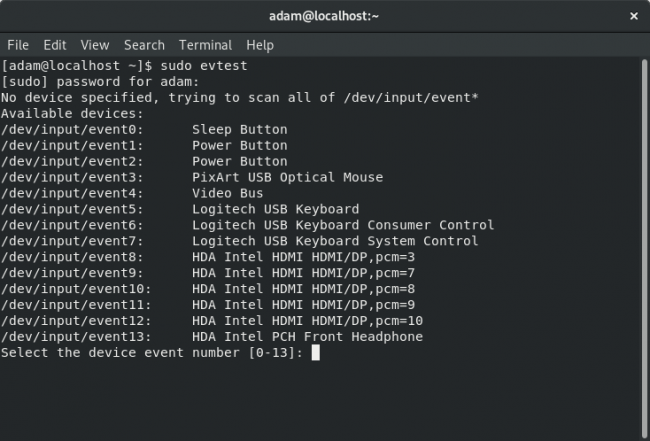
created in the configuration. Quickly identify which items under /dev/input
are the mouse and keyboard by running sudo evtest and pressing Ctrl-c after
it has enumerated the devices. From the output, I could see that my mouse is at
/dev/input/event3, and my keyboard is /dev/input/event6.

Figure 4. A List of Input Devices on My Workstation
You can't access the /etc/libvirt folder just by using the
sudo command.
Enter a root bash session by running sudo bash, and change the directory to
/etc/libvirt/lxc. Open the container's configuration and scroll down to
the device section. You need to add hostdev tags for each
device you just
identified. Use the following layout:
<hostdev mode='capabilities' type='misc'>

<source>

<char>/dev/mydevice</char>

</source>

</hostdev>
For my container, I added the following tags:
<hostdev mode='capabilities' type='misc'>
<source>

<char>/dev/tty0</char>

</source>

</hostdev>

<hostdev mode='capabilities' type='misc'>

<source>

<char>/dev/tty6</char>

</source>

</hostdev>

<hostdev mode='capabilities' type='misc'>

<source>

<char>/dev/input/event3</char>

</source>

</hostdev>

<hostdev mode='capabilities' type='misc'>

<source>

<char>/dev/input/event6</char>

</source>

</hostdev>

<hostdev mode='capabilities' type='misc'>

<source>

<char>/dev/fb0</char>

</source>

</hostdev>
Running the Container
It's time to start the container! Open it in virt-manger and click the Start button. Once a container has the option of using the host's tty, it's not unusual for it to present the login prompt only on that tty. So press Ctrl-Alt-F6 to switch over to tty6 and log in to the container. As I mentioned above, you need to write an xorg.conf with an input section. For your reference, here's the one I wrote:
Section "ServerFlags"
Option "AutoAddDevices" "False"
EndSection
Section "InputDevice"
Identifier "event3"
Option "Device" "/dev/input/event3"
Option "AutoServerLayout" "true"
Driver "evdev"
EndSection
Section "InputDevice"
Identifier "event6"
Option "Device" "/dev/input/event6"
Option "AutoServerLayout" "true"
Driver "evdev"
EndSection
Don't neglect to perform the usual housekeeping a new Linux system
requires with the container. The steps you take will depend on the
distribution you run inside the container, but at the very least, make sure
you create a separate user and add it to the wheel group, and configure the
container's network interface. With that out of the way, run
startx to
launch GNOME Shell.

Figure 5. GNOME Shell Running in the Container
Now that GNOME is running, check on the container's use of system
resources. Tools like top are not container-aware. In order to get a true
impression of the memory usage of the container, use virt-top
instead.
Connect virt-top to the libvirt-lxc driver by running virt-top -c
lxc:/// outside the container. Next, run machinectl to get the internal
name of the container:
[adam@localhost ~]$ machinectl

MACHINE CLASS SERVICE OS VERSION ADDRESSES

containername container libvirt-lxc - - -
Run machinectl status -l containername to print the
container's process
tree. At the very start of the command's output, notice the PID of the
root process is listed as the leader. To see how much memory the container
is consuming in total, you can pass the leader PID into top by
running top -p
leaderpid:
[adam@localhost ~]$ top -p leaderpid
lxc-5016-fedora(c198368a58c54ab5990df62d6cbcffed)

Since: Mon 2018-12-17 22:03:24 EST; 19min ago

Leader: 5017 (systemd)

Service: libvirt-lxc; class container

Unit: machine-lxc\x2d5016\x2dfedora.scope

[adam@localhost ~]$ top -p 5017

top - 22:43:11 up 1:11, 1 user, load average: 1.57, 1.26, 0.95

Tasks: 1 total, 0 running, 1 sleeping, 0 stopped, 0 zombie

%Cpu(s): 1.4 us, 0.3 sy, 0.0 ni, 98.2 id, 0.0 wa, 0.1 hi,
 ↪0.0 si, 0.0 st

MiB Mem : 15853.3 total, 11622.5 free, 2363.5 used, 1867.4
 ↪buff/cache

MiB Swap: 7992.0 total, 7992.0 free, 0.0 used. 12906.4 avail Mem

PID USER PR NI VIRT RES SHR S %CPU %MEM TIME+ COMMAND

5017 root 20 0 163.9m 10.5m 8.5m S 0.0 0.1 0:00.22 systemd
The container uses 163MB of virtual memory total—pretty lean compared to
the resources used by a full virtual machine! You can monitor I/O in a
similar way by running sudo iotop -p leaderpid. You can
calculate the container's disk size
with du -h /path/to/container. My fully
provisioned container weighed in at 1.4GB.
These numbers obviously will increase as additional software and workloads are given to the container. I like having a separate environment to install build dependencies into, and my most common use for these containers is running gnome-builder. I also occasionally set up a privileged container to run darktable for photo editing. I edit photos rarely enough that it doesn't make sense to keep darktable installed outside a container, and I find the notion that I could tar the container filesystem up and re-create it on another computer if I wanted to be reassuring. If you find yourself strapped for cash and needing to get the most out of your host, consider using a container instead of a virtual machine.


