Chapter 16: Ubuntu and Your iPod
With all the talk in the previous chapter about ripping, encoding, and playing back audio files, you may be wondering whether or not you'll be able to transfer any of those files to your iPod using Linux.
Well, you will be happy to know that Ubuntu does iPods, even Nanos. You will also be happy to know that using your iPod on your Ubuntu system is quite easy. All you have to do is plug your iPod into one of your computer's USB ports, after which Ubuntu will automatically mount it and place an iPod icon on your desktop (Figure 16-1). Yes, no longer do you have to mess around with mount and unmount commands or editing system tables. Just plug in your pod, and Ubuntu will do the rest.

Figure 16-1: A desktop icon for a mounted iPod
Although you can use your iPod in Ubuntu, you should remember that support for such devices is still rather new. Because of that, there is likely to be the occasional odd moment while working with your iPod. I have been using mine without problems, but a friend did lose all his data when he managed to freeze his system doing something bizarre. The same thing happened to me on a Mac, so I guess that's just the life of the pod. Anyway, if you do happen to lose all the data on your iPod or somehow corrupt its system, you can just use Apple's iPod Updater while in Windows to bring it back to normal and repopulate its song library from your hard disk.
If your iPod already has songs on it that you ripped using iTunes, you will be happy to know that such MP3s pose no problem. They are MP3s, after all. If, however, you have files encoded in iTunes' default AAC format, you should be aware that Linux does not have much in the way of playback support. Only XMMS, installed along with the XMMS-MP4 plugin, seems to provide an easy way for you to play such files. As for the protected AAC files you might have bought from the iTunes store—well, forget about playing those back on Linux. Nevertheless, these playback support limits shouldn't prove to be a problem—you can still add regular or protected AAC files to playlists, copy them to your hard disk, and delete them from your iPod in Linux.
For a Linux diehard, however, there is one big problem with regard to encoded audio formats (and it isn't a limitation only in Linux): iPods do not support Ogg Vorbis files. There is talk that Apple might include support in future iPods, but I wouldn't hold my breath. In the meantime, you can quite simply convert your Ogg Vorbis files to MP3 format for use on your iPod, though there will be a bit of a loss in quality. (This is understandable, considering both formats have their own, incompatible methods of compression which require the throwing out of actual music data.) Of course, if you originally encoded your audio files in FLAC format, this quality issue will be moot. You'll learn more about this in Converting Audio File Formats.
Regardless of which iPod you're talking about, all iPods have a formatted filesystem, just like your hard disk. In fact, with the exception of the Shuffle and the Nano, they actually have hard disks inside them. The filesystem format that is in place on your iPod depends on which system you originally used it on. If you first used it on a Mac, it will be in Apple's HFS+ file format. If you first used it on your Windows machine, it will be in Microsoft's FAT32 format.
Actually, in the short term, it doesn't matter which filesystem your iPod was formatted by; Ubuntu will usually mount either one, allowing you to browse through all the files on your little white beastie. If your iPod is HFS+ formatted, however, browsing and exporting tracks is just about all you will be able to dependably do, assuming your system does mount it. It is important that your iPod be FAT32 formatted if you want to really use it as you would in Windows or, ironically, Mac OS.
Determining Your iPod's Format
How do you know whether your iPod is HFS+ or FAT32 formatted? Well, as I said, it is basically a matter of knowing which system you've been using your iPod with up until now. When you first plugged your fresh, out-of-the-box iPod into your computer, it really couldn't do anything yet. At that time, your Windows or Mac system popped up some wizard asking you to run the iPod Updater tool. That tool is primarily a formatter, which formats your device in FAT32 if you're running it in Windows and HFS+ if you're running it on a Mac.
If you've been a two-OS sort of person up until now and have been happily using your iPod on both a Mac and a Winbox, then you can be sure that your iPod was formatted using FAT32, because Windows spews out chalk spittle when it tries to deal with anything that Microsoft itself didn't create. In other words, Windows can't read drives formatted by HFS+, while Mac OS can read both HFS+ and FAT32 drives. If you are using an iPod Shuffle, you can also be sure that it is FAT32 formatted, because all iPod Shuffles are—period.
Of course, if you're a prove-it-to-me kind of person, you can seek truth from facts by going to the Applications menu, selecting Accessories » Text Editor, and then opening the file /etc/mtab in the text editor to reveal the format of your iPod. Just look for a line that says something like /dev/sda2 /media/ipod or /dev/sdb2 /media/ipod and see what is listed to the right of that. If it says vfat, then you know your device is FAT32 formatted. If not, well. . . you're just going to have to change it.
Reformatting Your iPod
And how do you change your iPod from HFS+ to FAT32 format? First you're going to have to find a machine running Windows XP (preferably Service Pack 2 for more recent iPods) and a recent edition of iTunes. Once you've found your machine, you need to go to www.apple.com/ipod/download and download the most recent Windows version of the iPod Updater you can find there. Once you've downloaded and installed the updater, you will be asked if you would like to restart your machine (because the updater requires you to do so). Just say no for the time being, and plug your powered-up iPod into one of the machine's USB ports. Windows will go through one of its found-new-hardware scenarios and then ask you to restart the machine. This time you can agree to it, so go ahead.
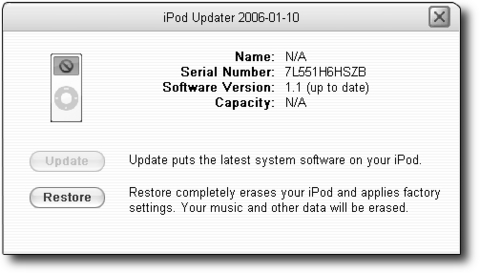
When the machine starts up again, the iPod Updater will automatically detect that you have an iPod in a non-Microsoft format connected to the machine and ask you if want to update it. You do, so click Yes, after which the iPod Updater will appear (Figure 16-2).
Before you go any further, make sure that you have everything on that iPod backed up somewhere, because the updater is going to reformat your iPod, and that means that it is going to wipe it clean. Of course, if the iPod is sort of a backup of what you've got on your computer already, this shouldn't really be an issue. Once you are ready to roll, just click the Restore button in the Updater window, and then click Restore again in the confirmation window that appears.
When the process is complete, run iTunes to perform the final setup steps. If your iPod does not soon appear in the left pane of the iTunes window, close all your applications, restart the system, and run iTunes again. Your iPod should appear in iTunes this time around. When it does, iTunes will present you with a brief wizard that you can pretty much handle on your own. The only direction I will give here is that when you come to the wizard page that asks you if you want iTunes to automatically update your iPod with your photo and music collections, deselect the two checkboxes; doing otherwise could lead to unwanted weirdness down the line.
Once the process is done, you will have a properly configured, FAT32-formatted, and all but empty iPod that is ready for use in Linux, Windows, and Mac OS. You can even use your iPod now on all three systems interchangeably, though I would only do so if the auto-update function is disabled.
Auto-Updating Your iPod
When you enable auto-update on your iPod via iTunes, the function is set up within your iPod itself. With a FAT32-formatted iPod, you can use your iPod on a Winbox, Mac, or Linuxbox—or all of them interchangeably. If you set up your iPod to auto-update songs and playlists, however, you are leaving yourself open for trouble unless you have exactly the same music collection on your Linux, Mac, and Windows machines.
The reason for this is simple. While iTunes allows you to add files to your iPod, it does not allow you to copy files from it. The auto-update feature is thus strictly a one-way street. This means that when you hook up your auto-update–enabled iPod to an iTunes-enabled computer, iTunes will automatically add the tracks in its library to your iPod, and, more frighteningly, it will remove any tracks from your iPod that are not present in its library. I learned this the hard way when I took my wife's loaded iPod to work and plugged it into my office Winbox with its completely empty iTunes library. When I brought the little podster back home to her with nothing at all on it, what ensued wasn't pretty.
If you have an iPod that is already in FAT32 format, it is best for you to disable the auto-update function on your iPod while it is connected to your Winbox, before bringing your iPod into the Linux world. To do this in Windows, just go to the iTunes Preferences (while your iPod is connected), click the iPod tab, and then select Manually manage songs and playlists (Figure 16-3).
Normally in Windows and Mac OS, you load files to your iPod via iTunes, but, of course, since Apple has not created a Linux version of that popular application (and I doubt it ever will), you will have to find some other way to go about things. Fortunately, there are a few Linux applications that can work to various degrees with your iPod, including two you learned about in Chapter 15: amaroK and Rhythmbox.
In fact, Rhythmbox is set as the default application for iPods in Ubuntu, and as such it will automatically appear once your iPod is connected to your machine and mounted by your system. All you have to do then is click the IPOD icon in the left pane of the Rhythmbox window, and you can see the contents of your iPod. Click the small arrow to the right of the IPOD icon in the left pane, and you can also see your collection of playlists. But other than all that seeing, there isn't much more you can do with your iPod via Rhythmbox.
However, there are a few other applications, specifically designed for use with your iPod, that are arguably a bit more useful. These are the de facto Linux standards (in the GNOME world, anyway): gtkpod and YamiPod, a freeware entry, available in Linux, Windows, and Mac versions.
Managing Your iPod's Audio Files in gtkpod
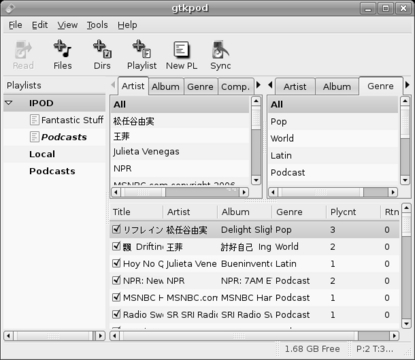
The most commonly used Linux application for iPod file handling is gtkpod, which is shown in Figure 16-4. It is a pretty straightforward application with a fairly large user base, which means you should be able to get a lot of questions answered in Ubuntu and other Linux online forums should you have any. It also handles most of the functions that one uses when dealing with an iPod, including album cover art (but it does not handle photos other than that).
Downloading, Installing, and Running gtkpod
Of course, in order to use gtkpod, you first have to download and install it. You can do this via Synaptic by doing a search for gtkpod and then installing gtkpod-aac following the installation steps in Chapter 5. If you didn't install the list of files mentioned in Project 15A on page 240, now would be a good time to do so. After that, plug your iPod into one of your computer's USB ports, if you haven't already. Once your iPod is mounted (once the desktop icon appears and Rhythmbox opens) go to the Applications menu, and select Sound & Video » gtkpod. You can close Rhythmbox if you like.
Using gtkpod
When the gtkpod window opens, you should see two entries in the left pane: one called Local and another with the name of your iPod. Sometimes there will be some other name there instead. Mine read amaroK, for some unknown reason. If you find yourself facing a similar naming mismatch, just change the name for the top entry so that it matches that of your iPod.
Once you've come to grips with the name thing, display the contents of your iPod by clicking the entry for your iPod in the left pane and then clicking the Read button. The contents of your iPod will appear in the right pane. If you have any playlists on your iPod, you can also click the small arrow to the left of your iPod's name in the left pane of the window, which will reveal the lists you have created.
You can add new songs or folders full of songs by clicking the +File or +Dirs buttons below the menu bar and then navigating to the items you want to add. You can also create playlists either by clicking +Playlists to create a playlist of the contents of a particular folder, or by clicking the New PL button to build your own playlist.
In the case of the latter method, a new list will appear in the Playlists pane at the left side of the window, after which you just drag the songs you want from the right pane in order to build your list. Just be sure to drag the files directly onto the playlist icon, as gtkpod can be a bit finicky in this department. You can also add songs to existing lists in the same way.
While on the topic of dragging and dropping, it is worth noting that you can add songs to your iPod library by simply dragging them from your Music folder (or any other folder) and then dropping them in the right pane of the gtkpod window. If you want to add a song to both your iPod's library and a specific playlist, drag a file or directory from your Music folder to the icon of the playlist in question. Pretty cool.
Album Art and Tag Handling
Tag editing, including album cover images, is another area in which gtkpod can prove quite useful. Click any track in the playlist, select Edit Details, and the Details window for that track will appear (Figure 16-5). In that window you can edit all of the tag entries (artist, album, track title, genre, and so on), and, very importantly, you can set the album cover art for the track. Once you have finished making your changes, click the Apply button, and then click OK.
Copying Files from Your iPod to Your Hard Disk
A handy feature of gtkpod that isn't available in iTunes (at least not without a special freeware plugin) is the ability to copy songs from your iPod to your hard disk. To do this, select the tracks or playlists you want to export (hold the ctrl key to make multiple selections or use the tabs to select whole artists or genres if you like), click the File menu, and select Export Tracks from Database. A submenu will then appear, showing three choices: Selected Playlist, Selected Tab Entry, or Selected Tracks. Choose the entry that matches your selections.
This approach works well enough, but it doesn't seem to work for AAC files. In that case, just drag the file in question from the gtkpod window to your desktop, and the file will automatically be copied there. That file, however, will not have its original filename. It will have an odd name, such as INEI.m4a or OSPO.m4a. The files exported in this manner are themselves fine; all you need to do is rename them as you would rename any other file (right-click the file, and then select Rename—in case you forgot).
Playing Tracks on Your iPod with gtkpod
It is possible to use gtkpod in order to play the tracks on your iPod, though gtkpod must use a helper application to do this, as it has no playback capabilities of its own. The default helper app for this purpose is XMMS, which isn't a bad choice—especially if you want to have headache-free AAC file support. Of course, if you haven't installed XMMS, the default setup won't do you any good. You must, therefore, either choose a different helper app, such as Rhythmbox or amaroK, or run Synaptic, doing a search for xmms and installing xmms and xmms-mp4 (if you want AAC playback support).
If you decide to change the audio helper application for gtkpod, open the gtkpod Preferences window by going to the Edit menu and selecting Edit Preferences. Once in the Preferences window, click the Tools tab, and then click the uppermost Browse button. In the window that appears, scroll up and select rhythmbox or amarok (depending on which you prefer). Once your choice is made, click the OK button, and then once back to the Preferences window, repeat the process, this time clicking the second Browse button. Click Apply and then OK to record your changes and close the Preferences window.
Finishing Up the Job with gtkpod
Once you've done all you want to do with gtkpod, click the Sync button to record the changes to your iPod. You can then quit gtkpod. After that, right-click the desktop icon for your iPod, and select Unmount Volume. When the desktop icon disappears, you can disconnect your iPod from your computer.
Using YamiPod for Your iPod File Management Needs
A relative newcomer to the iPod file management arena is YamiPod. YamiPod, which also comes in Mac and Windows versions, looks like a cleaned-up version of gtkpod; YamiPod's layout is more straightforward, making it easier to use in many ways. It also allows audio-direct, helper-less playback (which gtkpod doesn't), and it is easier to deal with in terms of playlist creation and handling.
Downloading, Installing, and Running YamiPod
To get YamiPod, you'll need to download it yourself from the project's website at www.yamipod.com. Just go the site's Downloads page, and then download YamiPod to your hard disk. The file will appear on your disk as a tarball, so first extract the tarball, and then move the yam-linux folder, which is the product of that extraction, to your home folder. Once you've done that, there is one small chore you need to perform before you can run the application: copying the libfmodex file within the yam-linux folder to the /usr/lib folder. Since /usr/lib is in protected territory, you will have to use the sudo command to perform the copy procedure.
Here are the steps:
Open a Terminal window, type cd yam-linux, and press enter.
In the same Terminal window, type the following command, and press enter (and make sure to leave a space on either side of cp and between so.* and /usr): sudo cp libfmodex.so.* /usr/lib
When prompted for your password, type it, and press enter. When your user prompt reappears, you can close the Terminal window.
As YamiPod itself is an executable binary file, you don't have to install it to put it to work, and you are now ready to step into action. To get things under way, plug your iPod into one of your USB ports, and then double-click the YamiPod file within the yam-linux folder. YamiPod will appear as a small window until it reads the contents of your iPod, after which the window should expand into something like the window in Figure 16-6.
Using YamiPod
Working with YamiPod is very simple. To add songs to your iPod, just drag tracks or folders from your Music folder to the bottom pane of the YamiPod interface or to any open playlist in the playlist pane. An Add To Ipod window (Figure 16-7) will appear, showing the tag information for each of the songs you've just dragged over. In that window you can edit the tags for each of the songs, if you'd like to, before adding them to the library. When you've finished making your changes, just click the Add All button, and the songs will be immediately added to your iPod's library.
To create a playlist, click the + button near the top-right corner of the window, and name your list in the New Playlist window that appears. Once you've made your choice, click OK. You can then drag the tracks you want to add to the list from the main library pane in the bottom half of the window. You can also drag files directly from your Music folder to the Playlist pane, thereby adding those tracks to the playlist and your iPod's library at the same time.
If you would like to remove a track from the library, just right-click the track in question, and then select Delete song in the popup menu. To remove a playlist, just select the targeted list from the drop-down menu button at the right-top corner of the window, and then click the – button to the right of that.
Finishing Up Your YamiPod Session
Since YamiPod performs changes to your iPod in real time as you perform those changes within the YamiPod window, wrapping things up is quite simple. Just click the small, circular eject button at the very bottom-right corner of the YamiPod window. YamiPod will then close, and your iPod will be automatically unmounted.
Exporting Files from Your iPod with YamiPod
Like gtkpod, YamiPod allows you to export files from your iPod to your hard disk. To copy songs from the library in YamiPod, select the tracks you want to copy in the main library pane (and hold down the ctrl key while doing so if you are making multiple selections), right-click any one of the selected files, and then select Copy song to in the popup menu.
Podcasts
Although both YamiPod and gtkpod allow you to copy podcasts to your iPod, neither application provides you with a list of available podcast feeds. YamiPod does have a feature by which it can download the feeds you want if you provide the URL, but I don't recommend doing that, as it seems to crash the program.
The result of these facts is that if you want to look for podcasts and add them to your iPod's library, you will have to do a little more work than you're used to. One application that can help is iPodder (Figure 16-8), which you can download and install via Synaptic by doing a search for ipodder, and then . . . well, you know the steps by now.
Once you select and download your podcasts, iPodder will place them in the downloads subfolder of the iPodderData folder that it creates for you in your home folder. To add these podcasts to your iPod in gtkpod, create a playlist called Podcasts (if there isn't one there already), and then add the podcast file to the playlist, as you would any audio file, by simply dragging it onto that playlist.
You can add podcasts to your iPod via YamiPod in almost the same way. Just select the Podcasts playlist from the drop-down menu button at the top-right corner of the YamiPod window, and then drag the file to the top-right pane of the window.
Setting Up Your System to Automatically Launch YamiPod or gtkpod
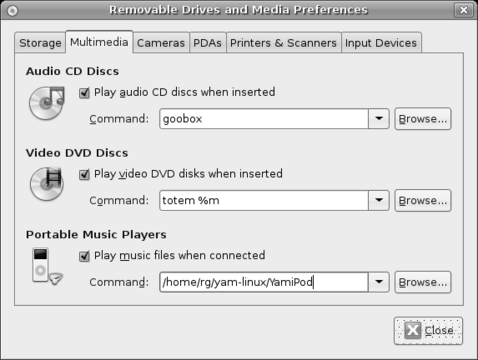
If you like, you can set up your system so that YamiPod or gtkpod automatically launches when you plug your iPod into one of your USB ports. To do this, go to the System menu, and select Preferences » Removable Drives and Media. When the Preferences window appears, click the Multimedia tab, and then check the box next to the words Play music files when connected in the iPod section of that tab. In the Command box, type gtkpod if you want to use that application, or if you prefer YamiPod, click the Browse button and navigate your way to the YamiPod binary file within your home folder. Once you're done, the Preferences window should look something like Figure 16-9. If so, click Close.
Ever since the iPod Photo appeared in 2004, iPods have been able to display photos. Unfortunately, until recently there was no simple way to transfer photos from your computer to your iPod in Linux. Things have, quite fortunately, changed since the appearance of a handy application called GPixPod. GPixPod (Figure 16-10) is, admittedly, an application still in development. Nevertheless, it should work on all color iPods, though it is not yet fully compatible with the original iPod Photo. Since version 0.4.1, it also seems to work with the Nano.
You can get GPixPod from its project page at https://sourceforge.net/projects/gpixpod. Click the Download GPixPod button, and then on the next page that appears, click the Download button. On the next page, click the gpixpod-0.4.4_all.deb (or newer) link, which will bring you to a list of mirrors. Select the one closest to you, and then wait for the GPixPod download to complete.
Once the gpixpod-0.4.4_all.deb package is on your hard disk, you have to install it. Rather than resort to the command line, as you did when installing DEB packages back in Chapter 9, let's go the easy route by just double-clicking the package itself. This will bring up the package installer, gdebi (Figure 16-11).
Note: Make sure that neither Synaptic nor the Add/Remove Applications utility are open when running gdebi, as only one package management tool can run at a time.
As you can see, the gdebi package installer looks like a piece cut out of the Synaptic window. It provides a description of the application, details about the file you are attempting to install, and a list of what's included in the package. To get down to the actual installation, just click the Install Package button. A small window will appear, telling you that you need administrative rights in order to proceed. Click Grant in that window (the equivalent of typing your password when using Synaptic), after which the installation will begin. Once GPixPod is installed, you can run it by going to the Applications menu and selecting Graphics » GPixPod.
Note: You cannot add photos to the GPixPod interface without first connecting your iPod to your system. You should also note that you can not view images added to GPixPod's database in the right pane of the application window until you save your changes by clicking the Save button.
If you would like to convert MP3 to Ogg Vorbis format or vice versa, SoundConverter (shown in Figure 16-12) is an application that makes it all quite simple. Because SoundConverter does not come bundled with Ubuntu, you will have to install it yourself (if you didn't install it in Chapter 5). To do so, just run Synaptic, search for soundconverter, and install it.
All you have to do to use SoundConverter after that is add the songs you want to convert to the main pane by clicking either the Add File or Add Folder buttons. If you prefer, you can also drag files from your Music folder (or wherever else you store your audio files).
Once you've chosen the files to convert, you need to choose which format to convert them to. You can do this by clicking the Preferences button and then making your choice in the Preferences window (Figure 16-13). While you're there, it is also a good idea to tell SoundConverter to place your converted files in a location other than the folder where the original files are stored. Doing this prevents having to deal with duplicates in Linux audio playback applications that automatically scan your Music folder, such as amaroK. This is not an issue in either gtkpod or YamiPod, as they will not allow you to add Ogg Vorbis files to their library lists. You might also want to check the box next to the words Create subfolders in order to keep things organized. Once you have set things up and are ready to convert, click Close in the Preferences window, and then click Convert in the main window. SoundConverter will then begin doing its stuff.
Ubuntu Linux for Non-Geeks: A Pain-Free, Project-Based, Get-Things-Done Guidebook
www.nostarch.com/ubuntu.htm
by Rickford Grant
August 2006, 360 pp. w/ CD
ISBN 1-59327-118-2
No Starch Press (www.nostarch.com/)
Download and install free applications, games, and utilities
Connect to the Internet and wireless networks
Configure your hardware, including printers, scanners, and removable storage devices
Watch DVDs, listen to music, and even sync your iPod
Tackle more advanced tasks, such as converting RPMs to DEB files, compiling software from source, and handling software based on Java, Python and Tcl/Tk
Rickford Grant, author of Linux for Non-Geeks and Linux Made Easy (both No Starch Press), has been a computer operating system maniac for more than 20 years. From his earliest days with his Atari XL600 to his present Linux machines, he has been the guy at the other end of the computer help line for family, friends and colleagues. Currently residing in Raritan, N.J., Rickford spends his working hours as a teacher, and his free time cycling along the Delaware & Raritan Canal or annoying his neighbors with his Nyckelharpa (Swedish key fiddle) playing.


