OOo Off the Wall: The Outlining and the Ecstasy
Outlining is the arrangement of sections within documents. The process of outlining includes re-positioning paragraphs and making decisions about what level in the hierarchy a heading should be.
Outlining is not writing, but it is a core part of the writing process. Despite this fact, many people begin to write with almost no outlining. Perhaps they are in a hurry to get started. Perhaps, if they attended high school in North America, they think of an outline as something they cobbled together after they finished writing the paper simply to satisfy a teacher's arbitrary demands. Whatever the reason, many people plunge into a document and discover its structure as they write. This practice usually is inefficient, because they are trying to do two things at the same time, write and organize. They don't know where they are going, which makes writing a prolonged and painful process.
It is true that a handful of professional writers never outline or outline only long and complex documents. Far more professionals, however, use some sort of outlining technique. For some, the physical act of writing accounts for as little as 10 to 20% of the time spent on a document. The rest is spent outlining and editing.
Judging from the habits of most professionals, then, outlining benefits most writers. However, each writer needs to discover how much outlining he or she need to do and what form that outlining should take. Sometimes, an outline can be a simple scribbled list or a brainstorming session on a white board. At other times, it's a formal document with headings and subheadings.
For those who prefer the formal approach, OpenOffice.org's Writer program offers a de-centralized set of tools. Writer uses:
Paragraph styles, specifically headings, to set up the overall structure of the document.
Tools > Outline Numbering, which sets up outlining for use within a document.
The Navigator (Edit > Navigator) for actual outlining.
Users of MS Word often leap to the conclusion that Writer has no outlining tools. In fact, Writer does have such tools, but they are arranged and function differently. Out-of-the-box (or out of the tar file), the tools are less functional than MS Word's, but with a little ingenuity, you can wrench almost the same functionality out of them.
The purpose of outlining is to structure your document. That means your document's format also needs to be structured if you are going to outline in Writer. And that, in turn, means using heading paragraph styles. If you format manually, there simply isn't enough consistency for Writer's outlining tools to work with.
Heading styles, numbered 1-10, are intended to indicate levels of organization. In other words, a heading at a higher level should contain the subject matter of a heading at a lower level. To give a simple example, if a document discusses the solar system, then the second-level headings might name individual planetary systems. Below the headings for planetary systems, the next level of headings might be each planet's moons.
Writer recognizes all other paragraphs as belonging to the same topic until the next heading at the same level appears. If the heading is moved during outlining, so are the other paragraphs, including any subheadings.
By contrast, the most you can do in a manually formatted document is single-style outline numbering (see "It's Numbering, But Not As We Know It". Single-style outlining is useful in the early stages of planning, when you have no content. But, if you find formal outlines useful in the first place, single-style outlining probably is too limited for you. Although you can promote or demote paragraphs easily enough by using Tab and Tab+Shift, moving sections of text requires you to copy and paste. Although you can get by using these methods, you'll probably find that copying and pasting distracts you from thinking about the structure of your document. In addition, a single-style outline ordinarily is not visible in the Navigator.
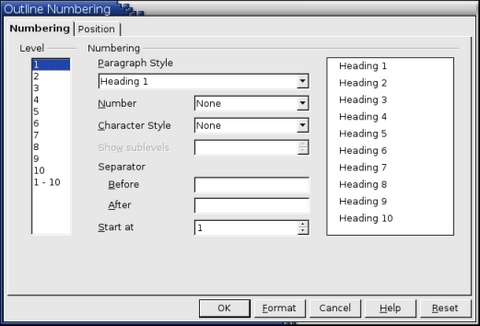
Here's where it gets confusing. If you use styles in Writer, you probably know that numbering styles can be applied to paragraph styles. Yet, in addition to numbering styles, Writer has a second system for numbering paragraph styles, located in Tools > Outline Numbering. I call this system multi-style outlining, as opposed to single-style outlining. Both are called outline numbering, yet the two systems are completely independent of each other.

Figure 1. Despite its name, Tools > Outline Numbering is as much about managing how other Writer tools use styles as it is about outlining.
Then, to make matters worse, multi-style outlining uses paragraph styles that it describes as levels. By default, these levels correspond to the paragraph styles Heading 1-10--but they don't have to. Moreover, if any of the paragraph styles used in multi-style outlining are formatted using paragraph styles, or even if a manually formatted list uses the headings, Tool > Outlining is overridden and has no effect whatsoever.
Why does Writer work this way? Why does the software encourage the use of paragraph styles in every other way and then muddy the waters with Tools > Outlining? The answer is simple:
Nobody knows.
My theory is Tools > Outlining was added by a programmer ignorant of styles back in the Jurassic Age when OpenOffice.org was StarOffice and owned by StarDivision. That is only a guess, but what else explains the duplication?
It may help if you think of Tools > Outlining as a means of managing how styles are used by other tools throughout Writer rather than as a means of setting style characteristics. Multi-style outlining sets the styles used:
to outline.
to create a table of contents with Insert > Indexes and Tables.
to create an autoabstract by using File > Send > Create AutoAbstract. An autoabstract is a summary of the document in a separate file. By default, it shows the first paragraph beneath each heading. You also can select File > Send > AutoAbstract to Presentation, but you should read about the role its MS Word counterpart, the Autocontent Wizard, played in making the Gettysburg PowerPoint Address before using this feature. You may decide that this feature, like a grammar checker, can do more harm than good.
to add a chapter number in a cross-reference or to insert the chapter name automatically using Insert > Fields. The chapter number or name is read from the last occurrence of the paragraph style assigned to Level 1 in Tools > Outlining.
By default, the numbers assigned to each level's style are formatted the same as the rest of the paragraph. If you choose, though, you can use the Character Style on the Numbering tab of Tools > Outlining to give them a different format. You also can insert a separator automatically, such as a period or a parentheses before or after the number, as well as the numbering system, the starting number and the position and spacing for the number.
Perhaps the most important setting is the paragraph style. Because Tools > Outlining has ten levels and uses Headings 1-10 by default, you can be lulled into thinking no other arrangement is possible. The truth is, you can assign any paragraph style to any level. Because you rarely need more than four levels of headings, you can assign the main body text to one level and have it displayed in the Navigator. You can't read all of the body paragraph, though, because the Navigator uses a single line for each level. Most headings are short, so that's all that normally is needed. But by dragging the Navigator window wider, you should be able to see enough that you can work with the body text. Be sure, however, that the level to which the body text style is assigned isn't included when you set up a table of contents.
If outlining features in your work methods, create a template in which multi-style outline numbering is set up. However, be careful to include text that uses each of the outline levels have configured. Through some oversight, multi-style outline settings are not preserved in a template unless they actually are used.
The Navigator lists all the elements of your document. In Writer, over a dozen types of objects, including headings, graphics, tables, cross-references and draw objects are listed in the Navigator. You can click on any instance of one of these objects to jump to it. This ability especially is useful if you give each instance a meaningful name instead of using the default names, such as Graphic1 or Table1.

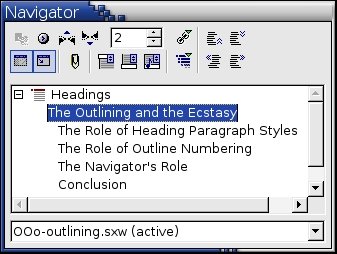
Figure 2. The Navigator, set to the content view and ready to start outlining
Yet, as useful as this feature is, the Navigator really comes into its own in outlining. To use the Navigator in outlining, press the F5 key to open its floating window. Of all the objects listed in the Navigator, headings are the only ones you need, so select Headings in the Navigator's list, then select the Contents View button in the Navigator tool bar second from the top. This selection displays only the currently selected type of object, giving you more window space in which to work. When you are finished, you can press the Contents View button again to display the complete list of objects.
If you have never done much with the Navigator, you also should drag on a corner of the window to make it bigger. The default size of the Navigator usually is too small to be used conveniently for outlining.
Each heading level is indented further than the one above it. You can change how many heading levels are visible by selecting the Heading Levels Shown button. The button is third from the right on the Navigator's second tool bar.
Unfortunately, Navigator offers no provision for hiding a single paragraph. You can, however, select Insert > Fields > Other > Functions > Hidden Text to hide a paragraph. Because an open Field window does not keep you from using the main editor window, this is a workable kludge, but only so long as you have a large enough screen for all the open windows.

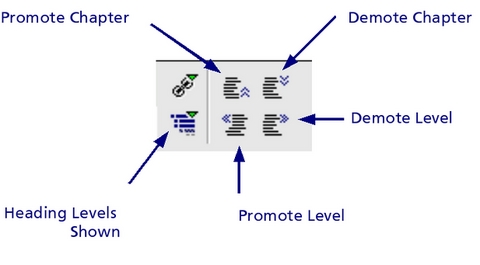
Figure 3. The Navigator's Outlining Buttons. Promote Chapter and Demote Chapter are on the top right; Promote and Demote Level on the bottom right. On the bottom left is Heading Levels Shown.
Around the Heading Levels Shown button are the other tools you need for outlining:
Promote Chapter: Raises the heading and all sub-headings and other paragraphs below it in the hierarchy one position closer to the start of the document.
Demote Chapter: Moves the heading and all headings and other paragraphs below it in the hierarchy one position farther from the start of the document.
Promote Level: Raises the heading one level in the hierarchy of headings set in multi-style outline numbering. For example, if the heading uses a Heading 2 paragraph style, it becomes a Heading 1 style.
Demote Level: Lowers the heading one level in the hierarchy of headings set in multi-style outline numbering. For example, if the heading uses a Heading 1 paragraph style, it becomes a Heading 2 style.
Contrary to many users' first inclination, trying to drag headings around with the mouse doesn't work. You must use these buttons instead.

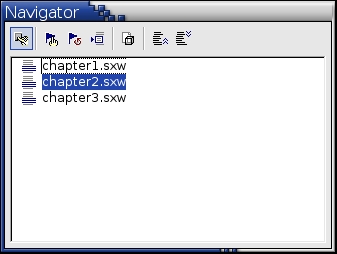
Figure 4. The Navigator also can be used for outlining in master documents. Only the buttons have been changed, to protect the inconsistent.
In a master document, the Navigator works much the same way. Acting like a table of contents in a floating window, in a master document, the Navigator acts similarly to a book file in FrameMaker. In a master document, however, the Promote and Demote Chapter buttons are replaced--for no good reason except inconsistency--with the Move Up and Move Down buttons.
Serious outliners have complained that OpenOffice.org's outline tools are basic. They have a point. Although workarounds exist for the most important deficiencies, they require more than a beginner's knowledge of Writer to set up. Still, even when used with default settings, Writer's outlining tools are preferable to repeated cut and pastes.
If you're not in the habit of outlining, give it a try--single and multiple style outlining both. Once outlining becomes part of your routine, you'll probably find that you spend more time preparing for but less total time on each document. Who knows? It even may give you enough confidence that you look forward to writing instead of avoiding it.
Bruce Byfield was product manager at Stormix Technologies and marketing and communications director at Progeny Linux System. He also was a contributing editor at Maximum Linux and the original writer of the Desktop Debian manual. Away from his computer, he listens to punk-folk music, raises parrots and runs long, painful distances of his own free will.


