OOo Off the Wall: Paragraph Styles, Part II
So, you've chosen the fonts for your paragraph style and its positioning. What next? In many cases, nothing is next. Font and positioning choices are the basics of paragraph styles in OpenOffice.org Writer. Often, you need nothing more. But, when you do need more, Writer's paragraph styles have a grab bag of tricks waiting for you. These tricks include:
Assigning a paragraph style to a numbering style
Including or excluding a style from line numbering and resetting the numbering
Making the formatting depend upon conditions
Adding drop capitals to the start of the paragraph
Except for conditional formatting and drop capitals, all these options are available from Format -> Paragraph if you are formatting manually. They also are available from the window for each paragraph style. Because conditional formatting requires consistency of styles, it is unavailable when you format manually. Learning these tricks now not only readies you for future needs, but it give you some ideas to try.
Unlike most word processors, Writer does not make bulleted or numbered lists part of the paragraph style. Instead, both ordered and unordered lists have a style of their own called numbered lists. Paragraph styles can be associated with a numbered list style for adding numbers automatically.
This division of lists and paragraphs has several advantages. To start with, it reduces confusion by separating the two different functions of setting up lists and formatting paragraphs. More than one MS Word user has complained of not knowing which they were editing, but with Ooo Writer, this confusion is eliminated. Equally as important, by separating lists and paragraphs, Writer not only gains the interface space for giving lists a complete set of options, it also avoids burying the options deep in the menu structure. Moreover, because lists are separate, they can be used by more than one paragraph style, which saves users time. For instance, if you want two paragraph styles to use Roman numerals, you need to set up the numbering only once. Changing a paragraph's numbering style is equally easy. This is the economy of effort that all styles are intended to provide.
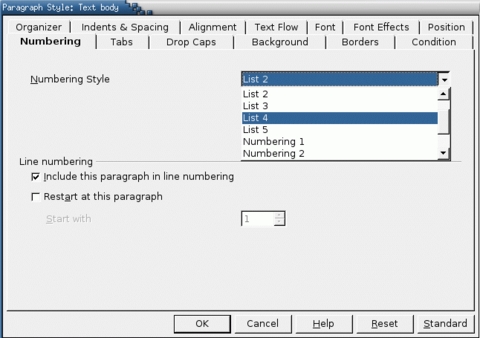
Paragraph and line numbering can be added from the Numbering tab. Paragraph numbering associates a numbering style with the paragraph style. Line numbering is set in Tools -> Line numbering.
If you set the view in the Stylist to List Styles, you should notice that Writer's pre-defined paragraph styles contain styles called List 1 through 5 and Numbering 1 through 5. The List styles are meant to correspond to the pre-defined number styles called List and are intended for bullet lists. Similarly, the Numbering styles are meant to correspond to the pre-defined number styles called Numbering and are intended for numbered lists. No doubt, matching paragraph styles to the numbering styles they link to helps you to see the relations between them more easily. Still, I personally prefer to define custom styles for both paragraph and numbering that describe the type of numbering, such as Arabic Numerals Red. These style names are even more convenient.
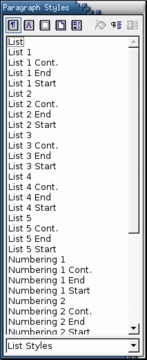
OOo Writer comes with pre-defined list styles. However, you are better off designing your own styles with descriptive names.
Both the List and Numbering paragraph styles also include special styles for the start and end of a list and for lists continued at the top of new pages. Such styles can be useful for adding extra space above the top or bottom of the list or for adding a continuation message. However, if you give enough thought to design, you usually can do without these styles.
The Numbering tab also includes options for including the paragraph style when Tools -> Line Numbering is turned on and for restarting or changing line numbers with each instance of the style. Unfortunately, paragraph numbering does not include a similar restart option, the way that FrameMaker does. Instead, you have to use the Restart Numbering button on the Function tool bar that becomes available when the mouse cursor is in a list. Click the blue arrow on the right if this button isn't visible second from the right on the tool bar.
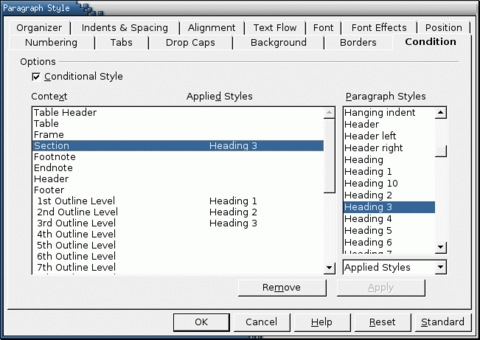
Making a paragraph style conditional means it changes its formatting depending on where it is used. For example, a paragraph style could be smaller when used in a footer or a header instead of in the body of the document. Similarly, if a page contained frames with a blue background, you could set the style so that the Body Text style was its normal black elsewhere on the page and white in a frame. In each circumstance chosen, the style takes on the formatting of another style.
However, these goals can be accomplished equally well by applying multiple styles. Probably the most common use for conditional formatting is with single style outlining. Single-style outlining is a type of outline numbering designed with a Numbering style, rather than with Tools -> Outline numbering. Instead of using different styles, it changes the number formatting whenever you press the Tab key to create a subordinate heading.
The only trouble with single-style outlining is all levels look the same. That's where a conditional paragraph style comes in handy. Assign the paragraph style to an outline numbering style in the Numbering tab and then open the Condition tab. There, you can assign the levels of the outline numbering style to other paragraph styles. Then, when you press the Tab key while using the paragraph style, each level of the outline takes on different formatting, making single-style outlining even more convenient than it is on its own.
The only drawback to conditional paragraph styles are the limits to their use. Pre-defined styles cannot be set as conditional. In one sense, the Default style is conditional, because other styles are based on it. Although the on-line help refers to this fact, it's of no practical use. More importantly, if you want to make a style conditional, you have to do it while the style window still is open for the first time. After the window closes, the condition tab no longer appears in the window.
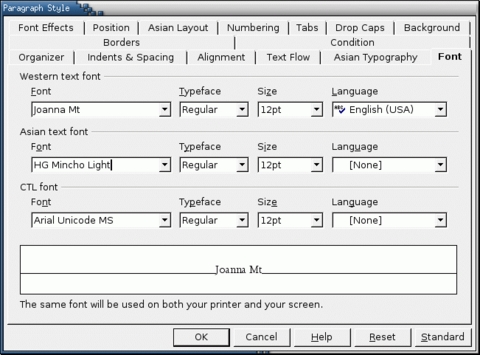
Enable Asian languages support in Tools -> Options -> Language Settings -> Languages suddenly gives you two new tabs for paragraph formatting: Asian Layout and Asian Typography. These two tabs, which really could be merged into one, are used for Japanese, Korean and Chinese characters. The Asian Layout tab sets up Japanese double-line characters. The Asian Typography tab activates use of the lists of forbidden characters for the start and end of lines set in Tools -> Options -> Language Settings -> Asian Settings, the use of hanging characters and the spacing between different sets of characters.
You'll also notice that the Fonts tab has another setting for the default Asian language. If you enabled Complex text layout (CTL) for languages such as Arabic and Hebrew, a third default font will be listed as well.
None of these settings, of course, magically add support for other languages. That has to be available on the operating system level. However, depending on the fonts available, some CTL characters can be added using Insert -> Special Characters and are governed by the language support enabled in OpenOffice.org.
Drop capitals are characters at the start of a paragraph that are larger than the rest of the text. Originating in medieval manuscripts, today drop capitals are common ornaments at the start of a new chapter. In Writer, you could add drop caps relatively easily by using a text frame, but Writer automates the process through a tab in the paragraph style window.
Start the design of drop capitals by making a new style linked with the Default or Body Text style, whichever you are using for the main contents of the document. The style automatically inherits all the settings of its parent style. Call the new style Drop Caps, so its purpose is obvious at a glance. Then turn to the Drop Caps tab for the new style. Enable drop caps, and start designing.
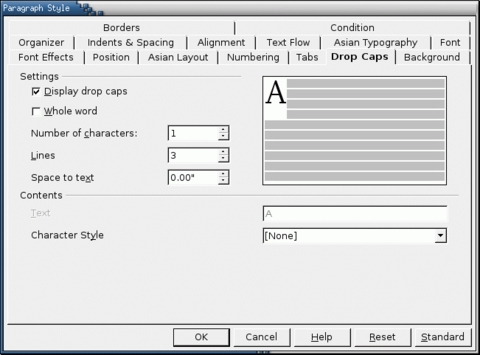
The Drop Caps tab automates the use of drop caps and gives a preview of the settings. The tab only available only for styles, not for manually formatted paragraphs.
In medieval manuscripts, drop caps often were decorated richly with intricate patterns of knotwork and intertwined beasts. Some manuscripts even used gold-based inks and expensive dyes to make their drop capitals as lavish as possible. Modern drop caps are a faint echo of this splendor. You can find many fonts that imitate the drop caps of medieval manuscripts, but their decoration is limited to size, weight and font effects. Fortunately, these tools are enough to achieve your main purpose--making the drop caps look different from the rest of the text. You can set the drop cap font's characteristics by using a character style specifically for that purpose. A character style called Drop Caps is pre-defined for precisely this purpose.
The Drop Caps tab has a grayed out field called Text that is supposed to start a paragraph with a particular word or phrase instead of using the opening of the paragraph. However, I have yet to encounter any combination of choices that enables this option. Instead, your choices are limited to setting the number of characters that the drop-cap picks up from the paragraph's contents, the number of lines that a drop cap occupies and the spacing between the drop cap and the text.
Guidelines for using these options are simple. The more lines, the fewer characters in the drop cap; otherwise, the drop-caps overwhelm the paragraph. Similarly,the larger the drop caps, the more space that is needed around them. Too much space, however, can make the transition from the drop caps to the rest of the paragraph hard to read, so experiment before finalizing your choices.
When you use a paragraph style with drop caps, at first the only sign of the feature is the gray border denoting a field around the letters to be presented as drop caps. Be patient. As you type, the drop caps gradually assume their full size and position. When the paragraph's number of lines reaches the height of the drop caps, the drop caps finally are revealed in all their glory and your document has a small touch of elegance.
Fonts, positioning, tricks--no other type of style in OpenOffice.org is called upon to do as much as paragraph styles does. Cell styles in Calc are their nearest equivalent, but even they are nowhere near as versatile. Master paragraph styles, and you still have a lot to learn, but already your documents should be looking better and your work flow should be streamlined.
Next column, the topic is numbering styles--and there's more than lists to be discussed in it.
Louis Suarez-Potts, the Community Manager for OpenOffice.org, reminds me that this year's OooCon is scheduled for September 22-24, 2004 at Humboldt University in Berlin, Germany. Two programming tracks are scheduled, one for programming and one for business, marketing, open source and the Ooo community. The conference is soliciting papers until the end of July. Last year's conference, the first, attracted attendees from 35 countries. Given the rising interest in OpenOffice.org, this year seems likely to be even more popular. You can find out more about OooCon here.
Bruce Byfield was a manager at Stormix Technologies and Progeny Linux Systems and a Contributing Editor at Maximum Linux. Away from his desktop, he listens to punk-folk music, raises parrots and runs long, painful distances of his own free will. He currently is writing a book on OpenOffice.org


