OpenOffice.org Off-the-Wall: Style Is Everything, Right?
Styles are the chief feature that make office suites more than electronic typewriters. In OpenOffice.org, however, they are even more important than usual. Most word processors offer character and paragraph styles, but OpenOffice.org also includes frame, page and numbering styles. Even more importantly, OpenOffice.org extends the concept of styles to other applications. Impress, for example, has a system of styles, whereas PowerPoint, its MS Office equivalent, has none. The same is true of OOo's Calc and MS Excel. Once you understand why you should use styles and when, you'll find OpenOffice.org's tools for managing and applying styles second to none. You'll also start to unleash the full power of OpenOffice.org.
Styles are the preferred way to format documents in an office suite. The alternative is manual overrides. To use manual overrides whenever you want to change the default formatting, you select part of the document--for example, a page or a group of characters--and then apply the formatting using the toolbars or menu. Each time you want to format something, you do it individually. This style of formatting is popular mainly because it requires no special knowledge. In effect, it involves using a word processor as though it were a typewriter.
The trouble is, as Robin Williams points out in the title of her best-known book, The PC Is Not a Typewriter. As Williams' title hints, you can do far more with a word processor such as Writer than you can with a typewriter. If you use manual formatting, you either cannot use many functions a word processor's offers or you can use them only partially. Therefore, for all their popularity, manual overrides are the least efficient way to work.
The chief feature that typewriters and manual formating lack is styles. Styles are a list of format settings. Their advantage is you set them up in one place and then tag the parts of your document that you want to use them in. If you want to change the format of all the tagged areas, you don't have to visit each area individually the way you do when using overrides. Instead, you change the style settings. Instantly, all the areas tagged with that style also are changed--at a speed with which manual formatting simply can't compete. If you are a developer, you can think of designing a style as the equivalent of declaring a sub-routine; tagging part of the document to use it is calling the sub-routine.
Several times, die-hards who refuse to use styles have posted to the OpenOffice.org user list. They have a right to work any way they want, they insist. OpenOffice.org should be redesigned so that users of manual overrides have the same access to features as those who use styles. At first, this request sounds reasonable. Yet, on closer look, it makes no more sense than insisting that all roads should be engineered so that pedestrians can go as fast as drivers. Although OpenOffice.org accommodates manual overriders in some ways, including several shortcuts found in Tools -< AutoCorrect/Autoformat, the advantages of styles require a regularity of input that manual formatting never could provide.
Basically, using styles offers four main advantages:
At the cost of extra preliminary work, you save time in the long run. Spend a couple of hours setting up styles, save the results in a template and you don't have to think about design for months at a time.
When you want to reformat, you have to change only the styles to reformat the entire document. Because styles are hierarchical, often you don't even need to change every style, only the ones at the top of the hierarchy.
Some tools in OpenOffice.org are either crippled or don't work at all without styles. In the Navigator, styles are right at the top of the window, acting as the basic milestones for moving about in the document. Want a field to pick up a chapter number or to have different styles of headers and footers? For both these tasks, you need to use styles. You want to build a table of contents or change page designs? You can do both without using styles, but this two-minute task will take you twenty minutes.
You use styles anyway. Indexes and tables and object frames all use paragraph styles automatically. By default, anything resembling a URL is formatted with the Internet Link character style. Add a footer, and you're using the Footer paragraph style. Unless you're deeply into masochism or are content to use an office suite at only the most superficial level, sooner or later you need to use styles. And because you can't escape them, you may as well learn how to use them instead of jumping through hoops to avoid them.
The short answer is almost always. In practice, though, even experts use manual overrides in certain circumstances. Before deciding whether to use overrides or styles, check the following table and decide which circumstances apply to the document you are preparing.
| Consider Using Overrides If... | Use Styles If... |
|---|---|
| The document is short. | The document is long. |
| The document is going to be printed once and never reused. | The document is going to be revised many times. |
| The document is going to be edited by only a single person. | The document is going to be edited by more than one person. |
| Any editing will only take place within a few days of finishing the document. | The document will be edited weeks, months or even years after the first version. |
| The document's format is unique and unrelated to any other documents. | The document belongs to a standard class of documents, such as a letter, fax or memo. |
| You plan to save the document as plain text, so all formatting will be lost anyway. | The document design should match that of other documents from you or your company or organization. In the business world, this concern is part of branding. |
| The document consists mostly of graphics, and what text is used is not regularly placed or spaced--for example, a brochure or a product sheet. | You want to use the document in a number of different ways, each of which requires some minor changes: for example, printing it on both white and red color paper. |
Even if one of the first five conditions for using overrides applies, using styles still might make sense if you have a template that suits your needs. The last two conditions are the only real reasons, besides laziness, for using overrides. Writer even offers the Direct Cursor for graphical design, a setting that adds tabs and lines as needed to allow you to insert text anywhere on the page (see Tools -< Options -< Text Document -< Formatting Aids).
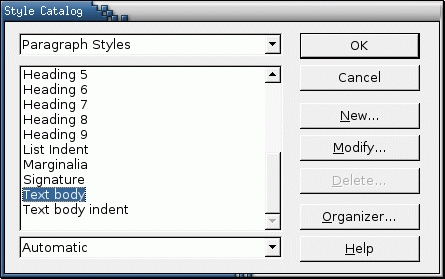
When you are applying styles, you have two main tools, the Catalog and the Stylist. The Style Catalog, available from Format -< Styles -< Catalog, is similar to the tool of the same name in MS Office. The Stylist, available from Format -< Stylist or by pressing the F11 button, is a floating palette. Both are tools for adding, editing and applying styles.

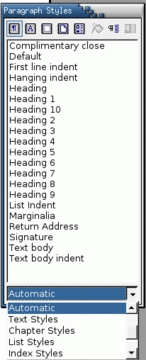
Figure 1. The Stylist is the easiest way to apply styles. Its content differs between applications. This is the Stylist for Writer.
If you are used to MS Office, you might feel most comfortable with the Catalog. However, the Catalog requires many more mouse-clicks or keystrokes than the Stylist to do the same thing. Being stuck in the menu, the Catalog is not as convenient as a floating window such as Stylist. For these reasons, Stylist should be most users' preferred tool. The main exception is users with a monitor of 15" or less, who do not have the extra free space for a floating palette. Yet, even on a small screen, users can open and close the Stylist as necessary.

Figure 2. The Catalog is a part of the OOo interface and closely resembles its MS Office counterpart. Unless you don't want to change your work habits, the Stylist is more efficient.
The Stylist can be left to float or docked or undocked from a side of the editing window by dragging its title bar while pressing the Ctrl key. Across the top is a button for each type of style available in the current application. Click the button, and the types of styles listed in the stylist change. There's also the Fill Format button, which allows you to apply a style by dragging it over an area of your document, and an Update Style button, which allows you to modify a style based on manual overrides.
On the bottom of the Stylist is a drop-down list of different views of styles. Especially useful views are the Applied Styles, which lists only those styles that have been used; HTML Styles, which lists only those used in HTML; and the Hierarchical view, which shows in a tree which styles are based on which.
The Stylist is so convenient that it is one of the main reasons to use OpenOffice.org. However, you can make styles even more convenient by writing macros to automate the application of commonly used styles and then assigning each macro to a key combination. In addition to the Stylist and the Catalog, OpenOffice.org also includes the Load Styles tool, available from Format -< Styles -< Loads. Load Tools is a dialog for transferring styles between documents. From the dialog, you can choose which styles to transfer and whether existing styles are over-written or not.
OpenOffice.org includes dozens of pre-existing styles. Many of these styles are waiting for your selection. Others are used automatically by OpenOffice.org. Add a graphic, for example, and a frame using the Graphics style automatically is placed around it. Similarly, typing anything that looks like a URL immediately formats the text with the Internet Link character style, unless you turn off the URL recognition option in Tools -< AutoCorrect/Autoformat. All of the pre-existing styles can be edited but not deleted. You'll also want to add your own styles as the need arises.
You can work with styles using the Catalog, but when applying styles, the Stylist is more convenient. To edit a style, highlight it in the Stylist and select Modify from the right-click menu. If you want to add a style based on the highlighted style, select New instead. Alternatively, if you want a style not based on any existing style except the Default, select a blank space in the Stylist for your right-click. In all these cases, the Style window opens, and you're ready to design.
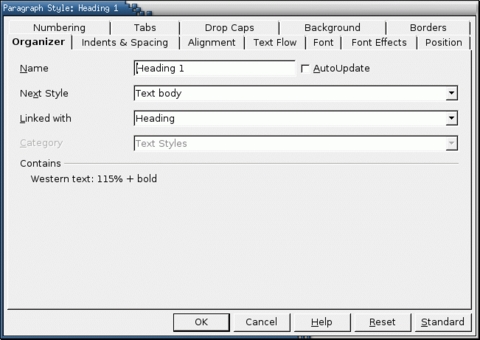
No matter what the style, your first stop when designing styles should be the Organizer tab. Depending on the type of style, the Organizer has three fields. How you fill in these fields heavily influences the usefulness of styles:
Name: For convenience, each style should have a distinct name. The pre-defined styles usually are named for context--Heading 1 or Emphasis. You might prefer, however, to give your styles a descriptive name instead--2-Column Page or Blue Bullets. Some styles can be associated with another style of a different type, so you can also simplify your life by giving them all the same name. For instance, if a numbering style uses Arabic numbers, you might want to call it, the character style used to format the numbers and the paragraph style that uses the numbering style Arabic numbers. Because each type of style displays separately, you'll never confuse them, but their association is obvious at a glance.
Linked with: This field lists the existing style on which the current style is based. If you started designing a new style by highlighting an existing one, the existing one is entered in this field automatically. The new style uses all the characteristics of the style with which it is linked except those that are specifically changed. What's more, changes to the parent style change the new style. This inheritance simplifies the design of your document by allowing you to design related styles only once. For example, if you use the Heading style, all you may need to set for its child styles Heading 1 and 2 is the size or color. You can see which styles inherit from which by changing to the Hierarchical view in the Stylist.
Next Style: Which style is used automatically after another style. For some styles, making this setting available doesn't make sense. A frame for example, usually is not followed immediately by another one. For other styles, such as paragraphs and pages, this setting does save time. For instance, by default, the Title paragraph style is followed by Sub-title, which is followed by Text body. Instead of having to set the style every, all you need to do is press the Enter key, and the next style is used automatically.
A description of other settings must wait for other articles. For now, though, know that designing a full range of styles for a document is an intensive process. Even an expert OpenOffice.org user is likely to need several hours for tweaking styles in some documents. For that reason, the last step in designing styles always should be to save the results to a template using File -< Templates -< Save. By the third or fourth time you use the template, you'll already be starting to save time and noticing the improvement in your blood-pressure.
Bruce Byfield was a manager at Stormix Technologies and Progeny Linux Systems and a Contributing Editor at Maximum Linux. Away from his desktop, he listens to punk-folk music, raises parrots and runs long, painful distances of his own free will. He currently is writing a book on OpenOffice.org.


