Is Beauty Only Pixel Deep?, Part 2
Welcome back, everyone, to another installment of the SysAdmin's Corner, where knowledge and discovery are keywords and mysticism and impossible are not. It is time once again to pull back the curtain from Linux fonts and have a nice long chat with the gentleman at the controls. Judging from some of the responses I received from my last column, it seems that fonts are a nightmare to many (and I can't say I blame you). Nevertheless, it's time to put away fear and learn to enjoy your font experience.
As many of you already know, I firmly believe in learning by doing, by trying out things and seeing what happens when you type this command or that one. On that note, I'm going to have you play with your fonts. I'm going to have you try some things here, some of which may wind up producing some strange-looking results when it comes to your X display's fonts. I'm not trying to scare you, I simply want to make sure you back up your files before you start.
One of the questions that came up repeatedly was that of the font server, specifically xfs. Why would you want to use xfs when XFree86 4.X already knows how to deal with TrueType fonts? I agree that it seems to be an overly complicated thing to do, but remember Linux's server roots (so to speak). The idea is that you can run a font server on one machine in your office and have all the other Linux clients take advantage of its resources. Why? Because each machine then uses the same fonts, thus providing a consistent environment. You might remember that xfs, the X font server, runs on port 7100 by default. That's what this line in your XF86Config-4 file is all about.
FontPath "unix/:7100"
As you might have guessed by the fact that a port is specified, it is possible to run the font server from another port. In fact, you can run multiple font servers, each with its own configuration. In the following example, I started a second instance of xfs, this one running on port 7101 as opposed to the default 7100.
xfs -config /etc/X11/fs/configtest -port 7101
Yes, I added something else to the command. That -config parameter tells the program to read its information from a different config file since I don't really want to muck up my original when I'm experimenting. In this case, the file is called configtest, and I could put it in any directory that amuses me. If you'll remember from the first part of this series, xfs uses a file called config, which can be found in /etc/X11/fs or /usr/X11R6/lib/X11/fs depending on your system. By specifying a second file, we can tweak and experiment at will.
Using the xlsfonts command, you were able to get a list of all the fonts on your system. You can also get that list with a query to the font server directly by typing fslsfonts -server unix/:7100.
Depending on your Linux distribution and your installation of X, this may or may not work. For instance, on my notebook computer (which runs Red Hat 7.2), the X font server does not allow TCP connections by default. This is done for security, but it does kind of negate the advantage I spoke of a few paragraphs back. That setting is controlled with the following line from your fs/config file.
no-listen = tcp
Just delete the tcp from the above line, save your changes, then stop and start the font server. Now you should be able to use the fslsfonts command without a hitch. In fact, you even can use it to query your system remotely or another system altogether. For instance, I can get a list of all the fonts served by my main development machine (scidev) by using the command fslsfonts scidev:7100.
Before we move on to the next step, I want to show you how you can start a second X session on your system without touching the one you are currently using. Your X session is most likely running on virtual terminal 7. That's because your virtual terminals from 1 to 6 are busy providing text logins for additional sessions. You can jump out of your current session by typing Ctrl-Alt-F1, and get back in by typing Ctrl-Alt-F7. Give it a try.
Back safe and sound? Great. Now go to your second (or third or fourth) terminal session and login to a test account. Since I do crazy things like this all the time, I create a handful of additional logins, test users so that my own work environment remains somewhat stable. Using an alternate login, type this command at the shell prompt:
startx -- :1
A complete second X session will start on your system, running on virtual terminal 8. To switch to your first session, you can use Ctrl-Alt-F7; Ctrl-Alt-F8 will take you back to your second session.
We'll use same principle for the X server itself. By default, it uses a file called XF86Config (or XF86Config-4). What I do is take a copy of that file and bring it into a work directory. I called mine Xperiment.
     cd $HOME/fontplay
     cp /etc/X11/XF86Config-4 Xperiment
Open your new file and look for the FontPath line. Then, change the font server from port 7100 to port 7101.
FontPath "unix/:7101"
Now, let's start our play X session to use the new config file and the new X server.
startx -- :1 -xf86config $HOME/tmp/Xperiment
What you have now is a separate xfs environment to play with, one that doesn't affect your current running session. You can now safely remove fonts from the catalogue (as defined in your new config file), change the load order and so on. The order, by the way, does make a difference. Look at the top of your xfs config file, and you'll see something that looks like this:
     catalogue = /usr/X11R6/lib/X11/fonts/misc:unscaled,
        /usr/X11R6/lib/X11/fonts/75dpi:unscaled,
        /usr/X11R6/lib/X11/fonts/100dpi:unscaled,
        /usr/X11R6/lib/X11/fonts/misc,
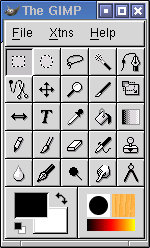
Before you change anything, start up Netscape or the GIMP or anything that uses native X fonts. The reason I mention this is that various desktop environments (such as KDE) control their own fonts for their own applications. Unfortunately, merely running KDE and having all your fonts nicely defined doesn't mean that the GIMP necessarily will use those fonts. That said, once you've fired up the GIMP, you should get something that looks like the image below.

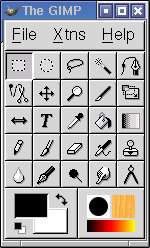
Now go back into your xfs config file and swap the 75dpi line at the top with the 100dpi line. Save your changes, stop and restart xfs. Then restart your desktop and get the GIMP rolling again. You should see something that looks this image:

Note that while the KDE desktop fonts look the same (the window title bar where it says The GIMP), the menu fonts (where it says File, Xtns, Help) are much larger. Some of you will be saying, "Yes, but you can change the dpi setting of your X session with a command-line option", and you are correct. What I wanted to demonstrate here is that the order of the font list matters. When the system calls for a 12 pt. regular Times font, it grabs the first one that it finds and that may not be what you want. Here's something else to try. Notice that your FontPath list includes 75dpi, 100dpi and miscellaneous fonts in both a regular version and an unscaled version.
     /usr/X11R6/lib/X11/fonts/75dpi:unscaled
     /usr/X11R6/lib/X11/fonts/75dpi
Try putting the unscaled fonts at the top of the list instead of their scaled counterparts; you may be pleasantly surprised. In fact, consider removing the scaled fonts from the list entirely. Stop and start your font server on port 7101, then launch X. When you are happy with the results, you can migrate those changes to your real xfs configuration file.
That pretty much covers my allocation of electrons for now, so I am going to pause here. Next time around, we'll concentrate specifically on TrueType fonts. I'll tell you where you can get them and how to work with them. I may even have to mention that other OS and square away a few things. In the meantime, remember that beauty is more than pixel deep.
Marcel Gagné's book, Linux System Administration; A User's Guide (ISBN 0-201-71934-7, Addison Wesley) is in stores now (including your favorite on-line vendor). You can download a free excerpt from his web site at https://www.marcelgagne.com.
email: mggagne@salmar.com


