What's New in 3D Printing, Part I: Introduction

Three years ago, I wrote a series of articles titled "Getting Started with 3D Printing" that discussed the current state of the hobbyist 3D printing market from both the hardware and software angles. This is an incredibly fast-moving industry, and a lot has changed since I wrote those columns. So much has changed in fact, that this first article will serve just to introduce what likely will be a three- or four-part series on the current state of 3D printing. In my next articles, I'll dive deeper into particular 3D printing topics, so consider this article as an overview and sneak peek to those topics. 3D printing is a big topic, and this is Linux Journal, so I'm going to approach this topic from a Linux-using open-source perspective and stick to tools that work in Linux.
Open Source in 3D Printing
One of the things that has interested me most as I've followed the 3D printing industry is just how similar it is to the story of Linux distributions. In my articles from three years ago, I discussed all of the open-source underpinnings that have built the hobbyist 3D printing movement, starting with the RepRap 3D printer—an open-source 3D printer designed to be able to build as many of its parts as possible. Basically every other 3D printer you see today can trace its roots back to the RepRap line. Now that commercial interests have taken the lead in the hobby though, it is no longer a given that you will be able to download the hardware plans for your 3D printer to make improvements, even though most of those printers got their initial designs from RepRaps. That said, you still can find popular 3D printers that value their open-source roots, and in my follow-up article on hardware, I will highlight popular 3D printers and point out which ones still rely on open hardware and open-source software.
On the subject of open-source software, many 3D printers still depend on open-source software to run. Open-source 3D printing software works well, so I can see why many companies would prefer to focus on their hardware and use the common, popular and capable open-source options. That said, some 3D printers on the market, particularly those from larger companies, ship with their own proprietary software that you must use with the printers.
The Hardware
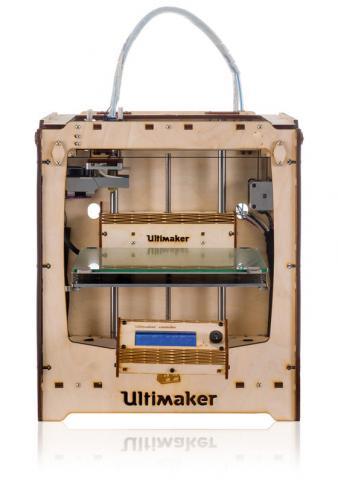
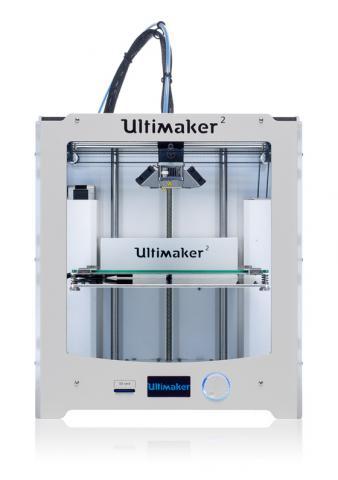
The hardware side of the 3D printing world probably has changed the most during the past few years. Three years ago, many of the popular 3D printers still primarily were purchased in kit form, and in some cases, they required not just assembly with screwdrivers, wrenches and calipers, but also might have even required some soldering. Many of the printers also heavily followed the RepRap approach of having many 3D-printed parts. Those printers that veered from the RepRap approach still often used laser-cut wood. In either case, the end result were 3D printers that looked and felt much more like a hobbyist electronics project than a consumer product. These days, most of the popular printers look more like a consumer appliance than a hobbyist project. Wires and electronics are hidden. The cases themselves are made of painted wood, metal or glass, and if there are any plastic parts on the printer, they're more likely to be injection-molded than printed.

Figure 1. The Original Ultimaker

Figure 2. The Current Ultimaker 2
Calibration of 3D printers three years ago still was largely a manual affair. Leveling the bed might have involved a pair of calipers or a feeler gauge as you adjusted screws in each corner of the bed. Adjusting the Z axis on the printer also typically involved adjusting a screw somewhere on the printer. In some cases, you might even have had to adjust stepper motor controls on your 3D printer electronics with a screwdriver to dial in the proper voltage. As many printers were kits, a large part of the assembly process involved squaring, centering and calibrating hardware as you built the printer. These days, a lot of engineering effort has gone into automating as much of the calibration as possible. Some printers automatically sense the print bed and level it in software. Finer Z axis adjustments often can be made in software along with more exotic adjustments like stepper motor voltage. Most of the printers are sold assembled these days, and most of the calibration already has been done.
Extruder design three years ago mostly was based on the Wade's extruder design from Thingiverse, and it incorporated a number of 3D-printed parts, including gears. Although everyone was eyeing the multiple extruder support that commercial printers had, it still was at the prototype phase at best. Most hot ends had .5mm tips, and .3mm layer heights were the norm. These days, extruders have moved away from 3D printed parts with large gears into machined parts that directly drive filament into the hot end. A dual-extruder option now is available on many of the higher-end hobbyist printers. That said, most hot ends these days still extrude with .3mm to .5mm tips, although the average printer is expected to be able to extrude at a .1mm or .2mm layer height.
The change in printable materials is one of the latest and most exciting areas of innovation in 3D printing. Three years ago, ABS and PLA plastic were your only real options. Now you have a huge variety of choices: glow-in-the-dark PLA; water-soluble PVA; a number of different types of nylon filament with different strength and flexibility profiles; flexible Ninjaflex filament that behaves more like rubber than plastic; metallic PLA filament with embedded copper, brass or bronze dust that can be polished and finished much like the pure metal counterparts; and even PLA filament with carbon fiber or bamboo. A cutting-edge category in consumer 3D printers even has emerged that prints in liquid resin and allows a new level of fine detail.
The Software
Although the improvements in 3D printing software during the past three years may not be as dramatic as the hardware changes, that doesn't make them any less interesting. The general software workflow three years ago involved downloading or building a 3D model in STL format and then loading it in a slicing tool, such as the open-source Slic3r software that you configured manually with your printer's capabilities, the filament you were using and the overall settings for the print. The slicer would slice the model into individual layers and then convert each layer into a series of GCODE commands, such as stepper motor movements that the printer understood. That GCODE then was loaded into a second piece of software, like the open-source Printrun software that was able to communicate with your printer, provide you with manual controls and send your GCODE to the printer so it could start printing. These tools worked, but they required quite a bit of in-depth knowledge of your printer's individual quirks.
Although Slic3r and Printrun still exist, these days, other open-source projects, such as Cura, are becoming the preferred open-source tools. Cura combines the slicing, communication and manual control of your printer in one interface, and it also adds nice 3D visualizations of the object so it's easier to rotate, manipulate and resize. It also ships with printer profiles for quite a few popular printers along with a wizard that runs the first time you start it, so it's much easier to set up your printer the first time.
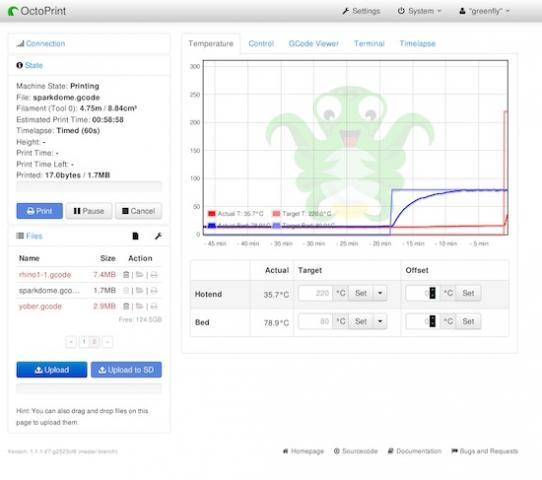
Another interesting innovation on the open-source software front is a program called OctoPrint that provides a Web-based interface to control your printer remotely. It can run on a regular computer but is geared to run from a Raspberry Pi. It supports both the Raspberry Pi camera as well as most modern Webcams that run in Linux, so you not only can watch your printer print over the network, but you also easily can generate time-lapse movies of your prints to watch over and over again.

Figure 3. OctoPrint
As you can see, a lot has changed since the last time I discussed 3D printing with Linux. In my next column, I'll discuss the hardware side of 3D printing in more detail, followed by an article on open-source 3D printing software. I'll finish the series with a column that walks through setting up OctoPrint on a Raspberry Pi step by step. My hope is that by the end of the series if you still were holding out on buying a 3D printer, you'll be convinced that now is the time to get started, and you'll have a good idea of what's out there so you can begin immediately.


