The Tiny Internet Project, Part III
In a previous article, I introduced the Tiny Internet Project, a self-contained Linux project that shows you how to build key pieces of the internet on a single computer using virtualization software, a router and free open-source applications. In the second installment, I explained how to set up the host server using Proxmox and build a first basic Ubuntu 14.04 virtual machine. In this third installment, you'll learn how to set up an Ubuntu mirror, a DNS server, a mail server and a web server.
As you finished with Part II, you hopefully had just booted a raw Ubuntu 14.04 server VM. Now, I'll describe how to customize that VM with some user accounts and software, keeping it fairly generic, but ready to become a template for most everything else you'll build.
Initially, you'll do all your work from the Proxmox web interface on your Proxmox server: https://10.128.1.2:8006.
Log in and start the Ubuntu VM you made, which probably was named "100 (ubuntu)". Wait a moment for it to boot, and click the Proxmox Console button to launch what is essentially a web-based terminal.
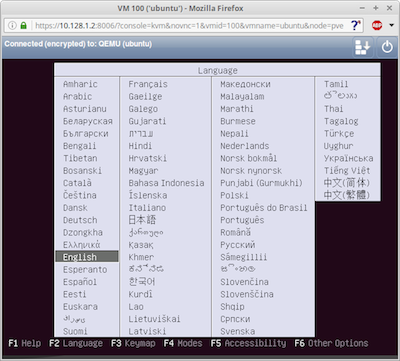
Figure 1. Ubuntu Installation Screen—Selecting Your Language
When the shell opens, you'll see the Ubuntu installation screens. Select your language and choose "Install Ubuntu Server" from the action list. You'll be prompted again for language choices and keyboard layouts; choose the ones that suit your needs. The installer will detect your network and prompt you to enter a hostname.
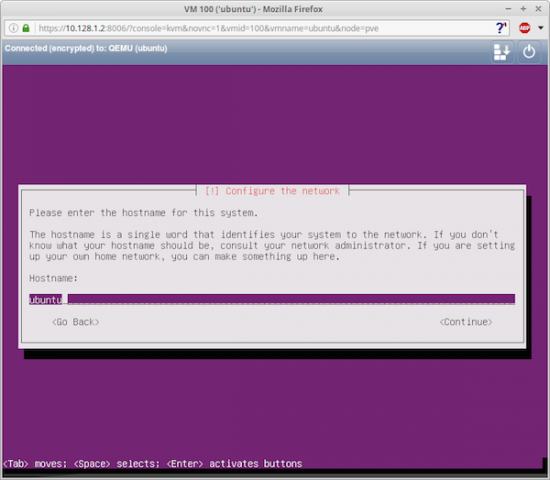
Figure 2. Entering a Hostname
Since you'll be making this VM a template, give the machine a generic hostname like "ubuntu". That way, if you later deploy a different type of server (say, ArchLinux), you'll easily be able to tell them apart.
When you're asked to create a user name, choose something that follows a naming convention you can use for all future users, such as your first initial and your full last name. Then when you need to figure out user names (and email addresses) later, you won't have to guess.
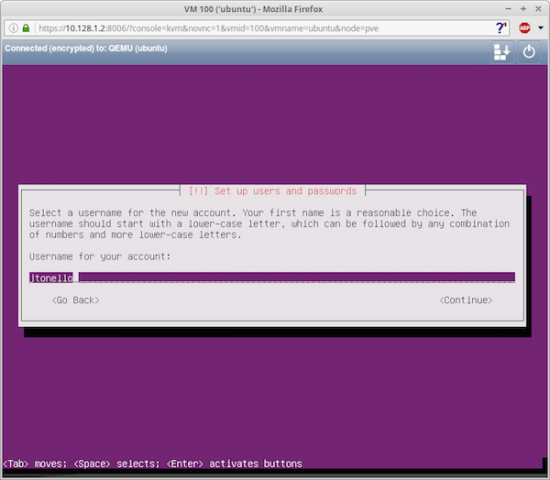
Figure 3. Selecting a User Name
Provide a password, add encryption if you like, set your time zone and proceed to the disk partitioning.
When you first created this VM under Proxmox, you gave it a main virtual disk, which is what the Ubuntu installer now sees. Select "Guided — use entire disk", not the default with the LVM option. Accept the configuration and then write the changes to disk.
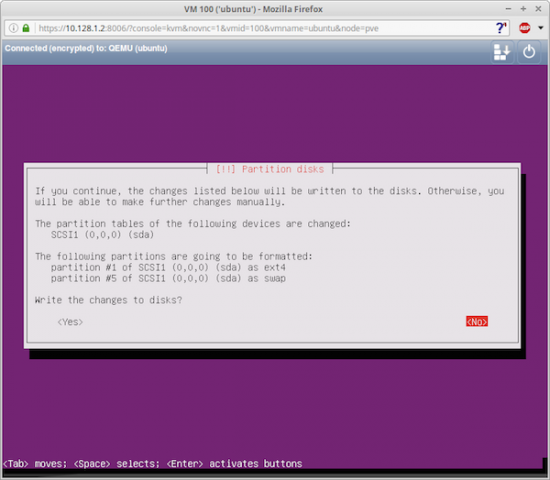
Figure 4. Disk Partitioning
The installer will set up the system, which takes a few minutes. If you've ever installed an operating system onto hardware from a DVD, this is the same thing.
When you're prompted for HTTP proxy information, leave it blank and continue unless your school or situation requires a proxy to access the public internet.
Once the installer configures apt, it'll set up all the base software
and prompt you about how to manage upgrades. Select "Install security
updates automatically" and continue. On the Software selection page,
select only "OpenSSH server" for now. Doing so will give this base VM
template direct shell access and won't load up the machine with packages
you don't need.
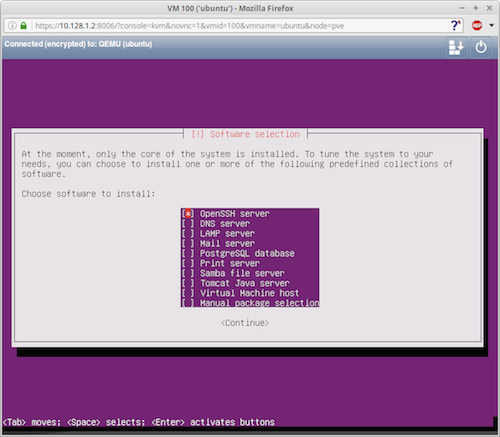
Figure 5. Software Selection—Selecting Only OpenSSH Server
When prompted to install the GRUB bootloader to the master boot record, choose "Yes", and reboot when prompted. The VM will launch into the GRUB menu quickly, boot and drop you at the login prompt.
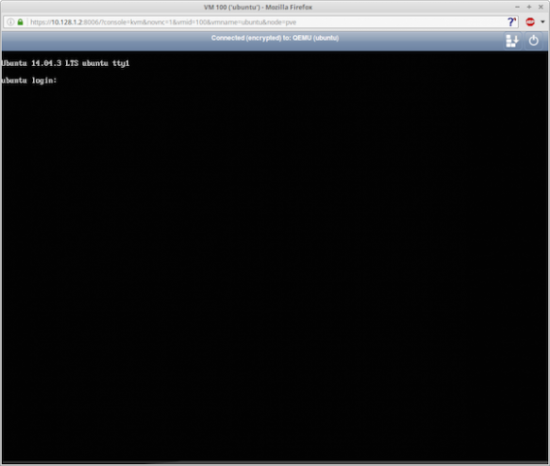
Figure 6. Login Prompt
Log in using the user name and password you set up during the installation
and check the system's IP address. It was dynamically configured with
DHCP during the installation, and it will be handy to know so you can
ssh into your new VM:
$ ifconfig
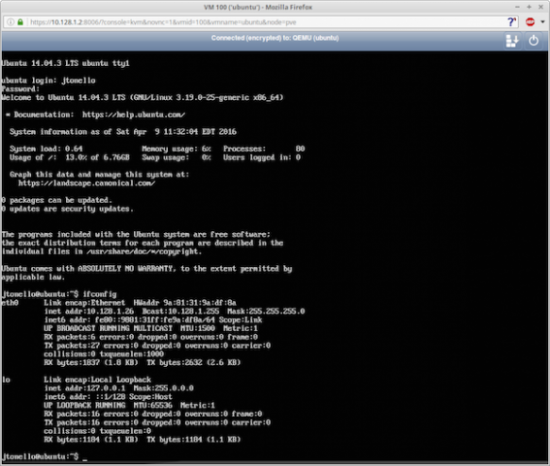
Figure 7. Logging in and ifconfig Output
You'll see two entries, one for eth0 and one for lo (local). In my
example, the automatically assigned address is 10.128.1.26. If your
administration PC is a Linux box or Mac, open a terminal and
ssh in to
your new VM by typing:
$ ssh username@10.128.1.26
If you're on Windows, ssh in using PuTTY or a similar tool. If you get a
login prompt, you're good to go. You always can use the Proxmox console
to connect to your VMs, but being able to ssh in directly is handy.
Customize the VM
With your Ubuntu VM up and accessible, it's time to make some customizations that will save time for all future deployments. Start by adding any other administrative users you want. That way, when you make a template out of this VM, all those users already will be set up. You're already an administrative (sudo) user yourself, but it might be handy to have someone else with admin rights:
$ sudo adduser msmith
Follow the prompts and enter the user's full name and any of the rest you care to add. Next, add your new user to the sudoers group:
$ sudo adduser msmith sudo
These steps can be combined, but I think it's useful to see the output so you better understand what's happening under the covers.
Set a Static IP Address
All your servers will have static IP addresses so they can be mapped to DNS later, so this is a good time to change them by editing the network configuration file:
$ sudo vi /etc/network/interfaces
Change the eth0 entry from this:
auto eth0
iface eth0 inet dhcp
to this:
auto eth0
iface eth0 inet static
    address 10.128.1.200   # .200 is out of range of anything
                           # I might be adding soon
    netmask 255.255.255.0
    dns-nameservers 10.128.1.3
    dns-search tiny.lab
Save the file and reboot.
Add a Second Network Interface
The goal of your tiny internet is to make a self-contained system that doesn't rely on the public internet, but you'll need to cheat a little with this first VM and, later, with the mirror server. These VMs need a second NIC so they can access both your private and public networks simultaneously.
Once this VM is customized and updated, you can delete the second NIC by reversing the steps you're about to take.
In the main Proxmox web interface, click on the Hardware tab for your VM. Click Add and select Network Device from the menu. In the modal window, select "Bridge mode" and bridge the second network interface, in my example "vmbr1". Click OK, and for good measure, restart the VM.
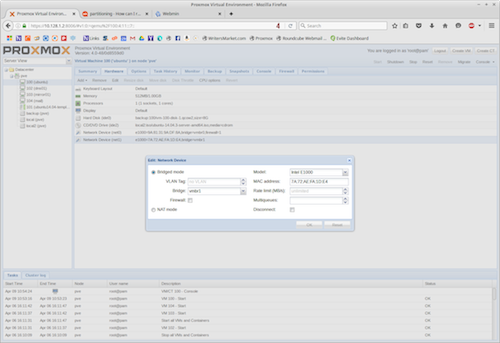
Figure 8. Bridge Mode
When you type ifconfig at the prompt after you log in, you'll still
see only eth0 and lo, so you need to activate the newly added NIC. In
the console window (or shell), edit the network configuration file:
$ sudo vi /etc/network/interfaces
Create a static IP entry for the second NIC:
auto eth1
iface eth1 inet static
    address 192.168.1.200   # .200 is an available address on
                            # my network
    netmask 255.255.255.0
    gateway 192.168.1.1
    dns-nameservers 8.8.8.8 8.8.4.4
In this example, I choose .200 because it's a free address on my LAN. Assign one of your own that doesn't conflict with other machines on your network. The dns-nameservers are Google's.
Save the file and reboot the VM. When you log in and run
ifconfig now,
you should see that the eth0 and eth1 interfaces are active (Figure 9).
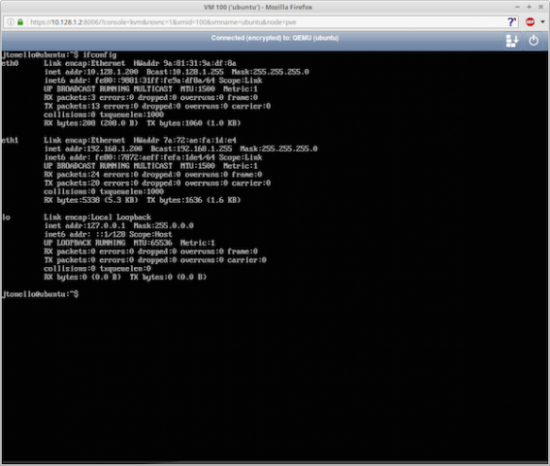
Figure 9. eth0 and eth1 are both active.
This VM now has access to your private network and the public internet so you can do updates and downloads. Run this update so you have the latest version of your software and kernel:
$ sudo apt-get update && sudo apt-get upgrade -y
 ↪&& sudo apt-get autoremove -y
Install Webmin
You're now ready to install Webmin, a browser-based tool for administering your Linux server. It's worth installing on the template VM so it's available on every server you build from here on out.
First, install a few packages Webmin needs to work properly:
$ sudo apt-get install libnet-ssleay-perl libauthen-pam-perl
 ↪libio-pty-perl apt-show-versions libapt-pkg-perl
When those packages are installed, copy the URL of the latest Debian installer from the Webmin downloads page (see the Resources section), and fetch it to your home directory on this VM:
$ cd ~
$ wget https://prdownloads.sourceforge.net/webadmin/
↪webmin_1.791_all.deb
Now, install it:
$ sudo dpkg -i webmin_1.791_all.deb
The installer will take a little while, so be patient. When it's done, it'll direct you to log in at https://ubuntu:10000, but since you don't have DNS set up yet, you'll have to use https://10.128.1.200:10000 for now. Use your administration PC and log in with your user name and password.
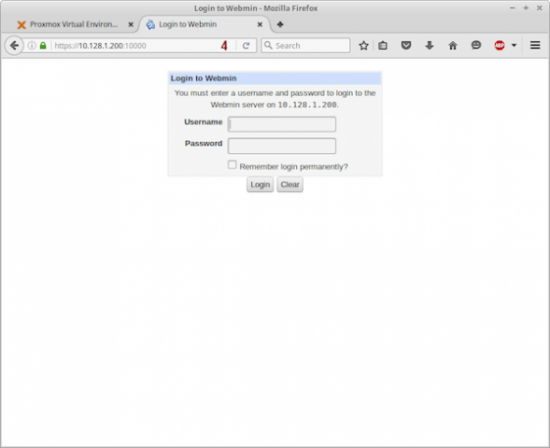
Figure 10. Logging in to Webmin
Set Up the Firewall
If you want to enable a firewall on your template, this is the time to do it. It's easy with the Webmin interface—under Networking, click Linux Firewall. Check the box at the bottom that says "Enable firewall at boot time", and click the "Setup Firewall" button. Create four basic rules:
-
Accept if state of connection is ESTABLISHED,RELATED.
-
Accept if interface is not eth0.
-
Accept if source is 10.128.1.0/24.
-
Accept if source is 192.168.1.0/24.
These rules allow traffic only from devices on your two networks—the one you use to connect to the internet and the private one that makes up your tiny internet. Set the "Default Action To:" button to "Drop" on the first entry ("Accept" on the other two), and click Apply Configuration.
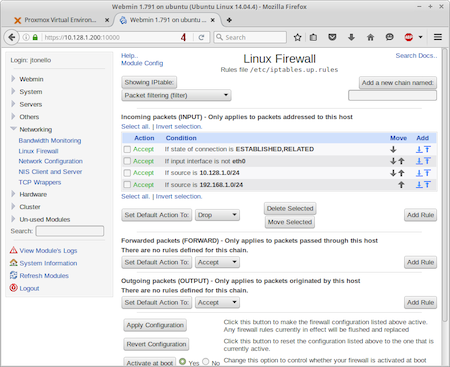
Figure 11. Setting Up the Firewall Rules
You can confirm these rules are active by running this simple command:
$ sudo iptables -L
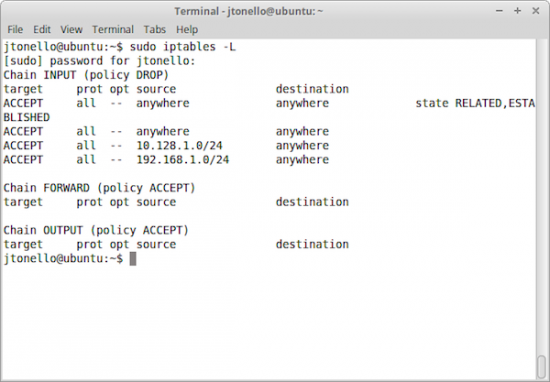
Figure 12. Output of the sudo iptables -L Command
Change Your Local sources.list
Next, you'll change the apt package repository listed in /etc/apt/sources.list from the Ubuntu default to your own. This will enable you to update all your VMs locally without them ever needing to access the public internet. Note that this won't work until your apt-mirror is fully operational (if you don't want to set up a mirror, skip this step):
$ mv /etc/apt/sources.list /etc/apt/sources.list.bak
$ sudo vi /etc/apt/sources.list
Enter the following three lines in sources.list and save it. The URL points to the VM you'll make called "mirror" on the domain you'll create called "tiny.lab":
deb https://mirror.tiny.lab/ubuntu trusty main restricted
 ↪universe multiverse
deb https://mirror.tiny.lab/ubuntu trusty-security main
 ↪restricted universe multiverse
deb https://mirror.tiny.lab/ubuntu trusty-updates main
 ↪restricted universe multiverse
Set Up a Proxy
If you're planning to build and use an HTTP proxy, edit /etc/environment
to add the following lines. In this example, I used addresses and a port number
created later by installing tinyproxy. After the
PATH line, add:
no_proxy="127.0.0.1, localhost, *tiny.lab"
http_proxy="https://proxy.tiny.lab:8888"
ftp_proxy="https://proxy.tiny.lab:8888"
In this case, I don't want the system to use the proxy for anything on my private tiny internet domain (*tiny.lab), but it can for anything else that isn't local. If you're not planning to build your own mirror and plan to use a public repository (the default), you'll also need to edit /etc/apt/apt.conf to add a line telling apt to use your proxy to get to the repository:
Acquire::https::Proxy "https://proxy.tiny.lab:8888";
Convert Your VM to a Template
Now you're ready to convert this VM to a template. It's been customized with your credentials, static IP addresses that can be modified easily, Webmin for easy system management, simple firewall rules, a custom sources.list and proxy settings, if necessary.
To convert it, return to the Proxmox browser interface and shut down the machine. Right-click on the VM and select "Convert to template" from the menu.
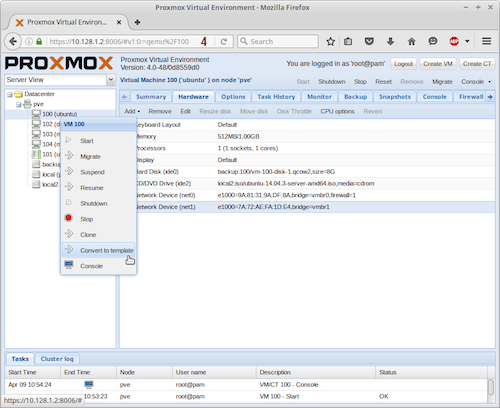
Figure 13. Converting the VM to a Template
After a few moments, the VM's icon will change, showing you that the machine is now purely a template. It no longer can be started as is.
If you installed a second hard drive on your Proxmox host server, now is a good time to back up this new template. Check the Proxmox website for more information.
Deploy a Linux Repository Mirror
You have two choices when it comes to deploying the Ubuntu repository: clone your new VM template and resize its 30GB virtual disk, or create an all-new VM with a larger disk. I explain the latter here.
Start by creating a new VM from the Ubuntu .iso file you used to create your template VM. This time, give the machine a virtual disk that's at least 200GB. Boot the machine and step through the server installation process as before, making sure to give the machine the hostname "mirror" and an IP address of 10.128.1.6. Use the same user name and password you set on your template, and install only OpenSSH from the application list.
Follow the procedure for adding a second NIC, and be sure to leave the /etc/apt/sources.list unchanged for now. You'll need it to point to the default external Ubuntu repository.
Install apt-mirror
With the machine set with access to both your tiny internet and the
public internet, install apt-mirror and the web server that will serve
up packages:
$ sudo apt-get install apt-mirror apache2
The core of the apt-mirror configuration is the list of repository
URLs. Make a backup of the default file and edit the original:
$ sudo cp /etc/apt/mirror.list /etc/apt/mirror.list.bak
$ sudo vi /etc/apt/mirror.list
Leave the config section at the top as is, and don't change the first
three deb listings. However, to save disk space, remove all the
deb-src entries and replace them with the 32-bit repositories. Your
entries should look like this:
deb https://archive.ubuntu.com/ubuntu trusty main restricted
 ↪universe multiverse
deb https://archive.ubuntu.com/ubuntu trusty-security main
 ↪restricted universe multiverse
deb https://archive.ubuntu.com/ubuntu trusty-updates main
 ↪restricted universe multiverse

deb-i386 https://archive.ubuntu.com/ubuntu trusty main
 ↪restricted universe multiverse
deb-i386 https://archive.ubuntu.com/ubuntu trusty-security main
 ↪restricted universe multiverse
deb-i386 https://archive.ubuntu.com/ubuntu trusty-updates main
 ↪restricted universe multiverse

clean https://archive.ubuntu.com/ubuntu
Save the file and start apt-mirror with your edited
mirror.list. Depending on your internet connection, this likely
will take many hours. You'll get a hint of just how long when it tells you how
many gigabytes will be downloaded. Be patient:
$ sudo apt-mirror /etc/apt/mirror.list
Continue your work during this download by opening another shell into the
server. You can configure apache2 while apt-mirror is doing its thing
by creating a symbolic link from the apt-mirror repository to the web
directory that was created automatically when you installed
apache2.
If you haven't already, test to see that the web server is up by pointing your browser to https://10.128.1.6.
If it works, create a new directory at the root of the web server:
$ sudo mkdir /var/www/html/ubuntu
Create a symbolic link from the directory where
apt-mirror stores the
packages to the new directory:
$ sudo ln -s /var/spool/apt-mirror/mirror/archive.ubuntu.com/
↪ubuntu/pool/ /var/www/html/ubuntu
Test it by pointing your browser to https://10.128.1.6/ubuntu. If you see a list of directories, you're all set. Any VMs built with the local sources.list will be able to download packages from this local server once apt-mirror completes. (See the Resources section for more information.)
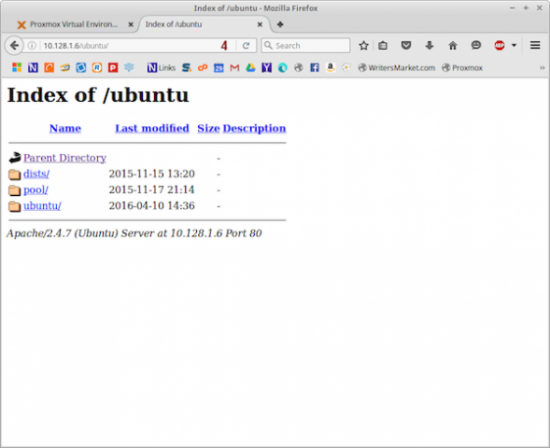
Figure 14. Installing apt-mirror
Set Up DNS (bind9)
If you want to use domain names instead of IP addresses for reaching all your tiny internet machines, it's time to deploy a DNS server. Use the addresses you established as part of your tiny internet schema. Here's a reminder:
-
pve — 10.128.1.2
-
dns01 — 10.128.1.3
-
dns02 — 10.128.1.4
-
mail — 10.128.1.5
-
mirror — 10.128.1.6
-
web01 –10.128.1.7
Start by cloning your VM template. Right-click on the template and select "Clone". The target node will default to "pve" (or whatever you called your Proxmox host). Set the VM ID and name to whatever you want. Leave the auto-incrementing ID as is, and give the VM a name that's the same as the hostname you'll assign. In my example, I used "dns01". Set the Mode to "Full Clone", and set the Target Storage to "local" with "Raw disk image" as the format.
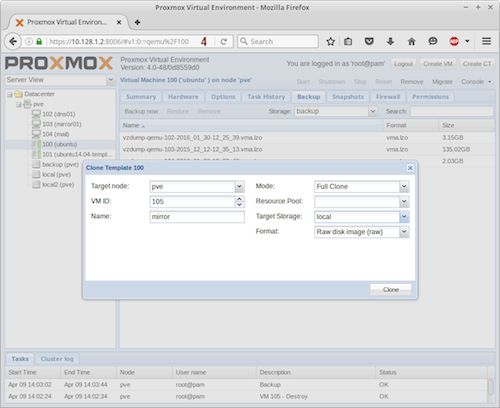
Figure 15. Cloning the Template
It takes less than a minute to spawn a new VM from your template. In its current state, it's exactly like the original "ubuntu" VM—same IP address, same hostname. Of course, you'll need to change those before putting the machine into production:
-
Edit /etc/hosts — change
127.0.1.1 ubuntuto10.128.1.3 dns01.tiny.lab dns01. -
Edit /etc/hostname — change
ubuntutodns01.tiny.lab. -
Edit /etc/network/interfaces — change the
10.128.1.200address to10.128.1.3.
Once you've made these basic changes, reboot, log in and install
bind9:
$ sudo apt-get update
$ sudo apt-get install bind9 bind9utils dnsutils bind9-doc
The main DNS configuration is done in these three files:
-
/etc/default/bind9
-
/etc/bind/named.conf.options
-
/etc/bind/named.conf.local
You'll finish by creating your zone files in /etc/bind/zones. I'm using the "tiny.lab" domain name in all these examples, but you can set the name to anything you want.
Start by adding an IPv4 option:
$ sudo vi /etc/default/bind9
Add the following to the end of the file:
OPTIONS="-4 -u bind"
Make backup copies of the next two files before editing them, then edit /etc/bind/named.conf.options and add your trusted hosts (one for each server and resource you have), and set the options:
acl "trusted" {
    10.128.1.1;
    10.128.1.2;
    10.128.1.3;
    10.128.1.4;
    10.128.1.5;
    10.128.1.6;
    10.128.1.7;
    10.128.0.0/16;
};

options {
    directory "/var/cache/bind";

    recursion   yes;   # enables recursive queries
    allow-recursion     { trusted; };   # allows queries from "trusted"
                                        # clients
    listen-on { 10.128.1.3; };   # dns01 IP address
    allow-transfer { none; };   # disable zone transfer by default

    forwarders {
        8.8.8.8;   # These are Google's DNS servers
        8.8.4.4;
    };

    ...
};
Save the file and create your zones by editing /etc/bind/named.conf.local. This is where you set your domain name, replacing "tiny.lab" with whatever you want:
zone "tiny.lab" {
    type master;
    file "/etc/bind/zones/db.tiny.lab";
    allow-transfer { 10.128.1.4; };  # Setting this for a
                                     # future secondary DNS server
};

zone "128.10.in-addr.arpa" {
    type master;
    file "/etc/bind/zones/db.10.128";
    allow-transfer { 10.128.1.4; };
};
Now create the forward and reverse zone files, placing them in the /etc/bind/zones folder. If it doesn't exist, create it:
$ cd /etc/bind
$ sudo mkdir zones
Copy the default DNS forward and reverse zone config files into that folder, renaming them to match your domain name and IP subnet:
$ sudo cp db.local ./zones/db.tiny.lab
$ sudo cp db.127 ./zones/db.10.128
Edit /etc/bind/zones/db.tiny.lab, and enter your current and future hosts. The file I set up includes comments at the top to remind me of changes I make. I also created entries for my router (10.128.1.1) and a proxy server, which I put on the same box as my dns02. Each time you make modifications, increment the Serial entry before saving. Also note the ".?" after each name. Don't leave those off. You can find more information about DNS in the Resources section at the end of this article, but this will get you started:
; BIND data file for local loopback interface
;
;       20150505        JST     Modified proxy address
;       20160505        JST     Added web01

$TTL    604800
@       IN      SOA     dns01.tiny.lab admin.dns01.tiny.lab. (
                             12         ; Serial
                         604800         ; Refresh
                          86400         ; Retry
                        2419200         ; Expire
                         604800 )       ; Negative Cache TTL
; name servers -- NS records
        IN      NS      dns01.tiny.lab.
        IN      NS      dns02.tiny.lab.

; name servers -- A records
dhcp.tiny.lab.          IN      A       10.128.1.1
pve.tiny.lab.           IN      A       10.128.1.2
dns01.tiny.lab.         IN      A       10.128.1.3
dns02.tiny.lab.         IN      A       10.128.1.4
proxy.tiny.lab.         IN      CNAME   dns02.tiny.lab.
mail.tiny.lab.          IN      A       10.128.1.5
mirror.tiny.lab.        IN      A       10.128.1.6
web01.tiny.lab.         IN      A       10.128.1.7
Save the file and edit the /etc/bind/db.10.128 reverse zone file. The IP addresses for each server under "PTR records" are truncated-looking and can be confusing. Imagine each leading off with an invisible "10.128." to envision the addresses. Again, be sure to increment the Serial entry each time you make a change:
; BIND reverse data file for local loopback interface
;
; 20160505      JST     Added cname for proxy
; 20160505      JST     Added mirror01

$TTL    604800
@       IN      SOA     tiny.lab. admin.tiny.org. (
                             11         ; Serial
                         604800         ; Refresh
                          86400         ; Retry
                        2419200         ; Expire
                         604800 )       ; Negative Cache TTL
;
; name servers -- NS records
        IN      NS      dns01.tiny.lab.
        IN      NS      dns02.tiny.lab.

; PTR records
1.1     IN      PTR     dhcp.tiny.lab.
1.2     IN      PTR     pve.tiny.lab.
1.3     IN      PTR     dns01.tiny.lab.
1.4     IN      PTR     dns02.tiny.lab.
1.5     IN      PTR     mail.tiny.lab.
1.6     IN      PTR     mirror.tiny.lab.
1.7     IN      PTR     web01.tiny.lab.
Save the file and check the syntax of your files by running:
$ sudo named-checkconf
If everything is correct, you'll get no output and no errors. Check the
configurations further with named-checkzone:
$ sudo named-checkzone tiny.lab /etc/bind/zones/db.tiny.lab
$ sudo named-checkzone 128.10.in-addr.arpa /etc/bind/zones/db.10.128
You'll see "OK" if everything checks out. If not, edit the files. Leaving off the trailing ".?" is a common mistake.
Restart bind to get it up and running:
$ sudo service bind9 restart
When bind9 restarts, do a quick check with the
dig utility,
or simply open a browser and navigate to your mirror server at
https://mirror.tiny.lab:
$ dig mirror.tiny.lab
If you see 10.128.1.6 in the dig output, you've succeeded. DNS is
working. You can complete your DNS setup by deploying a second VM or
installing bind9 on a physically separate machine on your tiny internet
network, but it's not strictly necessary at this point. You also can set
this VM to start automatically when your Proxmox host starts, so you have
DNS running whenever your tiny internet is up.
Deploy a Mail Server
Mail servers have two key components: a service that transfers mail and a service that serves up mail. Postfix is a common transfer agent (SMTP), and when coupled with Dovecot, it will provide you with all you need to send and receive mail via IMAP (or POP if you're so inclined).
Deploy another clone of your "ubuntu" template, this time naming
it "mail", making sure the Mode is "Full Clone" and your Target
Storage is "local". Once it's generated, start it up, open a
console,
and update the same basic information you did for your mirror server: set
the static IP address for eth0 as 10.128.1.5, and
change the hostname
to mail.tiny.lab.
Reboot and install Postfix and Dovecot:
$ sudo apt-get update
$ sudo apt-get install postfix
During the install, you'll be prompted to select the type of installation you want. Choose "Internet Site". Follow that by setting the "System mail name" as "mail"—the same as the hostname.
When it's done, install mailutils and Dovecot tools:
$ sudo apt-get install dovecot-imapd dovecot-pop3d
Reply "Yes" to install the self-signed certificate, set the hostname as "mail" and allow the install to complete.
To configure Postfix, run this command:
$ sudo dpkg-reconfigure postfix
You can confirm the entries you made during the Postfix install, and then proceed to set your user name for the "Root and postmaster mail recipient"—in my case, "jtonello". Look over the other destinations from which to accept mail, and add your domain ("tiny.lab"). Don't force synchronous updates on the mail queue, but under the local networks, be sure to add "10.128.1.0/24" to the list. That's the scope you defined for all your machines. If you leave this out, the mail server will reject all incoming mail.
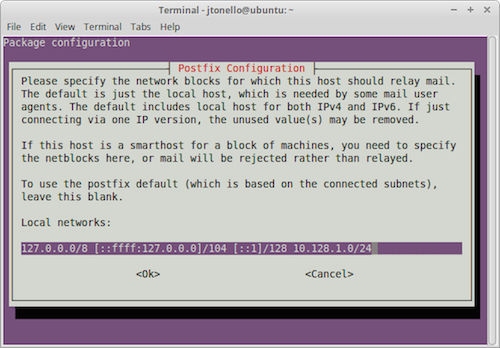
Figure 16. Postfix Configuration
Set the mailbox limits to suit your needs, and set "all" as the internet protocols to use. You'll start with IPv4, but having IPv6 enabled offers future flexibility.
With the basics now in place, check out the main Ubuntu Postfix and Dovecot pages listed in the Resources section for more information.
You'll be able to use any email client with your new mail server, including Thunderbird and Evolution, two common tools that come pre-installed on many Linux distributions. You also might consider installing a web-based mail tool like Roundcube. It provides a great interface and plenty of features that work well with Postfix and Dovecot.
If you want to dig in to the mail configuration, use Webmin. Log in at https://mail.tiny.lab:10000 and look under the Servers tab for the Postfix and Dovecot entries. From there, you can explore and manage the servers easily.
Set Up a Web Server
So far, without possibly being aware, you've installed apache2 on the mirror and mail servers. These allow web connections to those services, but you'll want a more full-featured LAMP stack (Linux, Apache, MySQL and PHP) for building robust websites.
When you first installed Ubuntu from the .iso, you may have noticed a LAMP choice during the applications install step. You definitely can create a VM from scratch and check that box; it'll give you everything you need. However, since you have a nice pre-made VM template, you can use that and add LAMP to it.
Start by cloning your Ubuntu template. Follow the same steps you did with previous clones—change the IP address (10.128.1.7) and hostname (web01). Reboot and open a terminal to install the LAMP components:
$ sudo apt-get install lamp-server^
The caret (^) is important; don't leave it off. As the installers proceed, you'll be asked to create a root password for the MySQL database. Jot it down or put it in your password safe so you don't forget it.
The installation will create the /var/www/html folder and the default index.html. If you point your browser to the machine (either by IP or DNS name if you set it up), you'll see the default Apache2 page. Test the PHP installation by creating a new file in the same directory:
$ sudo vi /var/www/html/phpinfo.php
Add these lines to the file:
<?php
        phpinfo();
?>
Point your browser to the page at https://web01.tiny.lab/phpinfo.php. If you see a page with information, your server is successfully serving up PHP.
To make it easier to work with the MySQL database, install phpMyAdmin:
$ sudo apt-get install phpmyadmin
Select "apache2" as the server to reconfigure automatically, and answer "No" to the next question (because the database is already configured). When the installation is complete, you'll have a very robust web-based tool to manage all your databases. Log in at https://web01.tiny.lab/phpmyadmin with the MySQL user name "root" and the password you set.
If you plan to deploy multiple web servers, go ahead and convert this web01 VM to a template. That way, it will be full-featured and ready with only a few small changes. If you want each VM to use WordPress or another content-management tool, install that before you make your template.
Conclusion
You now have a fully operational tiny internet, complete with a Linux repository; mail, DNS and web servers; and a number of useful tools. Use this setup to explore and learn about Linux. If you mess up a VM server, just deploy another one from your template. Most important, share what you've learned and get others involved, and help spur the curiosity of the next generation of Linux enthusiasts.
Resources
Download PuTTY: https://www.chiark.greenend.org.uk/~sgtatham/putty/download.html
Webmin Downloads: https://webmin.com/download.html and https://prdownloads.sourceforge.net/webadmin/webmin_1.791_all.deb
Setting Up a Mirror: https://www.howtoforge.com/local_debian_ubuntu_mirror_p2
Setting Up DNS (bind9): https://www.digitalocean.com/community/tutorials/how-to-configure-bind-as-a-private-network-dns-server-on-ubuntu-14-04 and https://help.ubuntu.com/community/BIND9ServerHowto
Postfix and Dovecot Installation: https://help.ubuntu.com/community/Postfix and https://help.ubuntu.com/community/Dovecot
Installing Roundcube: https://github.com/roundcube/roundcubemail/wiki/Installation
Install a LAMP Stack: https://help.ubuntu.com/community/ApacheMySQLPHP
TinyProxy How-To: https://tinyproxy.github.io


