Secure Desktops with Qubes: Installation

This is the second in a multipart series on the Qubes operating system. In my first article, I gave an overall introduction to Qubes and how it differs from most other desktop Linux distributions, namely in the way it focuses on compartmentalizing applications within different VMs to limit what attackers have access to in the event they compromise a VM. This allows you to use one VM for regular Web browsing, another for banking and a different one for storing your GPG keys and password manager. In this article, I follow up with a basic guide on how to download and install Qubes, along with a general overview of the desktop and the various default VM types.
Download and Verify the Qubes ISO
You can download the latest version of Qubes here, and on that page, you will find links to download the ISO image for the installer as well as more detailed instructions on how to create a bootable USB disk with the Qubes ISO (currently the latest 3.1 ISO is larger than will fit on a standard DVD, so you will need to stick with a USB-based install for that version).
In addition to the ISO, you also should download the signature file and signing key files via their links on the same download page. The signature file is a GPG signature using the Qubes team's GPG signing key. This way, you can verify not only that the ISO wasn't damaged in transit, but also that someone in between you and the Qubes site didn't substitute a different ISO. Of course, an attacker that could replace the ISO also could replace the signing key, so it's important to download the signing key from different computers on different networks (ideally some not directly associated with you) and use a tool like sha256sum to compare the hashes of all the downloaded files. If all the hashes match, you can be reasonably sure you have the correct signing key, given how difficult it would be for an attacker to Man-in-the-Middle multiple computers and networks.
Once you have verified the signing key, you can import it into your GPG keyring with:
$ gpg --import qubes-master-signing-key.asc
Then you can use gpg to verify the ISO against the signature:
$ gpg -v --verify Qubes-R3.1-x86_64.iso.asc Qubes-R3.1-x86_64.iso
gpg: armor header: Version: GnuPG v1
gpg: Signature made Tue 08 Mar 2016 07:40:56 PM PST using RSA
      ↪key ID 03FA5082
gpg: using classic trust model
gpg: Good signature from "Qubes OS Release 3 Signing Key"
gpg: WARNING: This key is not certified with a trusted signature!
gpg:          There is no indication that the signature belongs
               ↪to the owner.
Primary key fingerprint: C522 61BE 0A82 3221 D94C  A1D1 CB11
                          ↪CA1D 03FA 5082
gpg: binary signature, digest algorithm SHA256
What you are looking for in the output is the line that says "Good signature" to prove the signature matches. If you see the warning like in the above output, that's to be expected unless when you added the Qubes signing key to your keyring, you took the additional step to edit it and mark it as trusted.
Install Qubes
The Qubes installation process is either pretty straightforward and simple or very difficult depending on your hardware. Due to a combination of the virtualization and other hardware support Qubes needs, it may not necessarily run on hardware that previously ran Linux. Qubes provides a hardware compatibility list on its site so you can get a sense of what hardware may work, and the Qubes site is starting to create a list of certified hardware with the Purism Librem 13 laptop as the first laptop officially certified to run Qubes.
Like most installers, you get the opportunity to partition your disk, and you either can accept the defaults or take a manual approach. Note that Qubes defaults to encrypting your disk, so you will need to have a separate /boot partition at the very least. Once the installer completes, you will be presented with a configuration wizard where you can choose a few more advanced options, such as whether to enable the sys-usb USB VM. This VM gets all of your USB PCI devices and acts as protection for the rest of the desktop from malicious USB devices. It's still an experimental option with some advantages and disadvantages that I will cover in a future column. It's off by default, so if you are unsure, just leave it unchecked during the install—you always can create it later.
The install also gives you the option of installing either KDE, XFCE or both. If you choose both, you can select which desktop environment you want to use at login as with any other Linux distribution. Given how cheap disk space is these days, I'd suggest just installing both so you have options.
The Qubes Desktop
Whether you choose KDE or XFCE as your desktop environment, the general way that Qubes approaches desktop applications is the same, so instead of focusing on a particular desktop environment, I'm going to try to keep my descriptions relatively generic so that they apply to either KDE or XFCE.
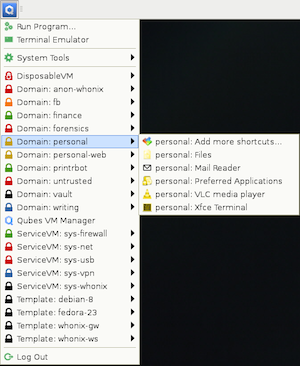
The first thing you may notice is that instead of organizing applications into categories, the Qubes application menu is a list of different classes of VMs. Under each of these VMs is a default set of applications, but note that it isn't a complete list of available applications—that would make the menu too unwieldy. Instead, you choose which applications you want to make available for each VM by selecting Add more shortcuts from that VM's submenu (Figure 1). This brings up a window that allows you to move application shortcuts over to the menu. Note that Qubes detects only applications that provide a .desktop link (the same way they automatically would show up in other desktop environments).

Figure 1. An Example Qubes Desktop Menu
Qubes categorizes VMs in the desktop menu into groups based on their VM type. It's important to understand the purpose of each category, as it will help you make more secure decisions about what to do (and what not to do) in each type of VM. Here are the main categories:
Disposable VM: these also are referred to as dispVMs and are designed for one-time use. When you launch a Disposable VM, it creates a brand-new VM instance based on a template and launches an application (usually a Web browser if launched from the menu, but it could be any application available within the VM's template). When you close that application, all data for that VM is erased. You can open multiple Disposable VMs at a time, and each is run within its own container. Disposable VMs are useful for opening risky e-mail attachments, browsing risky Web pages or any other activity where the chance of being compromised is high. If attackers do happen to compromise your Disposable VM, they had better act fact, because the entire environment will disappear once you close the window.
-
Domain VM: these also often are referred to as appVMs, and they're the VMs where most applications are run and where users spend most of their time. When you want to segregate activities, you do so by creating different appVMs and assigning them different trust levels based on a range of colors from red (untrusted) to orange, yellow, green, blue, purple, grey and black (ultimately trusted). For instance, you may have a red untrusted appVM you use for general-purpose Web browsing, another yellow appVM for most trusted Web browsing that requires a login and still another even more trusted green appVM that you use just for banking. If you do both personal activities and work from the same laptop, appVMs provide a great way to keep work and personal files and activities completely separate.
-
Service VM: service VMs are split into subcategories of netVMs and proxyVMs, and they're VMs that typically run in the background and provide your appVMs with services (usually network access). For instance, the sys-net netVM is assigned all of your network PCI devices and is the untrusted VM that provides the rest with external network access. The sys-firewall proxyVM connects to sys-net, and other appVMs use it for network access. Because sys-firewall acts like a proxy, it allows you to create custom firewall rules for each appVM that connects to it, so you can, for example, create a banking VM that can access only port 443 on your bank's Web site. The sys-whonix proxyVM provides you with an integrated Tor router, so any appVMs you connect to it automatically route their traffic over Tor. You can configure which Service VM your appVM uses for its network (or if it has network access at all) through the Qubes VM Manager.
-
Template VM: Qubes includes a couple different Linux distribution templates from which you can base the rest of the VMs. Other VMs get their root filesystem template from a Template VM, and once you shut the appVM off, any changes you may have made to that root filesystem are erased (only changes in /rw, /usr/local and /home persist). When you want to install or update an application, you turn on the corresponding Template VM, perform the installation or update, then turn it back off. Then the next time you reboot an appVM based on that template, it will get the new application. A compromise of a Template VM would mean a compromise of any appVMs based on that template, so generally speaking, you leave Template VMs off and turn them on only temporarily to update or install new software. You even can change which Template VM an appVM is based on after it is set up. Because only your personal settings persist anyway, think of it like installing a new Linux distribution but keeping your /home directory from the previous install.
Installing Applications
Installing applications in Qubes is a bit different from a regular desktop Linux distribution because of the use of Template VMs. Let's say that you want to install GIMP on your personal appVM. Although you could install the software directly inside the appVM with yum, dnf or apt-get, depending on the distribution the appVM uses, that application would last only until you turn the personal appVM off (and it wouldn't show up in the desktop menu). To make applications persist, you just identify the Template VM the appVM is based from, and then in the desktop menu, you can select the debian-8: Packages or fedora-23: Software option from the menu to start the VM and launch a GUI application to install new software. Alternatively, you also can just open a terminal application from the corresponding template VM and use yum, dnf or apt-get to install the software.
Once you install an application, if it provides a .desktop shortcut and installs it in the standard places, Qubes automatically will pick it up and add it to the list of available applications for your appVM. That doesn't automatically make it visible in the menu though. To add it to the list of visible applications, you have to select the Add More Shortcuts option from within that appVMs menu and drag it over to the list of visible applications. Otherwise, you always can just open a terminal within the appVM and launch it that way.
The Qubes VM Manager
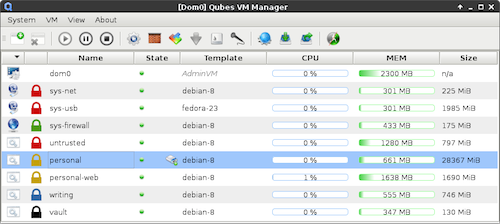
The Qubes VM Manager provides a nice graphical interface for managing all of the VMs inside Qubes. The primary window shows a list of all running VMs, including the CPU, RAM and disk usage, the color you've assigned them, and the template from which they are based. There is a list of buttons along the top that let you perform various operations against a VM you've selected, including creating a new VM or removing an existing one, powering a VM on or off, changing its settings and toggling the list to show only running VMs or all of your VMs.

Figure 2. The Qubes VM Manager with Some Running VMs
You can potentially tweak a lot of different settings with a VM, but the VM manager makes creating new VMs or changing normal settings relatively simple and organized. Some of the main settings you may want to tweak include the color to assign the VM, how much RAM or disk it can have at maximum, what template it uses and to which netVM it is connected. In addition, you can set up custom firewall rules for your VM, assign PCI devices to it and configure your application shortcut menu.
The VM manager is one of the nice points that makes it easier to navigate around what otherwise would be a pretty complicated system of command-line commands and configuration files. That, combined with some of the other Qubes tools like its copy-and-paste method (Ctrl-Shift-c to move from an appVM's clipboard to the global clipboard, highlight the appVM to paste into, then Ctrl-Shift-v to move it to that appVM's clipboard) and its command-line and GUI file manager tools that let you copy files between appVMs, all make an environment that's much easier to use than you might expect given the complexity.
Although this article will get you started with Qubes, where things really get interesting is in how you organize appVMs and divide tasks between them. In my next article, I will go over some of my own approaches to compartmentalization both on my personal and work laptops, and I'll highlight some additional Qubes security features that make it hard for me to go back to a regular old Linux desktop.


