Raspberry Pi: the Perfect Home Server

Ever since the announcement of the Raspberry Pi, sites all across the Internet have offered lots of interesting and challenging uses for this exciting device. Although all of those ideas are great, the most obvious and perhaps least glamorous use for the Raspberry Pi (RPi) is creating your perfect home server.
If you've got several different computers in need of a consistent and automated backup strategy, the RPi can do that. If you have music and video you'd like to be able to access from almost any screen in the house, the RPi can make that happen too. Maybe you have a printer or two you'd like to share with everyone easily? The Raspberry Pi can fill all those needs with a minimal investment in hardware and time.
Raspberry Pi Benefits
Low cost: for $35, the RPi model B is nearly a complete computer with 512MB of RAM, 100Mb Ethernet, an SD card slot, two USB ports, audio out and HDMI or RCA video out. I've seen HDMI cables that cost more than that.
Energy efficient: hardware costs are only one component of a server's expense, because you also need to consider the energy cost to keep the device running constantly. The services needed for home use aren't going to tax the CPU much, and most of the time it will just be idling, waiting for something to do. The RPi's ultra-low power components are a perfect fit for this workload, which helps keep your power bill down. My model B unit plus external hard drive consume only 8 watts total, while the old Athlon-based box it replaced drew 54 watts at idle. Assuming 10 cents per kilowatt hour, that puts the yearly power bill for an RPi at $7 vs. $47 for an Athlon-based machine. The RPi basically pays for itself in less than a year!
Low noise: because the RPi doesn't have fans or moving parts, the only component in your final configuration that generates noise or any appreciable heat will be the hard disk. If you're concerned about noise, enthusiast sites like Silent PC Review often include noise benchmarks in their storage reviews. My experience is that any modern drive is quiet enough to avoid detection anywhere there's something else already running (such as a media center, gaming console or other computer). If your home doesn't provide a lot of flexibility for wiring options, the RPi's small size, minimal thermal output and low-noise footprint may make it possible to sneak in a server where it was difficult to justify one in the past.

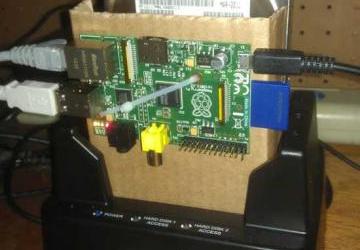
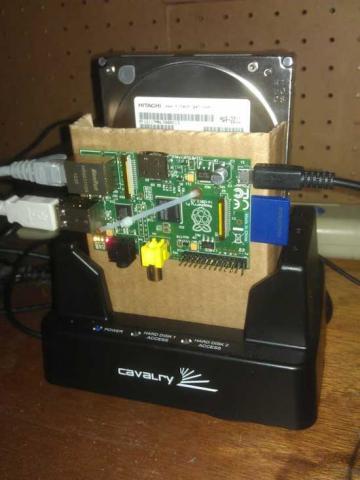
Figure 1. A Compact, but Highly Capable Home Server
New opportunities: a less tangible benefit is the simple joy of trying something new! For me, this was my first time really working on a Debian-based distribution, and it's probably the first time many Linux enthusiasts will have a chance to try an ARM-based architecture.
Arranging the Hardware
For a home server, you'll need a medium-size SD Flash card for local storage. It's possible to use a USB thumbdrive for booting, but that would use up one of the two precious USB slots. The Flash storage card doesn't need to be large, but the faster the better. I chose a name-brand SD card with an 8GB capacity and class 10 speed rating. For backups and multimedia files, a large hard drive with a USB dock is a must. I chose a 1.5TB hard drive and a Calvary EN-CAHDD-D 2-bay USB 2.0 hard drive dock. This dock has a feature to run two drives in RAID-0 mode, which could be useful someday. Finally, the RPi doesn't come with a power supply, but most smartphone chargers supply the required 5v-over-micro USB. To see if the RPi was fussy about the power source, I swapped through three different micro-USB cell-phone chargers for power supplies. I tried each one for about a week, with no issues on any of the units.
Installing the Operating System
Installing the RPi operating system is covered in extensive detail elsewhere, but here are a few home-server-specific tips, roughly in the order needed.
1) Get the Raspbian "Wheezy" install image directly from https://www.raspberrypi.org/downloads, and copy it onto the SD card, using the steps listed on the site.
2) When booting the RPi for the first time, attach a keyboard, mouse and monitor. Don't forget to turn on the monitor before booting the RPi, so that it can detect the correct HDMI or composite output port.
3) The RPi has a nice "raspi-config" screen that you'll see on first boot. For a home server, the following selections will be useful:
-
expand_rootfs: resizes the default 2GB OS image to fill the rest of the Flash card.
-
change_pass: the default password is "raspberry", but something more secure than that would be better.
-
Set your locale and timezone.
-
memory_split: assign the minimum amount possible (16) to the GPU to leave as much room as possible for services.
-
SSH: don't forget to enable the SSH server.
-
boot_behaviour: turn off boot to desktop (again, to save memory for your services).
When finished, you'll be at the pi@raspberrypi prompt. The setup
script can be re-run at any time via sudo raspi-config.
There are just a few more configuration items, and then the operating system is ready to go.
1) A static IP makes everything easier, so switch the network settings for eth0:
>> sudo nano -w /etc/network/interfaces
change the eth0 line iface eth0 inet dhcp to the following
(modify to meet your home network setup):
======/etc/network/interfaces======
...
iface eth0 inet static
address 192.168.1.10
netmask 255.255.255.0
gateway 192.168.1.1
...
======/etc/network/interfaces======
2) Create a local user, and put it in the users and sudo group:
>> sudo adduser YOURUSERIDHERE
>> sudo usermod -a -G users YOURUSERIDHERE
>> sudo usermod -a -G sudo YOURUSERIDHERE
3) Update the system to ensure that it has the latest and greatest copies of all the libraries:
>> sudo apt-get update; sudo apt-get upgrade
4) At this point, you're ready to go headless! Shut down the PI:
>> sudo /sbin/shutdown -h now
Once it's down (monitor the green status LEDs on the RPi circuit board to know when it has finished shutting down), unplug the monitor, keyboard, mouse and power cord. Attach the USB storage, then restart the RPi by plugging the power back in.
5) Once the RPi starts up (again, those green LEDs are the clue to its
state), you can ssh in to the RPi from any other machine on the network
and finish all the configuration remotely from here on out (modify the following for
your static IP):
>> ssh YOURUSERIDHERE@192.168.1.10
Congratulations, you have a working Raspberry Pi!
Peripherals
The first order of business is to get the external storage device mounted.
Use dmesg to look for where the storage device was
found—it
almost certainly will be /dev/sda. I like using automounter to handle
mounting removable storage devices, as it is more flexible about handing
devices that may not be present or ready at boot time:
>> sudo apt-get install autofs
>> sudo nano -w /etc/auto.master
======/etc/auto.master======
...
/misc /etc/auto.misc
...
======/etc/auto.master======

>> sudo nano -w /etc/auto.misc
Note, my external storage device is formatted with ext4—modify this for your needs if required:
======/etc/auto.misc======
...
storage         -fstype=ext4            :/dev/sda1
...
======/etc/auto.misc======
>> sudo /etc/init.d/autofs restart
>> ls -lat /misc/storage
Optionally, create a symlink to shorten the path a smidgen:
>> ln -s /misc/storage /storage
Backup Repository
At the top of any home server feature list is providing rock-solid backups. With the RPi, this is pretty simple, due to the wide range of network-sharing options in Linux: Samba/CIFS for Windows machines, NFS for UNIX-based devices and even SFTP for more advanced backup clients like deja-dup. Because the RPi has only 100Mb Ethernet, and the storage device is on USB, it's not going to have super-fast transfer speeds. On the other hand, good backup clients run automatically and in the background, so it's unlikely that you'll notice the slightly slower transfer speeds.
My home network includes one Windows 7 machine. For it, I exported a backup directory on the RPi's external USB storage device via Samba. Because the backup utility in the basic version of Windows 7 doesn't support network drives as a backup destination, I used SyncBack Free to set up automated, daily backups.
Configuring Samba is simple.
1) Install the samba and common-bin library (which has the smbpasswd utility):
>> sudo apt-get install samba samba-common-bin
2) Use smbpasswd to let your local ID have access:
>> sudo smbpasswd -a YOURUSERIDHERE
3) Edit the samba configuration file:
>> sudo nano -w /etc/samba/smb.conf
4) Change the workgroup = WORKGROUP line to match your Windows
workgroup name.
5) Comment out or delete the [homes] and [printers] share. (Printer sharing will be done later via direct CUPS access.)
6) Add an entry for the Windows backup paths. Here's my example, which I placed at the bottom of the file:
======/etc/samba/smb.conf======
...
[win7pc]
comment=Backup for windows PC
path=/storage/win7pc
writeable=Yes
create mask=0777
directory mask=0777
browsable=Yes
public=Yes
valid users=YOURUSERIDHERE
...
======/etc/samba/smb.conf======
7) Restart Samba to implement your edits:
>> sudo /etc/init.d/samba restart
8) Test connectivity from the Windows machine by mapping a network drive from the file explorer.
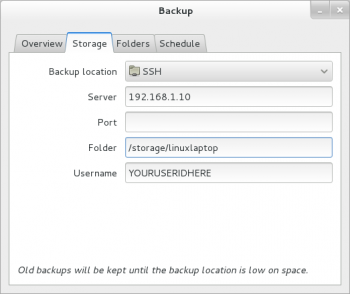
For Linux devices, deja-dup is brilliantly simple to set up and use. It's been installed by default on both my Fedora 18 and Ubuntu 12.10 installs. While the package name is "deja-dup", the front end is simply called "Backup". Although the RPi easily could support NFS export, I've found that using deja-dup's SSH option is easier and more portable, and it eliminates the need for an additional service on the RPi. Specifying a deja-dup encryption password is probably a good idea, unless you like the idea of all your files walking off if someone pockets the storage drive:
>> sudo mkdir /storage/linuxlaptop
>> sudo chown -R YOURUSERIDHERE:YOURUSERIDHERE /storage/linuxlaptop
From the client Linux machine, launch the backup utility, choose "SSH" as the backup location, and enter the RPi's IP address and the storage location you just created. The first backup will be slow, but future runs will be sending only incremental changes, which is significantly faster.

Figure 2. Deja-dup Client Setup
Multimedia Server: DLNA
Now that everyone's files are backed up safely, let's move on to some fun! A DLNA server will give you a central place to store your movies, music and pictures. From this central repository, DLNA clients from every screen in the house can play back this content with ease.
At least, that's the promise. The reality is that the DNLA specs don't quite nail down many important things like which formats or encodings are supported. Each client typically has a slightly different idea of what formats and server features it would like to support. A much higher-power server might be able to transcode local content to device-supported formats on the fly, but that's not possible on the RPi, and the on-the-fly transcoding often messes up other features like pause, fast-forward and rewind. In general, higher-powered devices like the PS3, Xbox and WD TV devices can handle most formats without any transcoding. Lower-end devices like smart TVs or Blu-ray players support a much more limited list of codecs.
For the RPi, your best bet is simply to encode to the standards your primary DLNA device supports and then test your other DLNA clients. If they won't play nicely, the tips in the next section may help. In my case, my PlayStation 3 acts as the DLNA client, which plays nicely with the compact .m4v files generated by Handbrake.
Minidlna is a great choice for the RPi DLNA server. It's already in the Raspbian distribution, is quite simple to set up and uses minimal server resources while running:
>> sudo apt-get install minidlna
>> sudo nano  -w /etc/minidlna.conf
Here are the relevant sections of my /etc/minidlna.conf:
...
# I found keeping video + audio in different paths helpful
media_dir=V,/storage/dlna/video
media_dir=A,/storage/dlna/music
...
presentation_url=https://192.168.1.10:8200/
...
friendly_name=MyRPi
...
# Since I add new media infrequently, turning off
# inotify keeps minidlna for polling for
# content changes. It's simple enough to run
# sudo /etc/init.d/minidlna force-reload
# when new content is added.
inotify=no
Once done editing, tell minidlna to restart and rescan for content:
>> sudo /etc/init.d/minidlna force-reload
Minidlna has the ability to provide movie-poster thumbnails for your movies for devices that support it (like the PS3). It makes finding a specific movie when scrolling through dozens of movie files much more convenient. I've found that the most compatible file layout is to have one directory per movie, containing just the movie file plus the thumbnail image named "Cover.jpg". Using a format like "MovieName.m4v" and "MovieName.jpg" works fine for the PS3, but it breaks VLC (if you can convince the VLC uPNP plugin to find the server in the first place).
From the PS3, you can test connectivity by going to "Video" on the XMB bar. The "friendly_name" you set previously should be visible when scrolling down in the Video section. If you cant find it, test to ensure that Minidlna is up by going to https://192.168.1.10:8200/ with a Web browser.
Multimedia for Non-DLNA Devices
Once you get DNLA working with some of your devices, you may find devices it doesn't want to work with, so a multimedia plan B is a good idea. The nginx Web server has an MP4 plugin that tries to improve streaming over plain-old HTTP, but browser playback performance varied widely, and fast-forwarding within a movie didn't work consistently either. It seems like the lowest common denominator for multimedia sharing across fussy or non-DLNA devices is a good-old-fashioned Samba share with guest read-only access.
Here's an sample section from /etc/samba/smb.conf:
[dlna]
path=/storage/dlna
read only=yes
browsable=yes
public=yes
After defining the share and restarting Samba (sudo /etc/init.d/samba
restart), you can start to test out your clients.
I tested the following clients with a mix of videos encoded with Handbrake as m4v files:
-
Android 4.0.4 phone: "ES File Explorer" with "ES Media Player" (player comes with install).
-
Android 4.1.2 tablet: "ES File Explorer" with "ES Media Player" (player comes with install).
-
Linux devices: automount ://192.168.1.10/dlna, then use VLC or MPlayer.
-
Windows: mount //192.168.1.10:/dlna, then use VLC.
All devices were able to start playing almost instantly and fast-forward with no delays.
Print Server
The RPi runs CUPS quite well, so it's easy to share an older printer that doesn't have native networking features.
Install CUPS and any packages needed by your printer. I needed hplip-cups since I have an HP inkjet printer:
>> sudo apt-get install cups hplip-cups
Update the "Listen" line and add the Allow @LOCAL block to
the Location directives as shown below (so you can use other machines
on your LAN to administer CUPS):
======/etc/cups/cupsd.conf======
#Listen localhost:631  #Comment this out
Listen 192.168.1.10:631 #Add this line
...
<Location />
  Order allow,deny
  Allow @LOCAL
</Location>

# Restrict access to the admin pages...
<Location /admin>
  Order allow,deny
  Allow @LOCAL
</Location>

# Restrict access to configuration files...
<Location /admin/conf>
  AuthType Default
  Require user @SYSTEM
  Order allow,deny
  Allow @LOCAL
</Location>
======/etc/cups/cupsd.conf======
Add your local ID to the lpadmin group so you can administer CUPS:
>> sudo usermod -a -G lpadmin YOURUSERIDHERE
Restart CUPS:
>> sudo /etc/init.d/cups restart
Then, go to https://192.168.1.10:631/ and click "Adding Printers and Classes" to set up your printer. My printer was auto-discovered on the USB, so all I had do to was click "share". Also access https://192.168.1.10:631/admin, and make sure to check "Share printers connected to this system".
Once you're done, you can set up your clients the usual way. My Linux clients auto-discovered the printer and picked the right printer drivers once I entered the hostname. On my Windows 7 machine, once I selected "Network Printer", I had to click "The printer that I want isn't listed", select "Select a shared printer by name" and then enter the URL from the CUPS Web interface: https://192.168.1.10:631/printers/HP_J4500.
Conclusion
With a minimal amount of additional hardware and configuration, the Raspberry Pi can be a highly capable, compact home server. It can bring the wide range of enterprise services offered by Linux into a home environment with minimal hardware expense.


