Mercurial - Revision Control Approximated

A short while ago, an article appeared in Linux Journal implying Git was the be-all and end-all of source code revision control systems ("Git—Revision Control Perfected" by Henry Van Styn, August 2011). I would like to challenge that assumption and declare to the world that the real perfect version control system is here, and its name is Mercurial.
In case you didn't notice it, my tongue was firmly in my cheek in that last paragraph. I think version control systems are like editors. They are all different and fit people and their work habits differently. There is no one perfect system to rule them all. Git may be the perfect fit for some people, and RCS may fit someone else better. This article describes another option to add to the mix. Mercurial provides some of the features of systems like Git, and some of the features of systems like CVS or Subversion. Hopefully, after reading this article, you'll have enough information to make a rational choice as to what is best for you.
The main Mercurial site contains lots of documentation for end users and developers alike. Several tutorials are available, and they even include a series of work flows that cover how end users can use Mercurial for their development projects. Using those, you can see how you could use Mercurial as a solo developer or as one of a group of developers, or how to work with a central repository like CVS. These work flows are great starting points for you to create your own.
First, let's look at what makes up Mercurial. A Mercurial repository consists of a working directory, which is paired with a store. The store contains the history of the repository. Every working directory is paired with its own copy of the store. This means that Mercurial has a distributed system, much like Git. When you commit a series of file changes, a single changeset is created, encapsulating these changes. Each changeset gets a sequential number, called the revision number. But, remember that each working directory gets its own copy of the store, so these revision numbers may not actually match up. For this reason, each revision also gets a 40-digit hexadecimal globally unique ID.

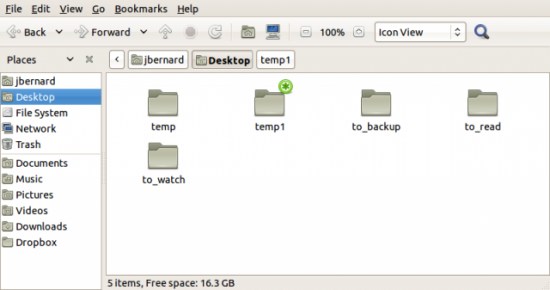
Figure 1. Here you see that Mercurial repositories are tagged for easy finding.

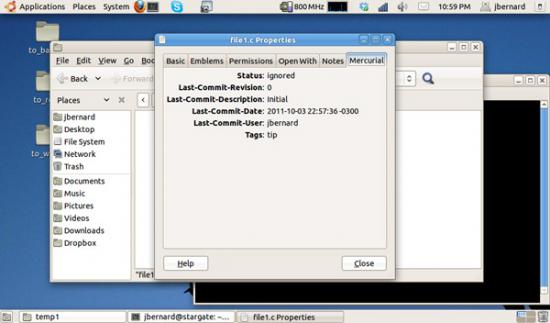
Figure 2. Right-clicking a file and pulling up the properties gives you lots of Mercurial information.
So, what happens when two users are doing parallel development? Assuming they are starting with equal repositories, any committed changes by user one creates a new branch, and any committed changes by user two also creates a new branch. User one then pulls in any changes from user two's repository. This creates two branches in user one's repository: one branch for user one's changes and one branch for user two's changes. User one then needs to merge these two branches together in order to incorporate all the changes since the last synchronization of repositories. User two would need to do the same thing (pull and merge) in order to synchronize the repositories. Changes also can be pushed to another repository.
One of Mercurial's strengths is
its use of extensions. Several extensions are available from the
project, and you always can go ahead and write your own. Extensions
are written in Python, so hone your scripting skills. You can enable these
extensions by adding them to the
[extensions] section of
your configuration file.
So, how do you actually use Mercurial? You probably will want to set some basic configuration options in the .hgrc file. Mercurial needs a user name for recording commits. You can set this option in the configuration file with:
[ui]
username = John Doe <john.doe@company.com>
The first thing to do is to create your local repository. If you are working off a copy from someone else, you would make a clone. The format of the clone command is:
hg clone [OPTIONS...] SOURCE [DEST]
The source option can take several different forms. If the repository you are cloning is on the same machine, you simply can provide the filesystem path to the source repository. Mercurial includes a Web server that can be used to provide access to a repository over HTTP. If you are cloning such a repository, the command simply would be:
hg clone https://[user[:pass]@]somemachine.com[:port]/[path][#revision]
You also can do this over HTTPS. At my work, we keep backup copies of repositories on a machine that is accessible only over SSH. And, that's fine, because Mercurial is perfectly happy cloning over SSH. You can use the following to do so:
hg clone ssh://user@host[:port]/[path][#revision]
You need to have a valid login on the remote machine, of course. The path is relative to your home directory, so if you want to use a full path, you need to start it with two forward slashes:
hg clone ssh://user@host//full/path/to/repo
Creating a new repository is even easier. All you need to do is create
a directory to house all of the files going into your repository. Then,
you can cd to that directory and execute the
following:
hg init
This command creates a subdirectory named .hg, containing all of the store files for your new repository.
Changing your repository's contents is done through the
add and
remove commands. There also is a
rename command you can use
to change the name of a file within your repository. You can use that command
to move files around within your repository as well. Let's say you
want to move a file to subdirectory dir1. You would execute this:
hg rename file1.c dir1
You can get the current state of a file with the
status command. This
will tell you whether a file has been modified, added, removed and so on. The
diff command shows the differences in a file from the current
version and the last committed version. If you decide to toss
away all of these changes, you can use the revert command to reset the
file to the last committed version. Once you are happy with your edits,
you can commit any changes with the commit command.
At the level of the repository as a whole, a lot of commands are
available. When you have done a lot of editing and committed all your
changes to your local copy of the repository, you can send the changes out
to another repository with the push command. The destination for the
push command can have any of the forms shown above
in
the clone command examples.
If the changes of interest were made by another user
at a remote repository, you can use the pull command to grab them and
put them into your local repository.
You may want to check what is going
to happen before merging these changes. Before pushing changes out, you
can use the outgoing command to see what changesets would have been
sent had you actually issued a push command. For pulls, you can use
the incoming command to see what changesets would be brought in had
you issued a pull command. Once this is done, these changes sit in a
separate branch. You then need to merge this branch back in to the main
one in order to incorporate the changes.
But, what if you don't really
have any kind of direct access over the network? You can use the
bundle
command to generate a compressed file containing the changeset. This
can then be transferred, either by e-mail or SneakerNet, to the remote
repository. Once it is there, you can use the
unbundle command to
import the changeset into the remote repository. Again, you can use the
incoming and outgoing
commands, with the --bundle filename option,
to check out the changesets and see what they will do before actually
running the real commands.
As I mentioned earlier, Mercurial includes a Web server that can provide access to your repository over HTTP. It is not appropriate to provide public full-time access to a repository, because it doesn't provide any type of user authentication. In those cases, you would use a real Web server, like Apache, to serve up the repository. But, if you simply want to throw up the server for quick temporary access, or if you are just offering up access internally on a local network and don't need to worry too much about security, this gives you really quick access. You simply need to run:
hg serve [OPTIONS...]
Some of the more common options include -d or
--daemon. This drops
the Mercurial Web server into the background.
You may want to set the
port that it is listening on with the option -p or
--port. The
default port is 8000. You can push and pull from such a Web server. If
you want to serve over HTTPS rather than HTTP, you can use the option
--certificate to set the SSL certificate file to use.
Several clients available for working with Mercurial repositories. For GNOME users, there is a handy one called tortoise. The really great part of this client is that it integrates nicely with Nautilus. This means you can interact with your repository, commit changes, clone it, synchronize it with a remote repository and much more. You also get informational icons within Nautilus, letting you see immediately which files are outdated, changed or whatever their status may be. All of the tools are simply a right-click away. Some great standalone clients also are available, so look around and see what you like.
Hopefully, this introduction gives you some ideas on what you can get done with Mercurial. Now you don't have any excuses for not putting your source code under version control.


