Installing and Running a Headless Virtualization Server

In recent years, hardware virtualization has become commonplace in the computing industry and more available to end users. The idea behind it is a noble one. Why invest in allocating more server hardware and not utilize it to its full potential, when instead you can consolidate it all onto one or a few servers and share their resources?
In this article, I focus on full hardware virtualization. This refers to the creation of a virtual machine with enough simulated hardware to act like a real computer with its own operating system. In turn, this virtual machine, or virtual guest, is enabled and running on top of a host machine. The software that controls virtualization is called the hypervisor. The hypervisor runs on the host machine.
Virtualization typically is used to consolidate hardware servers, reduce energy consumption, simplify server management and ease migration/recovery (in the situation of a failure). It sometimes is accomplished with hardware that needs to be accessed remotely, as the hardware may reside in what may not be a local data center. With that in mind, the hardware's operating system also may be configured without a graphical environment (meaning one that also includes a lack of attached monitor and input devices). This commonly is referred to as running headless. This article assumes that you have Secure Shell or SSH access to what will become the host machine.
Preparation
Prior to configuring the virtual machines, install the appropriate packages from your distribution's package repository. These packages include the libvirt library that provides a simple virtualization API, client-side utilities to access the library and manage the virtual machines, a Python virtual machine installer utility and the userspace components to the kernel-based virtual machine (KVM).
Note: libvirt is an open-source API, dæmon and management utility for managing platform virtualization. KVM is a virtualization infrastructure that turns the Linux kernel into a hypervisor. It requires a processor with hardware virtualization extensions.
Depending on your distribution, the package names may differ. On Red Hat/CentOS, they are labeled as libvirt, libvirt-client, python-virtinst and qemu-kvm. On Debian/Ubuntu, they are labeled as libvirt, libvirt-bin, python-virtinst and qemu-kvm.
Enable the libvirt dæmon to run on all appropriate runlevels at system boot up and manually start the service:
$ sudo /sbin/chkconfig libvirtd on
$ sudo /sbin/service libvirtd start
Starting libvirtd daemon:                   [  OK  ]
View the status of the dæmon and validate that it is running:
$ sudo /sbin/service libvirtd status
libvirtd (pid  2482) is running...
When the libvirt package is installed, /var/lib/libvirt/ is used as the default location for all virtual machines and related files. If you prefer to relocate this to a more redundant and sometimes external piece of storage hardware, you are welcome to do so. However, for this article, I'm going to continue with the default and place the operating system's installation ISO image in the /var/lib/libvirt/boot/ directory path.
Installing a Virtual Machine
Before beginning, view the list of locally installed virtual machines. Assuming that this is following a fresh installation, there shouldn't be any listed:
$ sudo /usr/bin/virsh list --all
 Id    Name                           State
----------------------------------------------------
With libvirt, virtual machines are defined by a specially formatted
XML file. You can read more on this XML format at the libvirt project
site. Fortunately enough, you don't have to touch the XML code and
can rely on virt-install. The virt-install utility is used to provision
new virtual machines and reduce most if not all complications.
For instance, if you want to define a new virtual machine named CentOS6.5-vm1 with one virtual CPU, 512MB of RAM and so on, you can do so in the following way:
$ sudo /usr/sbin/virt-install \
> --name CentOS6.5-vm1 \
> --description "CentOS 6.5 64 bit VM1" \
> --ram=512 \
> --vcpus=1 \
> --cpu host \
> --hvm \
> --disk path=/var/lib/libvirt/images/centos6.5-vm1,size=3 \
> --cdrom /var/lib/libvirt/boot/CentOS-6.5-x86_64-minimal.iso \
> --graphics vnc

Starting install...
Allocating 'centos6.5-vm1'               | 3.0 GB     00:00
Creating domain...                       |    0 B     00:00
Cannot open display:
Run 'virt-viewer --help' to see a full list of available command
line options. Domain installation still in progress. You can
reconnect to the console to complete the installation process.
The --cpu host option optimizes the CPU properties for the VM by exposing
the host's CPU's configuration to the guest, while the
--hvm option
requests the library for the use of full hardware virtualization. The
--cdrom option points to the installer disc image,
and the --disk option
gives the name (with absolute location) and size (in gigabytes) of the virtual
disk. The --graphics option allows VNC access to the virtual machine,
which will be utilized later in this article. Other supported options
include network configuration, boot priorities and more.
Re-list all locally installed virtual machines. Listed will be your newly created machine, and it is currently in a "running" state:
$ sudo /usr/bin/virsh list --all
 Id    Name                           State
----------------------------------------------------
 1     CentOS6.5-vm1                  running
Note: the virt-install manual page showcases many examples of utility usage and invocation.
Managing the Virtual Machine
Once the virtual machine(s) is/are defined, the virsh utility provides
the administrator with all the facilities required to manage the virtual
machines.
I already covered listing virtual machine, with their domain ID, name and state:
$ sudo /usr/bin/virsh list --all
 Id    Name                           State
----------------------------------------------------
 -     CentOS6.5-vm1                  shut off
To start an already shut down virtual machine, type:
$ sudo /usr/bin/virsh start CentOS6.5-vm1
Domain CentOS6.5-vm1 started
To reboot an already running virtual machine, type:
$ sudo /usr/bin/virsh reboot CentOS6.5-vm1
Domain CentOS6.5-vm1 is being rebooted
When a virtual machine is running, it will be assigned a domain ID. This domain ID also can be used to manage a virtual machine. For instance, the same reboot command can be invoked the following way:
$ sudo /usr/bin/virsh reboot 1
Domain 1 is being rebooted
To shut down the virtual machine, type:
$ sudo /usr/bin/virsh shutdown 1
Domain 1 is being shutdown
Sometimes, a virtual machine may become unresponsive and will not
adhere to your reboot or shutdown requests. This is where the
destroy
command comes into play. To force a complete shutdown of the virtual
machine, type:
$ sudo /usr/bin/virsh destroy 1
Domain 1 destroyed
To pause a virtual machine, type:
$ sudo /usr/bin/virsh suspend 1
Domain 1 suspended

$ sudo /usr/bin/virsh list --all
 Id    Name                           State
----------------------------------------------------
 1     CentOS6.5-vm1                  paused
To resume an already paused virtual machine, type:
$ sudo /usr/bin/virsh resume 1
Domain 1 resumed

$ sudo /usr/bin/virsh list --all
 Id    Name                           State
----------------------------------------------------
 1     CentOS6.5-vm1                  running
If there is ever a scenario in which you need to remove a virtual machine completely, you must undefine it. In order to undefine a virtual machine, it must be in a shut-off state. To undefine a virtual machine, type:
$ sudo /usr/bin/virsh undefine CentOS6.5-vm1
Domain CentOS6.5-vm1 has been undefined

$ sudo /usr/bin/virsh list --all
 Id    Name                           State
----------------------------------------------------
The virsh command also is capable of providing the user with domain,
network and more details/functionality. Read through
the manual page to learn more of these features.
Securely Access the Virtual Machine
Now you have reached what may be considered the most important piece
to the puzzle—that is, accessing the newly created virtual machine
from a remote location. This is where you will connect to the running
virtual machine to install, configure and use the guest operating
system. The easiest way to accomplish this is by using the virt-viewer
utility. Install this from your distribution's package repository, and
connect to the virtual machine via SSH:
$ sudo /usr/bin/virt-viewer --connect=qemu+ssh://192.168.1.89/system
 ↪-- CentOS6.5-vm1
Note that this utility also may be launched from the Applications menu
in your preferred desktop environment. Also, to toggle the keyboard
and mouse capture state to/from the virtual machine, the virt-viewer
defaults to the Ctrl-Alt key press.
When dealing with such technologies, security becomes an increasingly important topic, and it's advised to share public SSH keys between client nodes accessing the virtual machines on the server. This way, authentication and access can and will be limited only to authorized users and from authorized machines. Another area worth some attention is the firewall and ensuring that iptables allows access over specified ports from specified addresses, denying all else.

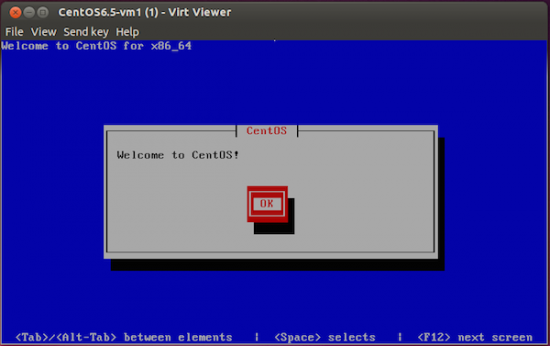
Figure 1. Using virt-viewer to Connect to the Virtual Machine
Connect to the virtual machine and proceed with the operating
system's installation process. When completed, the installer will
reboot the recently installed operating system, and the CD-ROM image
will eject automatically. If you noticed that the virtual machine did
not restart and you are unable to reconnect with virt-viewer, using the
examples highlighted in the previous section, check that the virtual
machine is running. If not, restart it. Your newly installed operating
system should boot and run as if it were installed on native hardware.
Additional Notes
A virtual machine can be enabled to autostart on the host system's bootup. To accomplish this, invoke the following:
$ sudo /usr/bin/virsh autostart 1
Domain 1 marked as autostarted
List the domain's information to see this option now enabled:
$ sudo /usr/bin/virsh dominfo 1

[ ... ]
Autostart:      enable
[ ... ]
To disable it, type:
$ sudo /usr/bin/virsh autostart --disable 1
Domain 1 unmarked as autostarted
Summary
Whether you are running multiple hosted services or virtual clients on limited hardware, or taking advantage of an isolated development environment, hardware virtualization has shown that it is capable of many great things. Run one or more virtual machines on a single server or on multiple servers within a cluster and with high availability enabled. There is no limit to what can be accomplished with few and sometimes limited limited hardware resources.
Resources
-
libvirt: https://www.libvirt.org
-
man 1 virsh -
man 1 virt-install -
man 1 virt-viewer


