Fun and Mayhem with the Blender Game Engine

Create 3-D games using the keyboard or mouse as controllers.
I've been working with Blender 3-D for several years now, but I started playing with the game engine only recently. I've had a lot of fun with it, and I'm sure you will as well. With the Blender Game Engine (BGE), you can create 3-D games using the keyboard or mouse as controllers. Your game can trigger events when objects collide with each other or when they get within a certain distance from each other. There is a built-in state engine, so that objects in your game can change their behavior as required. Although there is a powerful and well-documented Python API, we won't be using it today. In fact, we won't be writing a single line of code!
In the April 2009 issue of Linux Journal, I wrote an article demonstrating the Irrlicht 3-D engine by creating a basic 3-D environment in less than 100 lines of C. In this article, I demonstrate the BGE by creating a functional video game, complete with realistic physics, and all I'm going to do is connect dots.
One of the biggest attractions of the BGE is the built-in Bullet Physics Engine. The physics engine allows users to assign various physical characteristics, such as mass, to objects in their blender model and configure how they respond to collisions and movement. When done properly, users end up with blocks that fall when dropped and tumble when they collide. Balls roll down hill, and dominoes knock each other down.
In order to demonstrate the important aspects of the BGE and the Bullet Physics Engine, I've devised a little game that I affectionately call The Super Mega Demolition Derby. The premise of the game is simple; you build walls and towers and such with various types of building materials. Then, you drive a car through them and watch them crumble to pieces! Okay, so I don't know how you'd actually go about keeping score in a game like this, but games are supposed to be fun, and based on how much time I've spent destroying block walls, I think this is a fun game.
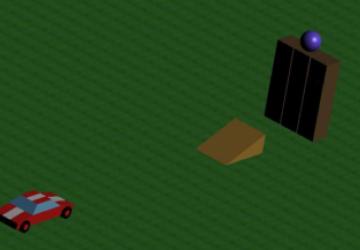
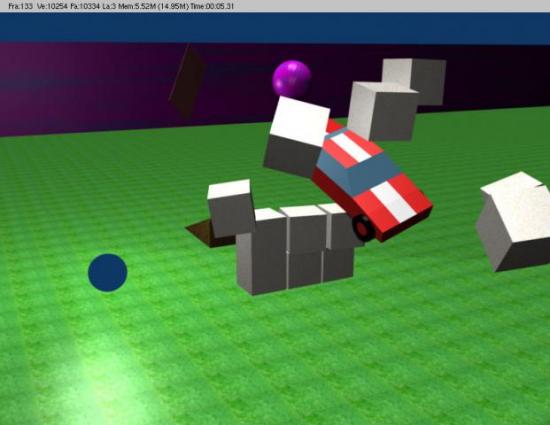
Figure 1 shows an action shot from one of the test animations I made while playing the game. As you can see, the modeling and texturing are very simplistic (this isn't meant to be a modeling tutorial). I'm sure you can see that this is the classic "drive a car over a ramp and through a wall" stunt. To set up this stunt, I created three stacks of blocks, stacked four high. I put the purple ball on top. Then, I positioned a ramp in front of the wall and put the car a bit further out. Once the lighting and camera angles were set up, I started the game and drove the car up the ramp.

Figure 1. Action Shot from a Test Animation
The first step in creating the game is to create a model for all of the various objects. The arena is simply a 100x100 plane. I then extruded the edges to create a fence to prevent the car from driving off the edge of the arena. The car was created from a cube that was scaled and extruded to form a very basic car shape. The rest of the game objects are fairly trivial.
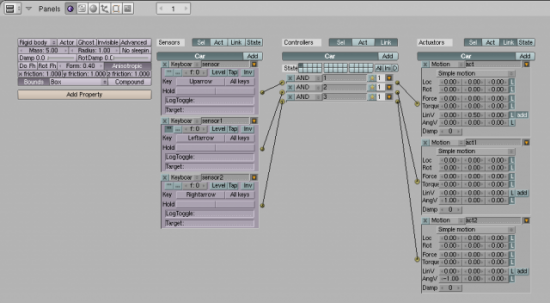
Once the game objects are finished, it's time to start the game logic. Because the car has both physical attributes and keyboard controls, it's the most complicated, and this is where we'll start. Selecting the car and pressing F4 brings up the Logic menu. The configuration I used for the car is shown in Figure 2. Here you see three columns of controls. The first column is where you configure the object's physical attributes, which I discuss later. For now, let's take a look at the Sensors, Controllers and Actuators columns.

Figure 2. Logic Panel
The Sensors column is where you select to which events you are interested in having your game object respond. In this case, you can see that the car responds to the up, left and right arrow keys. The keyboard sensor allows you to configure various parameters, such as repeat rates and keyboard modifiers. Game objects also can respond to mouse events, collisions, proximity to other objects, timers and messages sent from other objects.
Sensors are connected to controllers, which function essentially as filters and determine when a given sensor is of interest. As you can see, I selected the boolean logic equivalent to "always" in determining when the car should respond to keyboard events. I could have referenced Python code or any of the 30 different game states if I had chosen to, but that just introduces more complexity than the game requires. The state engine could have been used to introduce traps, puzzles and other hidden elements to the game. Implementing actual intelligence probably would have required some Python code.
The Actuators column is where the action comes from. Although I used "simple motion" for the car's keyboard events, the possibilities are a bit daunting at first. I had the option of changing the object's location and rotation along the X, Y or Z axis. I also had the option of applying a force or torque. Finally, I had the option of changing the object's linear and angular velocities. By selecting the L at the right, I told the BGE to use the object's Local orientation to apply the motion changes, as opposed to using global coordinates.
Getting the car's handling to "feel" right took a bit of tuning, and as it is, it's still a bit more like driving in slick mud than driving in a grassy arena. More tuning needs to be done before it's right. On the other hand, I was able to use a material setting to add random bumps to the driving surface that caused the car to bounce around a bit.
The BGE allows you to do more than just move objects around. You can use actuators to make sounds, send messages to other objects, create and destroy objects, change game state, change cameras or even start an animation sequence. It is hard to come up with something that can't be done with the actuators that the BGE provides. For example, I've considered the possibility of creating a series of actuators that destroy a box object and replace it with an identical-looking box that has the "Explode" modifier applied to it. This would allow me to create a box that explodes upon impact, but I've not tried it.
Now that you have a car you can drive around, you need to make it and the other game objects behave according to the laws of physics. This is done using the controls in the first column of the Logic panel in Figure 2. The first thing you have to do is decide what type of object you want, which essentially determines "how many" of the physical laws apply to the object. You have several types from which to choose, including static, dynamic, rigid body, soft body and sensor.
A static object responds to collisions, but it's not affected by gravity. I configured the ramp as a static object, for example. This way, the ramp would respond realistically if a car ran into it from behind, but I could also "stack" ramps in otherwise impossible configurations in order to build more complex obstacle courses.
Dynamic objects are just like static objects except that they're affected by gravity. They are not subject to rolling physics. When I initially set the car as dynamic, I found it didn't drive up the ramp as I expected. It resembled more of an escalator ride to the top of the ramp, because the car didn't tilt as it crossed the ramp.
When I configured my car to be a rigid body, I had everything. The car would fly off the ramp, fall to the ground and roll if it hit too hard or hit something on its way down. Most of the objects in the game are configured as rigid bodies.
The soft body type was fun to play with. By tweaking various parameters, I was able to come up with a giant beach ball that bounced and deformed when dropped. By loosening things up a bit more, I ended up with a giant ball of Jell-O, and who hasn't dreamed of driving a car through a giant ball of lime Jell-O? I know I have. This is the type to use on objects you want to deform upon impact.
A sensor is simply an object that can be used to trigger events but doesn't necessarily need to have the entire laws of physics applied to it. For example, a sensor could be used to spring a trap, release an enemy or simply change the state of the game upon collision. In this game example, a sensor object could be placed in the middle of a platform to trigger an elevator to rise when the car is positioned properly
Once you've determined what type of object you want, it's time to tune various parameters. For example, you can determine how much mass the object has, which will determine if it falls like a feather or a proverbial ton of lead, as well as how it behaves when it collides with other objects. By clicking on the Advanced button, you also can set limits on how fast the object can move, among other things. One of the most important things to tweak is the Bounds configuration. This configuration determines how collision detection is done. I found that if I used a spherical bounds for my car, things just didn't work well—the car ended up rolling down the path to the ramp instead of driving along.
You also can use the physics panel to assign various properties to an object. For example, you might assign a "damage" property to the car and assign an initial value of 0 to it. Then, for each collision, you could create an actuator that increased this value. Finally, you can use the property as a sensor and trigger an action when it exceeds a certain value.
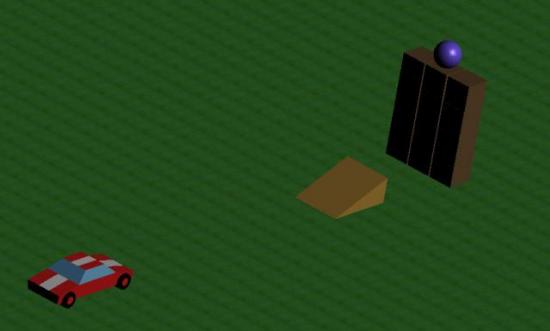
So, what do we have so far? Figure 3 is a screenshot of the game from another camera angle—it's a car that can be driven around in an environment that includes several different obstacles. This car (as well as the obstacles in the game) has physical properties, such as linear and angular momentum, mass and elasticity. All of these objects behave as you would expect them to behave in a real-life situation.
From this, I'm expecting to create even more interesting objects for the game. For example, I imagine that a very low mass object like a playing card could be created easily. From that, a house of cards could be constructed and subsequently destroyed. Dominoes, although fun to watch, are so trivial to create, they're almost uninteresting. In my opinion, beach balls and giant globs of Jell-O certainly warrant further investigation.

Figure 3. Screenshot of the Game
By parenting the camera to the car, I've been able to devise a cockpit view or a third-person view. Using this view, I could drive around the arena just like any other driving simulation. The only drawback was that once I drove the car through a wall, I wasn't able to watch it tumble to the ground unless I quickly turned the car around. It might be nice to set up several cameras, strategically place them in the game and create keyboard triggers to select them. Still, this is very easy to do with the BGE.
As you can see, the BGE is very powerful and doesn't require any programing to get started. However, if you know or are willing to learn Python, you can do a lot more interesting things. Tutorials on the Web demonstrate how to use Python code to create projectile weapons, for example. I've already alluded to the idea of using Python code to endow game objects with artificial intelligence. The BGE Python API also is very well documented. In fact, the BGE is the sole reason I've set out to learn Python.
As cool as it is, the BGE does have some limitations. Like Blender itself, the BGE is extremely powerful, and although they're both well documented, getting started can be a bit intimidating. The water and cloth simulations don't function in the game engine. I also note that the objects in this game don't cast shadows. I've not been able to figure out how to fix that, yet. The biggest challenge I faced with the BGE was the fact that object textures don't always seem to work the same in the BGE as they do in the render engine. Obviously, because the BGE is generating screen images in real time, some compromises have to be made. I eventually got satisfactory results, but sometimes I had to resort to UV mapping the texture onto the object to get it to work properly. Maybe I'm missing something.
As you can see, the BGE and Bullet Physics Engine are extremely powerful and configurable ways to create life-like game environments quickly. My initial plan for this article was to use a simple flight simulation as a demonstration. Once I started writing, I decided that a flight simulation just didn't fully demonstrate the power of the BGE.
Other types of games are well suited to writing with the BGE. For example, a billiards game is an obvious choice. Perhaps an off-road or monster-truck-driving simulation would be fun. Not having to write code in order to get game objects to behave intuitively means you can concentrate on creating interesting games with realistic content, and that is really cool.
Resources
Blender: https://www.blender.org
"3-D Graphics Programming with Irrlicht" by Mike Diehl, LJ, April 2009: https://www.linuxjournal.com/article/10294


