Four Hidden Tools in Scribus

Scribus is a powerful tool, but its menus are poorly laid-out. While you can usually find the features you most frequently use without any trouble, others may be hidden almost anywhere. From the Extras, Script, and Windows menus to the Document Setup dialog, useful features can be positioned almost anywhere, with only the most token regard for logic.
The tools described here are ones that took some time for me to discover in Scribus. None are worth more than a few hundred words of description, but I mention them here because all of them can be useful to know.
The Scribus Calendar Wizard
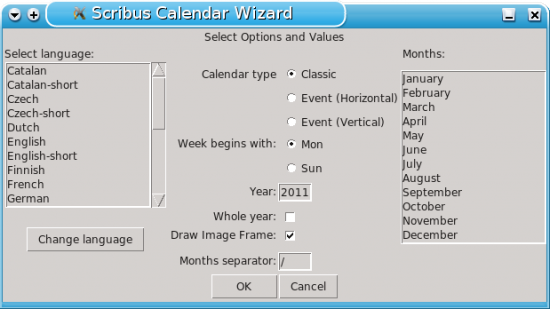
For some reason, Scribus' Python scripting capabilities haven't encouraged a wide variety of extensions. However, of those that are available, probably the most useful is the calendar wizard.

As packaged in most distributions, the calendar wizard is available from Script -> Scribus Scripts. If it's not included in your version, you can download it. You might also open it from /usr/share/scribus/scripts and follow the online directions for modifying it.
To produce a calendar, select the language and the layout options, the year, and the months to include (there's a check box if you want the entire year). When you click the OK button, the script starts a new document, with the days of the month laid out on each page and half the page reserved for a graphic. All you need to do is add the graphics, and, perhaps, change the fonts. The only way the wizard could be simpler is if it loaded a list of holidays and automatically added them, instead of leaving you add them manually.
Replace Colors
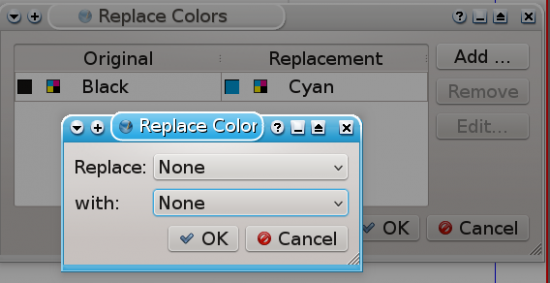
Replace colors works with the colors defined for use in a document (excluding those found in images. It can be a considerable time-saver when you are experimenting with variations of the same design.

To exchange one color for the next, select the objects with which you want to work, holding down the Shift key if you want to select multiple objects. Then select Edit -> Replace Colors. In the simple dialog, you can quickly exchange one color for another. Possibly, you will need to define the exact color you want with Edit -> Color before replacing a color.
Adding Barcodes
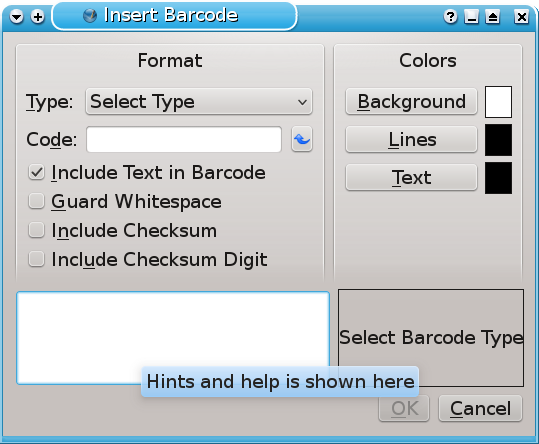
Scribus has one of the handiest tools for barcodes that I have ever seen. You can open the dialog window by selecting Insert -> Barcode.

Scribus supports eighteen separate types of barcode, and provides a brief help pane for each one, explaining both the formatting and how it is used. Besides typing in the actual code, the dialog includes some basic formatting for the background, lines, and text of the code.
After you click the OK button, drag the cursor across part of the document, as if you were drawing a frame. The barcode is created in a frame, floating freely to the right of the current page. Like any other object in Scribus, the bar code can be dragged into position with the mouse, and edited by pressing the F2 key or selecting Properties from the context menu.
Sections
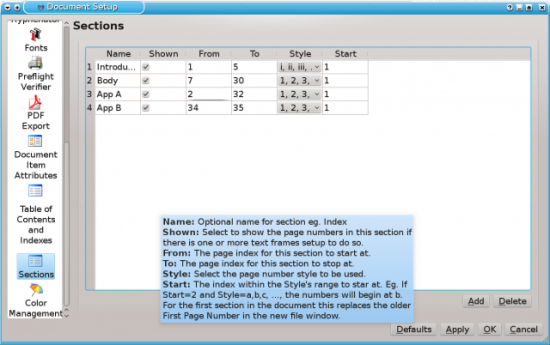
Sections in Scribus serve two purposes. First, sections allow you to number pages in part of the document differently from the rest. For example, you might want to number the introduction with lower case Roman numerals, and the rest of the document in Arabic numerals. You might also want to start the pages with Arabic numerals at 1, instead of continuing the count from the introduction.

Second, you can use sections to include different versions of a document within a single file. One case in which this ability would be useful is if you were writing a test for students and wanted a marker's guide. You could include both in the same file, then use sections to conceal the marker's guide before you printed out copies of the test for students.
To do either function, go to File ->Document Setup -> Sections. There, you can name a section (always a good idea, since using sections can get complex), and whether it displays or not. You can also add the range of pages in the section, the numbering style for the pages, and the first page number in the section.
Use the Add button to create a new section. The page numbering assumes that the first page of each section is a right page, so, when a page range is created autmatically for a new section, it will skip a page if the range for the previous section ends with an odd number. You can manually change the page numbering, but for printing you will probably not want to.
For page numbers to display, of course, you need to create a text frame on a page -- typically a header or a footer -- and select Insert ->Character -> Page Number. This addition should usually be done on a master page.
Keep Exploring
The more I work with Scribus, the more I believe that it's a powerful collection of tools, but badly in need of re-organization. I have to wonder why the calendar wizard, for example, isn't a template choice that becomes available when you create a new document, or why the sections dialog isn't included in the Page menu.
However, until a re-organization happens, the best thing you can do is explore constantly, and keep the possibilities in mind. You can usually find the tool you need for design somewhere in Scribus -- but, too often, you have to explore almost randomly to find it. At times, even a Misc. menu would be preferably to the present arrangement.


