Build a Large-Screen Command Center with the RPi 2
When the folks who make the Raspberry Pi made good on their plan to release a multi-core version of the tiny computer with 1GB of RAM earlier this year, I saw it as the perfect opportunity to put the single-board Linux box to work—real work—in our company's network operations center.
NYSERNet, Inc., is an optical networking company that provides high-speed connections for New York state's leading universities and research centers. Part of our job is to keep an eye on a fiber network that stretches from Buffalo to New York City. If something does down, we need to know quickly.
In the past, we had a walk-up command center that featured ten wall-mounted 19-inch monitors powered by two large-form Windows PC towers loaded with heavy-duty video cards and enough VRAM to make everything work. The screens showed network maps, data-center views and weather, among other things.
But during a recent office remodel, we decided all the cabling, clunky-looking PCs and video-card sharing needed to go. We wanted the new space—with two new 50-inch Ultra HD monitors instead of the army of 19-inchers—to be clean and uncluttered, and to offer staff and visitors a nice sense of "Aw, cool!"
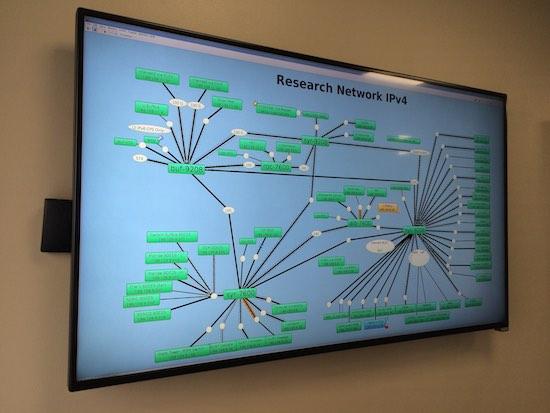
Figure 1. A 50-inch Vizio TV displays a NYSERNet, Inc., network map in high resolution, powered by a Raspberry Pi 2 Model B, the small black box to the left. The RPi is shown pulled out from its normal hiding space behind the screen (photo by John S. Tonello).
Enter the Raspberry Pi 2 Model B.
With its powerful new four-core processor and double the RAM of its immediate predecessor, the RPi seemed to be the perfect computer not only to drive our large new 4K monitors, but also to run several important applications used by the NOC team, including a Java-based network map, Iceweasel (a Firefox Web browser derivative) and InterMapper, a proprietary network monitoring tool. Raspbian, a Debian derivative that fits well with our Ubuntu shop, would be an ideal choice for the OS.
Before we could dive in and turn over a very public—and necessary—system to a pair of $35 RPis, I had to make sure they had enough video power to drive the large televisions. After all, we needed the 4K resolution in order to get the pixel depth necessary for sharp screen views and enough graphical real estate to accommodate the applications we'd be running. The old ten-screen setup featured a different application window on each monitor; the two-screen setup needed to show just as many windows.
I ran some preliminary tests on an HP Mini running Windows 8.1 and on the RPi 2 Model B. The Mini could muster only 1080p, but I found the RPi could indeed provide the resolution I wanted with its built-in full-size HDMI port and on-board Broadcom graphics. I also found I could do it without having to set the poor RPi on fire by overclocking it to the max.
Choosing the RPis
For this project, I needed two RPis, one for each new large-screen TV. You easily can set up more. I ordered two of the latest Raspberry Pi 2 Model B kits, which each included a computer, an 8GB SD card, a vented plastic case and a USB power supply. This particular RPi is ideal because it's powerful enough to run high-resolution video and our network-monitoring applications simultaneously. The previous RPi B+ with 512MB of RAM didn't provide quite enough horsepower for what I needed. If you don't need the Ultra HD resolution, an older RPi may work fine.
The rest of this article assumes you know how to set up a Raspberry Pi. If not, I've listed a good article in the Resources section that explains how to do it. I used Raspbian as my base OS.
Once your RPi is up and running, it's a good idea to connect it to your network. If something goes wrong with the video settings during this setup, you'll want another way to edit the configuration files. Giving the RPi an address on your network and setting up SSH will do just that.
If you're able to find a kit with a pre-installed Raspbian (or NOOBS) SD card, that'll work fine. Other flavors, such as Arch Linux ARM and Pidora, also may be good options, since this solution relies more on the RPi's base configuration and less on the OS that sits on top of it.
All told, the kits cost about $65 each. I purchased a couple 12-inch HDMI cables too—one for each RPi-TV pair.
Choosing the Screens
It was important to get high-resolution screens for this project, and after a bit of shopping, I settled on the Vizio 50-inch 4K Ultra HD LED Smart TV (P502UI-B1E). It features 3840x2160 resolution, a 120Hz refresh rate and the 16:9 aspect ratio I wanted. It didn't hurt that this particular television came in at less than $800 delivered.
Configuring the RPi
Using the raspi-config tool (built in to Raspbian), you can fine-tune how the computer handles memory, video display and a host of other RPi parameters. For my purposes, I used it to work with three things:
-
Overclocking
-
Overscan
-
Memory Split
By the way, these settings also can be modified by editing /boot/config.txt, so if you don't have raspi-config on your distribution, you can set the parameters using the configuration file. The /boot/config.txt on an RPi is sort of equivalent to BIOS on other computers, and there's good Raspbian documentation available for it. For more information, I've included a link about it in the Resources section.
To start with the modifications, launch raspi-config:
$ sudo raspi-config
Overclocking is option 7 in the first menu; Overscan and Memory Split are options A1 and A3 under the Advanced Options menu. Start with Overclocking (Figure 2).
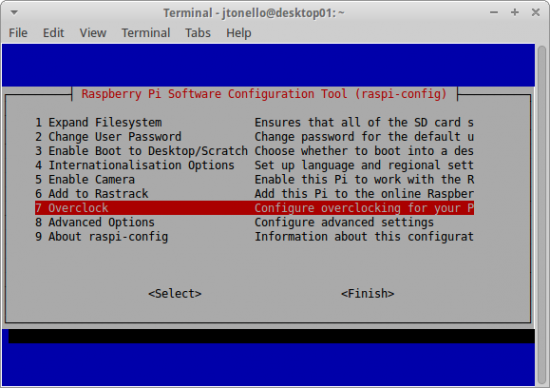
Figure 2. Overclock
After reading the warning, press Enter to acknowledge it (Figure 3). It's important to know that overclocking can make weird things happen to your RPi, so be careful.
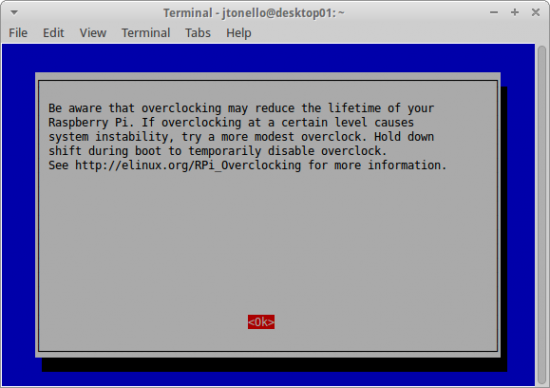
Figure 3. Overclocking Warning
You'll be offered six overclocking options. Each offers an increasing level of speed—and heat. Although the RPi 2 Model B is rated at 900MHz, I went ahead and chose the Medium overclock preset, which offers 900MHz ARM, 250MHz core, 450MHz SDRAM and 2 overvolt (Figure 4).
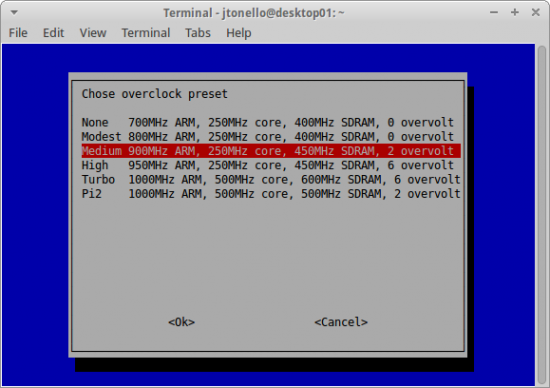
Figure 4. Choosing Overclock Preset
After experimenting with the basic settings (no overclocking), I found that this medium overclocking made the applications run a little faster, meaning the human experience of using the RPi was better.
If your applications are less resource-heavy, you probably can skip overclocking altogether. However, even multiple Iceweasel windows or tabs can hog system resources and may lead you to want a little more oomph. Remember, the RPi is being asked to do quite a bit of graphical processing that will use memory and cycles.
Select Medium, tab to Ok and press Enter, and you'll be back at the main raspi-config menu.
Now it's time to make two Advanced Options configuration changes: overscanning and memory. First, let's look at overscanning.
When you first connect your RPi to a monitor and boot it, you may see black bars on the screen. These are unused pixels, and overscan is disabled by default to give you a sort of graphical safe mode. If your display is newer (like my two 4K TVs), you safely can disable overscan and allow the RPi to use all the screen real estate.
Select Advanced Options in the main raspi-config menu, and choose Overscan (A1) from the list (Figure 5). You have two options: disable or enable. Choose Disable, and tab to Ok to return to the main menu.
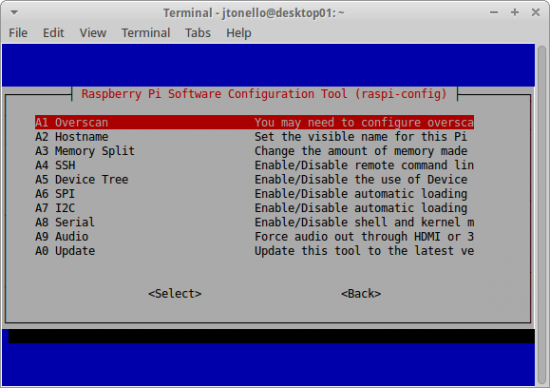
Figure 5. Overscan
It's often hard to know if overscan will mess things up, so this is a good point to save what you've done and reboot the RPi. Select Finish from the main menu. That'll drop you to your command prompt:
$ sudo reboot
If your screen looks okay on reboot (no black bars, no odd pixelation and
no weird flashing), you should be good to go. If it's screwed up,
or screwed up enough that you can't read anything, you'll need to
ssh
in to the RPi from a separate computer and re-run raspi-config from
there. In this unlikely event, repeat the previous steps from a remote
shell and choose the Enable overscan option.
Configure Memory Split
Now you can make the modification that will make the biggest difference for this project—changing how the RPi allocates its 1GB of on-board memory:
$ sudo raspi-config
Enter the Advanced Options menu again, this time selecting the Memory Split (A3) option (Figure 6).
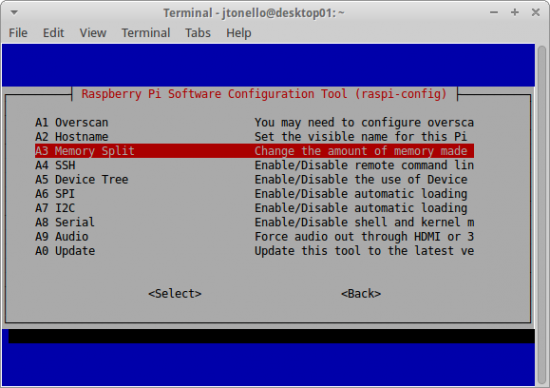
Figure 6. Memory Split
You'll be offered several choices: 16, 32, 128, 256 and 512. Out of the box, the RPi commits 64MB of its 1GB to the GPU. That's not nearly enough to give the pixel resolution we want. After some experimenting, I found that maxing out the memory for the GPU (512) worked best (Figure 7).
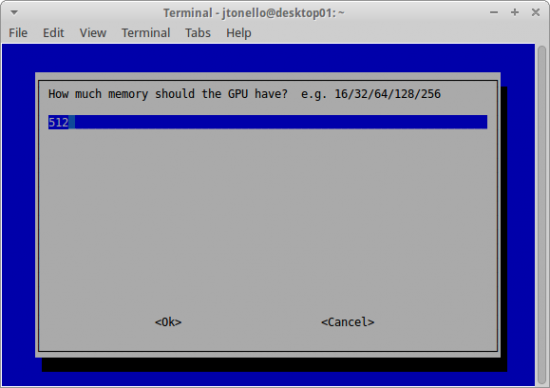
Figure 7. Maxing Out the Memory
This relatively massive amount of video memory delivers the graphical performance you'll need for Ultra HD screens. Still, don't expect it to perform like a desktop. Some graphical lag will remain when you resize or move application windows.
Tab to Ok, tab to Finish and return to the command line. Reboot to make the memory changes take effect.
Modify the Boot Configuration
Once the overscan, overclocking and memory split modifications are complete, the rest of the heavy lifting for this project is done in the boot configuration script: /boot/config.txt. See the Resources section for a link to the complete description of all its features.
Use your favorite text editor to open the file as root:
$ sudo vi /boot/config.txt
The in-file documentation is helpful and will give you easy-to-follow tips about the various parameters. In this file, you'll also see some of the changes you previously made using raspi-config. If you didn't use raspi-config, you can make the necessary modifications to overscan, overclocking and memory split in the following steps.
First, disable overscanning:
disable_overscan=1
If you set this in raspi-config, this already will be uncommented and
set to 1. Below that entry, you'll see overscan adjustments. These
all should be commented out. The same goes for the
framebuffer_width
and framebuffer_height settings. Unless you have a particular display
in mind, comment out these lines:
# uncomment this if your display has a black border
# of unused pixels visible and
# your display can output without overscan
disable_overscan=1

# uncomment the following to adjust overscan. Use
# positive numbers if console goes off screen,
# and negative if there is too much border
#overscan_left=16
#overscan_right=16
#overscan_top=16
#overscan_bottom=16
If the RPi doesn't automatically detect your HDMI display, uncomment
the hdmi_force_hotplug=1 line. That should fix it.
In order to get the RPi to support the Ultra HD screen resolution, you'll
need to use hdmi_group and
hdmi_mode to enable custom settings. The
hdmi_group parameter sets the type of display you're using: 0 will
auto-detect, 1 will set CEA (typical for televisions), and 2 will set DMT
(typical for monitors).
Although I'm using a Vizio TV, I needed to set
hdmi_group to 2:
# Set monitor mode to DMT
hdmi_group=2
Depending
on the screen you choose, you may need to experiment with these settings
a bit. Remember, if something goes wrong and you no longer can read the
screen, ssh in to your RPi and back out your
changes.
Driving the Vizio TV requires a custom resolution that is not offered in any of the preset modes, so you'll need to set the HDMI output format to 87, a custom mode:
# Make our custom resolution the default
hdmi_mode=87
For a complete list of hdmi_mode values (including
resolution and frequency), see the
Config.txt link in the Resources section of this article.
With the custom mode set, you now need to add the specific parameters for Coordinated Video Timings (CVT). The format is:
hdmi_cvt=<width> <height> <framerate> <aspect>
 ↪<margins> <interlace> <rb>
So, a simplified version of this entry for the 3840x2160 Vizio TV looks like this:
hdmi_cvt 3840 2160 24
Again, you can modify these settings to match your screen's parameters. It's much like adjusting the screen resolution on any computer monitor—width, height and framerate are key.
I also set the framebuffer width and height to match my
hdmi_cvt width
and height, and then set a high pixel frequency limit:
max_framebuffer_width=3840
max_framebuffer_height=2160
hdmi_pixel_freq_limit=400000000
After some trial and error, these settings worked well. Additional details are available in the RPi Config (see Resources).
If you didn't use raspi-config to set overclocking and the GPU memory split, add those parameters to the end of /boot/config.txt now:
arm_freq=900
gpu_mem=512
Your entire /boot/config.txt settings now should look something like this:
disable_overscan=1
hdmi_group=2
hdmi_mode=87
hdmi_cvt 3840 2160 24
max_framebuffer_width=3840
max_framebuffer_height=2160
hdmi_pixel_freq_limit=400000000
arm_freq=900
gpu_mem=512
Save /boot/config.txt and reboot. When the RPi comes back up, you should have the high-resolution view you want.
Deploying a second RPi is as simple as duplicating the SD card from the RPi you just set up and plugging it in to a second RPi. (See Resources for information on how to do that.)
Mouse and Keyboard Sharing
Because I have both RPis running in graphical mode, I need a keyboard and mouse, but in the NYSERNet, Inc., command center, eliminating clutter is an important goal. When it came time to control the RPis, I didn't want a bunch of keyboards and mice lying around. I wanted just one of each, and I wanted those to control the two computers wirelessly. The answer was SSH and its x2x feature. (See Resources for a full Linux Journal x2x how-to.)
With x2x, you can move the mouse (and keyboard focus) from one RPi to the other, one monitor to the other, as though the screens were attached to a single computer. It's fast and seamless.
I attached a Bluetooth USB dongle to the primary RPi I called rpi01. It was immediately detected by the system and connected my Bluetooth keyboard and mouse. I tested the functionality with the window manager, and everything worked fine, although I needed to adjust the mouse speed a bit so it would traverse the vast desktop more quickly.
The RPi is friendly to most modern Bluetooth USB adapters, so you should
be able to get one to be plug-and-play. From there, you'll want to share
the mouse and keyboard with your secondary RPi (in my case, rpi02). Since
rpi01 was my "primary" RPi, and I wanted to connect to rpi02,
my "secondary" RPi located to the left (or
-west) of the other,
I opened a terminal on rpi01 and entered the following:
pi@rpi01:~$ ssh -X pi@rpi02 x2x -west -to :0
This example assumes you're logged in to your primary RPi as the user pi and you want to connect to your secondary RPi as the user pi. Another way of putting it is this: if your Bluetooth mouse and keyboard are working on rpi01 and you want to connect to rpi02 at 192.168.1.11, issue the command:
pi@rpi01:~$ ssh -X pi@ 192.168.1.11 x2x -west -to :0
The :0 indicates the primary display. Once connected, the mouse
now will move seamlessly from one screen to the other, and the focus for the
keyboard will follow. If you want, you can create a script and drop it
on the desktop of the primary RPi so you quickly can run SSH x2x after
a reboot.
For those who want to do this from two or more systems that don't use Linux, Synergy is a good choice. It's a $10 application that works across Linux, Mac and Windows.
Set Up VNC as a Remote-Control Alternative
If you'd rather not have any keyboard and mouse cluttering your public space where you plan to hang your monitors (or because you just don't use them with the RPis very much), a good alternative to SSH x2x is VNC.
It used to be rather difficult to set up VNC on Linux and access the active session, but that changed with the advent of the vino package. Now, in-session VNC works right out of the box with a simple graphical control panel.
Use your package manager to install vino on each target RPi. Once installed, open a terminal and run the vino setup utility:
$ vino-preferences
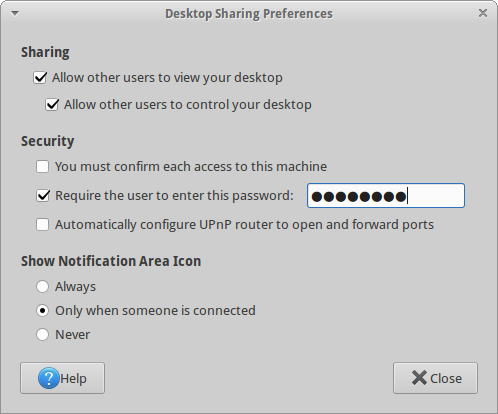
Figure 8. VNC Desktop Sharing Preferences
Under Sharing, enable both "Allow other users to view your desktop" and "Allow other users to control your desktop". Uncheck "You must confirm each access to this machine", so you don't have to acknowledge the connection on the target RPi. Also check "Require the user to enter this password", and enter a password to thwart any unauthorized access.
Click close and reboot the RPi. This will ensure that vino-server will start. In future boots, vino-server will start automatically. Again, the goal here is to set up these RPis so you can do everything remotely and not have to log in to start basic services.
Once the RPi reboots, repeat the vino package install and setup on any additional RPis you're using, then go to your desktop and install a VNC-compatible remote-desktop client. There are many options for all platforms, but I prefer Remmina on my Linux Mint 17 desktop. Remmina supports VNC and RDP, and it makes it easy to throttle the graphical resolution and connection speeds to customize the remote-user experience.
Use your package manager to install Remmina. It comes with VNC support out of the box, but you also can install remmina-plugin-vnc manually.
Once installed, launch Remmina from the command line by entering
remmina (or open the graphical control panel):
$ remmina
Create a new connection with appropriate parameters (Figure 9).
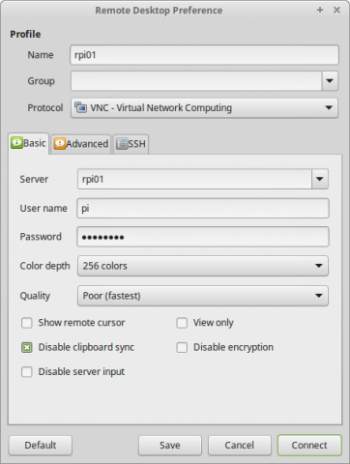
Figure 9. Creating a Profile
Create a profile for each RPi to which you want to connect. Give each profile a name, ensure that you've selected the VNC protocol, enter the server address for the RPi, use the default RPi account (usually pi unless you've changed it), and set the color depth and quality.
I used a color depth of 256 colors and "Poor" quality, because I wanted a better remote-user experience. If you get greedy with the color and quality, the RPi will struggle a bit to redraw and refresh the VNC window, which is about four times the size of a typical desktop monitor.
Click Save or Connect, and you'll connect to your RPi. Be patient. I've found that this connection is not instantaneous even across a fast LAN. It takes several seconds. Once connected, you can use Remmina to show a full-screen view and use its window sliders to navigate to areas of the RPi desktop that don't fit on your smaller desktop monitors.
Before hanging the new 50-inch TVs in our command center, I did my final testing with everything still on the ground. I booted each RPi, installed and launched the applications I needed, tested the networking and the remote connections, and left the whole thing running for a few days. Once I felt confident everything was stable, we hung the screens on low-profile wall-hangers, connected the RPis with the short HDMI cables and tucked them behind the TVs. Anyone looking sees only the monitors; the rest is neatly hidden away.
Final Thoughts
Because your RPis probably are sitting on a network, it's a good idea to secure them with a firewall. I set up some iptables rules that block almost all traffic.
Also, to make the RPis even easier to maintain, you may want to install Webmin, a free Web-based administration tool for Linux environments. It works well under Raspbian and doesn't hog resources when it's not in use.
Resources
NOOBS RPi Config: https://www.raspberrypi.org/documentation/installation/noobs.md
Config.txt Documentation: https://www.raspberrypi.org/documentation/configuration/config-txt.md
RPi Config Documentation: https://elinux.org/RPiconfig
Duplicate SD Card: https://www.raspberrypi.org/forums/viewtopic.php?f=91&t=46911
Linux Journal x2x How-To: https://www.linuxjournal.com/content/share-keyboardmouse-between-multiple-computers-x2x
Synergy Mouse and Keyboard Sharing: https://www.synergy-project.org


