Ansible, Part IV: Putting It All Together
Roles are the most complicated and yet simplest aspect of Ansible to learn.
I've mentioned before that Ansible's ad-hoc mode often is overlooked as just a way to learn how to use Ansible. I couldn't disagree with that mentality any more fervently than I already do. Ad-hoc mode is actually what I tend to use most often on a day-to-day basis. That said, using playbooks and roles are very powerful ways to utilize Ansible's abilities. In fact, when most people think of Ansible, they tend to think of the roles feature, because it's the way most Ansible code is shared. So first, it's important to understand the relationship between ad-hoc mode, playbooks and roles.
Ad-hoc Mode
This is a bit of a review, but it's easy to forget once you start creating playbooks. Ad-hoc mode is simply a one-liner that uses an Ansible module to accomplish a given task on a set of computers. Something like:
ansible cadlab -b -m yum -a "name=vim state=latest"
will install vim on every computer in the cadlab group. The
-b
signals to elevate privilege ("become" root), the
-m means to use the
yum module, and the -a says
what actions to take. In this case,
it's installing the latest version of vim.
Usually when I use ad-hoc mode to install packages, I'll follow up with something like this:
ansible cadlab -b -m service -a "name=httpd state=started
 ↪enabled=yes"
That one-liner will make sure that the httpd service is running and set to start on boot automatically (the latter is what "enabled" means). Like I said at the beginning, I most often use Ansible's ad-hoc mode on a day-to-day basis. When a new rollout or upgrade needs to happen though, that's when it makes sense to create a playbook, which is a text file that contains a bunch of Ansible commands.
Playbook Mode
I described playbooks in my last article. They are YAML- (Yet Another Markup Language) formatted text files that contain a list of things for Ansible to accomplish. For example, to install Apache on a lab full of computers, you'd create a file something like this:
---

- hosts: cadlab
  tasks:
  - name: install apache2 on CentOS
    yum: name=httpd state=latest
    notify: start httpd
    ignore_errors: yes

  - name: install apache2 on Ubuntu
    apt: update_cache=yes name=apache2 state=latest
    notify: start apache2
    ignore_errors: yes

  handlers:
  - name: start httpd
    service: name=httpd enable=yes state=started

  - name: start apache2
    service: name=apache2 enable=yes state=started
Mind you, this isn't the most elegant playbook. It contains a single
play that tries to install httpd with yum and apache2 with apt. If
the lab is a mix of CentOS and Ubuntu machines, one or the other of the
installation methods will fail. That's why the
ignore_errors command
is in each task. Otherwise, Ansible would quit when it encountered an
error. Again, this method works, but it's not pretty. It would be much
better to create conditional statements that would allow for a graceful
exit on incompatible platforms. In fact, playbooks that are more complex
and do more things tend to evolve into a "role" in Ansible.
Roles
Roles aren't really a mode of operation. Actually, roles are an integral part of playbooks. Just like a playbook can have tasks, variables and handlers, they can also have roles. Quite simply, roles are just a way to organize the various components referenced in playbooks. It starts with a folder layout:
roles/
  webserver/
    tasks/
      main.yml
    handlers/
      main.yml
    vars/
      main.yml
    templates/
      index.html.j2
      httpd.conf.j2
    files/
      ntp.conf
Ansible looks for a roles folder in the current directory, but also in a system-wide location like /etc/ansible/roles, so you can store your roles to keep them organized and out of your home folder. The advantage of using roles is that your playbooks can look as simple as this:
---

- hosts: cadlab
  roles:
    - webserver
And then the "webserver" role will be applied to the group "cadlab" without needing to type any more information inside your playbook. When a role is specified, Ansible looks for a folder matching the name "webserver" inside your roles folder (in the current directory or the system-wide directory). It then will execute the tasks inside webserver/tasks/main.yml. Any handlers mentioned in that playbook will be searched for automatically in webserver/handlers/main.yml. Also, any time files are referenced by a template module or file/copy module, the path doesn't need to be specified. Ansible automatically will look inside webserver/files/ or /webserver/templates/ for the files.
Basically, using roles will save you lots of path declarations and include statements. That might seem like a simple thing, but the organization creates a standard that not only makes it easy to figure out what a role does, but also makes it easy to share your code with others. If you always know any files must be stored in roles/rolename/files/, it means you can share a "role" with others and they'll know exactly what to do with it—namely, just plop it in their own roles folder and start using it.
Sharing Roles: Ansible Galaxy
One of the best aspects of current DevOps tools like Chef, Puppet and Ansible is that there is a community of people willing to share their hard work. On a small scale, roles are a great way to share with your coworkers, especially if you have roles that are customized specifically for your environment. Since many of environments are similar, roles can be shared with an even wider audience—and that's where Ansible Galaxy comes into play.
I'll be honest, part of the draw for me with Ansible is the sci-fi theme in the naming convention. I know I'm a bit silly in that regard, but just naming something Ansible or Ansible Galaxy gets my attention. This might be one of those "built by nerds, for nerds" sort of things. I'm completely okay with that. If you head over to the Galaxy site, you'll find the online repository for shared roles—and there are a ton.
For simply downloading and using other people's roles, you don't need any sort of account on Ansible Galaxy. You can search on the website by going to Galaxy and clicking "Browse Roles" on the left side of the page (Figure 1). There are more than 13,000 roles currently uploaded to Ansible Galaxy, so I highly recommend taking advantage of the search feature! In Figure 2, you'll see I've searched for "apache" and sorted by "downloads" in order to find the most popular roles.
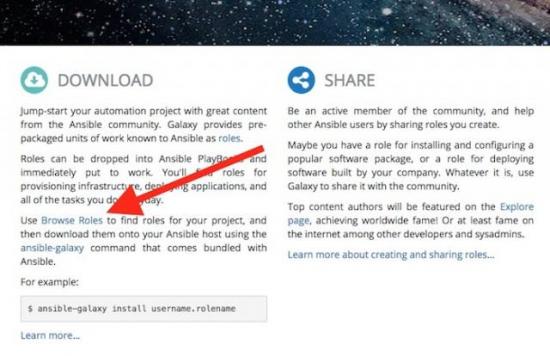
Figure 1. Click that link to browse and search for roles.
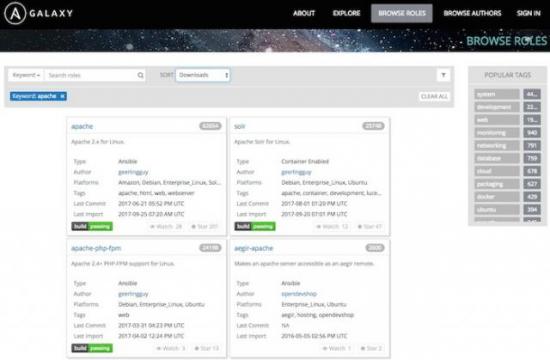
Figure 2. Jeff Geerling's roles are always worth checking out.
Many of the standard roles you'll find that are very popular are written by Jeff Geerling, whose user name is geerlingguy. He's an Ansible developer who has written at least one Ansible book that I've read and possibly others. He shares his roles, and I encourage you to check them out—not only for using them, but also for seeing how he codes around issues like conditionally choosing the correct module for a given distribution and things like that. You can click on the role name and see all the code involved. You might notice that if you want to examine the code, you need to click on the GitHub link. That's one of the genius moves of Ansible Galaxy—all roles are stored on a user's GitHub page as opposed to an Ansible Galaxy server. Since most developers keep their code on GitHub, they don't need to remember to upload to Ansible Galaxy as well.
Incidentally, if you ever desire to share your own Ansible roles, you'll need to use a GitHub user name to upload them, because again, roles are all stored on GitHub. But that's getting ahead of things; first you need to learn how to use roles in your environment.
Using ansible-galaxy to Install Roles
It's certainly possible to download an entire repository and then unzip the contents into your roles folder. Since they're just text files and structured folders, there's not really anything wrong with doing it that way. It's just far less convenient than using the tools built in to Ansible.
There is a search mechanism on the Ansible command line for searching the Ansible Galaxy site, but in order to find a role I want to use, I generally go to the website and find it, then use the command-line tools to download and install it. Here's an example of Jeff Geerling's "apache" role. In order to use Ansible to download a role, you need to do this:
sudo ansible-galaxy install geerlingguy.apache
Notice two things. First, you need to execute this command with root
privilege. That's because the ansible-galaxy command will install roles
in your system-wide roles folder, which isn't writable (by default)
by your regular user account. Second, take note of the format of roles
named on Ansible Galaxy. The format is username.rolename, so in this
case, geerlingguy.apache, which is also how you reference the role
inside your playbooks.
If you want to see roles listed with the correct format, you can use
ansible-galaxy's search command, but like I said, I find it less than
useful because it doesn't sort by popularity. In fact, I can't figure
out what it sorts by at all. The only time I use the command-line
search feature is if I also use grep to narrow down roles by a single
person. Anyway, Figure 3 shows what the results of
ansible-galaxy search
look like. Notice the username.rolename format.
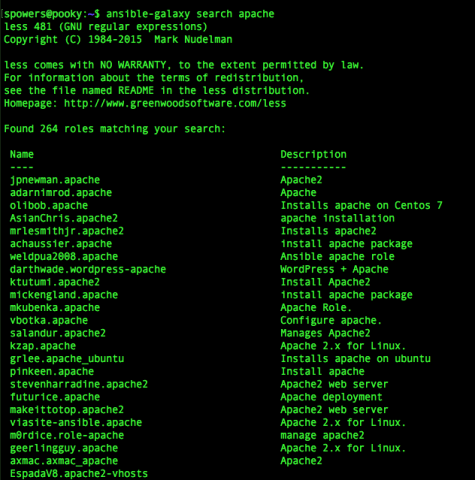
Figure 3. I love the command line, but these search results are frustrating.
Once you install a role, it is immediately available for you to use in your own playbooks, because it's installed in the system-wide roles folder. In my case, that's /etc/ansible/roles (Figure 4). So now, if I create a playbook like this:
---
- hosts: cadlab
  roles:
    - geerlingguy.apache
Apache will be installed on all my cadlab computers, regardless of what distribution they're using. If you want to see how the role (which is just a bunch of tasks, handlers and so forth) works, just pick through the folder structure inside /etc/ansible/roles/geerlingguy.apache/. It's all right there for you to use or modify.

Figure 4. Easy Peasy, Lemon Squeezy
Creating Your Own Roles
There's really no magic here, since you easily can create a roles folder
and then create your own roles manually inside it, but
ansible-galaxy
does give you a shortcut by creating a skeleton role for you. Make sure
you have a roles folder, then just type:
ansible-galaxy init roles/rolename
and you'll end up with a nicely created folder structure for your new role. It doesn't do anything magical, but as someone who has misspelled "Templates" before, I can tell you it will save you a lot of frustration if you have clumsy fingers like me.
Sharing Your Roles
If you get to the point where you want to share you roles on Ansible Galaxy,
it's fairly easy to do. Make sure you have your role on GitHub (using
git is beyond the scope of this article, but using git and GitHub is a
great way to keep track of your code anyway). Once you have your roles
on GitHub, you can use ansible-galaxy to "import" them into the publicly
searchable Ansible Galaxy site. You first need to authenticate:
ansible-galaxy login
Before you try to log in with the command-line tool, be sure you've visited the Ansible Galaxy website and logged in with your GitHub account. You can see in Figure 5 that at first I was unable to log in. Then I logged in on the website, and after that, I was able to log in with the command-line tool successfully.
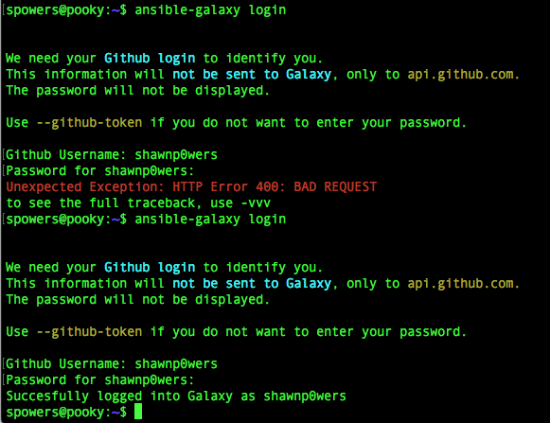
Figure 5. It drove me nuts trying to figure out why I couldn't authenticate.
Once you're logged in, you can add your role by typing:
ansible-galaxy import githubusername githubreponame
The process takes a while, so you can add the
-no-wait option if you
want, and the role will be imported in the background. I really don't
recommend doing this until you have created roles worth sharing. Keep
in mind, there are more than 13,000 roles on Ansible Galaxy, so there are many
"re-inventions of the wheel" happening.
From Here?
Well, it's taken me four articles, but I think if you've been following along, you should be to the point where you can take it from here. Playbooks and roles are usually where people focus their attention in Ansible, but I also encourage you to take advantage of ad-hoc mode for day-to-day maintenance tasks. Ansible in some ways is just another DevOps configuration management tool, but for me, it feels the most like the traditional problem-solving solution that I used Bash scripts to accomplish for decades. Perhaps I just like Ansible because it thinks the same way I do. Regardless of your motivation, I encourage you to learn Ansible enough so you can determine whether it fits into your workflow as well as it fits into mine.
Resources
Here are links to the first three articles in this series by Shawn Powers:


