Android Programming with App Inventor
Drag and drop your way to Android programming.
MIT App Inventor, re-released as a beta service (as of March 5, 2012) by the MIT Center for Mobile Learning after taking over the project from Google, is a visual programming language for developing applications for the Android mobile computing platform. It is based on the concept of blocks, and applications are designed by fitting together blocks of code snippets. This may sound like a very childish way of programming, especially for seasoned readers of Linux Journal. But then again, App Inventor will tickle the child programmer in you and make you chuckle at the ease with which you can develop applications for your Android device. In this article, I describe how to use the camera on the Android device, develop e-mail and text-messaging-based applications and also show how to use location sensors to retrieve your current geographical location. Let's get started.
Getting Started
App Inventor has minimum setup requirements and is completely browser-based. You need a working Java installation on your system, as it uses Java Web Start for its functioning. Point your browser to https://appinventor.mit.edu, and once you sign in with your Google account, you should see a screen as shown in Figure 1. This is called the Projects Page where you can see your existing projects and create new ones.

Figure 1. App Inventor's Projects Page
Now, let's develop and deploy an Android application using App Inventor and in the process learn the basic development-deployment cycle. Create a New Project using the New Project button, and enter a name for your project, say "Project1". Now you should see the Designer window for your project. The Designer window is composed of four sub-components. The Palette on the leftmost side of the window is the placeholder for all the available components for your project. The Viewer is where the application will be designed by placing together various components (this is where you design the user interface for your application). The Components show the currently used components in your project, and the Properties column is where you assign the properties of the components.
First, let me briefly explain the notion of components. An App Inventor project is made up of building blocks called components, such as a text label to display text, a text box to take user inputs, a camera component to click pictures and so on. Currently, you will see a few categories of components—basic components, such as those for user input and display of text to more specialized components, such as those for displaying media and animations, and components acting as an interface to the device sensors. A complete reference for all the components is available at https://appinventor.mit.edu/learn/reference/index.html. Components have associated behavior, methods and properties. Some of the properties can be set; whereas others can be only read.
In this first project, let's use the following components: Camera, Button and Image. The code usually shows it better, but briefly here is what you're going to do: clicking the button starts the camera on your device, which you use to click a picture, which then is displayed using the Image component. Here are the steps:
-
Drag a Camera component from the palette to the Viewer. It should show up under Non-visible components below the Viewer. By default, it will be named as Camera1, which you can, of course, change to something else.
-
Drag a Button to the Viewer, and from the Properties, change its Text to "Click".
-
Drag an Image component onto the Viewer.
-
You can play around with the Screen properties to set things like title, background color and orientation. For the purpose of this project, set the Title to "Click!".
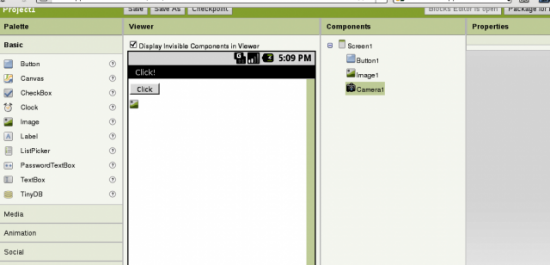
Figure 2. User Interface for Project1
That completes the design of the user interface (Figure 2). Next, let's program the components using Blocks.
Open the Blocks Editor, which should start downloading the JAR file for the editor. It will ask you for the location of the App Inventor setup commands if you have not installed them in the standard location under /usr/google. The Blocks Editor for the current project will look like Figure 3. Going back to the description for this project, the goal is to activate the device camera when the button is clicked. This is done with the code block "When Button1.click", which you dragged from the Blocks pane on the left. When the button is clicked, you want the device's camera to be activated, so drag the "call Camera1.TakePicture" block inside the previous block. Once the picture is taken, you will want it to be displayed using the Image component. So, insert the block "when Camera1.AfterPicture" into the editor, and then set the "Image1.Picture" to the location of the saved image.
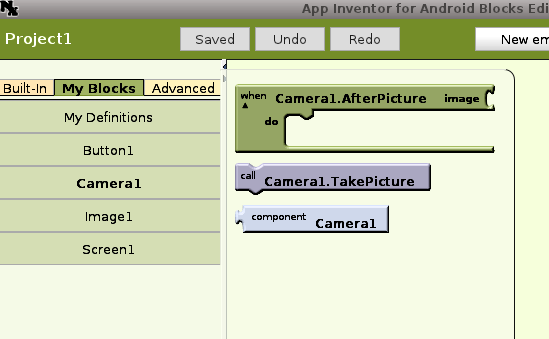
Figure 3. Blocks Editor for Project1
Now that you have designed the user interface and programmed the application's logic, you're ready to test it. Go back to the Designer window, and on the right, click on Package for Phone→Download to this Computer. That should initiate the download of the Android package (.apk file) for your project. Now, transfer this file to your Android device, and install it. Then, try it out.
A Peek under the Hood
Now you have designed and deployed your first Android application, and you have used components (the camera component and the image components), assigned them behavior and set properties. If you are familiar with the idea of event-driven programming, you already will have realized that App Inventor is an event-driven programming framework. The event can be the user clicking a button or the reception of a text message. For example, when the button is clicked, an event is said to have occurred, and in response to this event, the camera is activated. Again, when the camera finishes capturing a picture and saving it, the response code uses the image location to display it using an image component.
Earlier, I mentioned that components have associated behavior, methods and properties. You can find these for a component by clicking the component in the Blocks Editor. For example, Figure 4 shows the method available for the Camera component (Camera1.TakePicture) and the behavior (Camera1.AfterPicture).
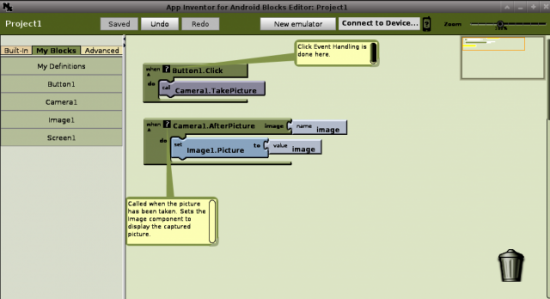
Figure 4. Blocks Available for the Camera Component
Besides the blocks associated with components, more fundamental programming blocks are available: Math blocks, Logic blocks, Control blocks and others. (I'll demonstrate using a few of these in one of the projects later in this article.)
Now that you have a basic idea of developing applications using App Inventor, let's look under the hood a bit, starting from the source. Download the source code for "Project1" by going to the Projects Page and selecting Project1 and clicking on More Actions→Download Source. That should start downloading the sources in a zip file. When you unzip the file, you will have two directories: src and youngandroidproject. Under the src directory, you will have a subdirectory called appinventor, which houses the subdirectories, and then ai_droidery/Project1 (note that "droidery" is my Google user name). In this directory, you will see the source files Screen1.blk, Screen1.scm and Screen1.yail. Screen1.blk is an XML-based representation of the visual blocks that was created earlier; Screen1.yail is an intermediate language based on the Scheme language used by App Inventor, which is then fed to Kawa to create the Android package for installation on Android devices. The Screen1.scm file is a JSON representation of the components used in the project with details about the components, such as the version information. If you are keen to understand how App Inventor really works, you also may want to check out App Inventor's source code (see Resources).
Next, let's move on to becoming familiar with sensors and some of the other components available in App Inventor.
Sensing the World Using Sensors
Sensors, true to their names, are the eyes and ears of your Android device. They allow your device to sense the world around it. For example, the location sensor on your device keeps track of your current location information using your mobile and Wi-Fi signal information and GPS data. Other sensors on your Android device include proximity sensors and motion sensors. In this section, let's use the location sensor on your Android device to write two simple applications that can be used on their own or as a starting point for something more useful and customized. In the process, you'll learn to make use of a couple more App Inventor components.
E-mail Your Current Location
Consider a not-so-fictional scenario when you might want to tell your friend exactly where you are at the moment so that she can drive down to meet you. Or, you simply may be lost. Either way, the Location Sensor can help. Let's call this project "LocationOnClickEmail". The user interface for this project looks like the one shown in Figure 5. Besides the basic components, such as text labels and buttons, add the LocationSensor component (found under the Sensors category) and an ActivityStarter component (found under the Other Stuff category). The ActivityStarter component, which has been named "MailAppStarter" will be used to start the e-mail application on the Android device. For details on the ActivityStarter Component, refer to https://appinventor.mit.edu/learn/reference/other/activitystarter.html.
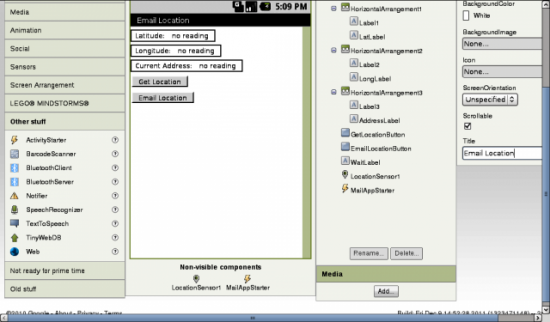
Figure 5. User Interface for the LocationOnClickEmail Project
Now you need to add the project logic using the Blocks Editor as before. Figure 6 shows the final state of the Blocks Editor for this project.
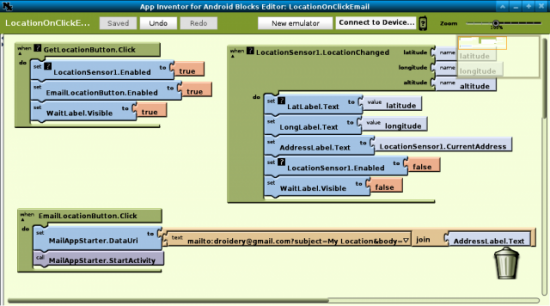
Figure 6. Final Blocks for the LocationOnClickEmail Project
The application logic can be divided into two steps—obtaining the location using the Location Sensor when the Get Location button is clicked. This is done in the "when GetLocationButton.Click" code block. When this button is clicked, the Location Sensor is enabled. Once the Location Sensor has been able to obtain the location information, it invokes the "when LocationSensor1.LocationChanged" method where the text labels are updated with the location data. Next, when the Email Location button is clicked, the MailAppStarter component's DataUri property is set to start the mailing application. Here, the recipient is set to "droidery@gmail.com", the subject to "My Location" and the body of the message to the obtained address. The recipient and subject can be changed in the mailer application on the device.
That completes the current project. For more details on using the Location Sensor and the App Starter components, refer to the App Inventor Reference (see Resources).
Text-Messaging-based Location Sensor Application
In the last application, you initiated the location sending event. What if you want to design an application that will run as a service, such that when it receives a request via text message, it sends your current location to the sender? Even with privacy being such a sensitive issue in today's connected world, such an application can be useful if you want to make sure your not-so-grown-up kid isn't lost, for example. In addition to the Location Sensor component, you will become familiar with the Texting component in this application.
Here is the idea: on receipt of a text message with "location" in its body, the application replies with the current location as a text message. The actions taken upon receipt of a text message are shown in Figure 7. This is the core logic for the application. In the "Texting1.MessageRecieved" procedure, the "number" and "messageText" are available as arguments. If the "messageText" is "location", then check whether the location has been obtained. If yes, then construct a reply using the address and send the text; otherwise, send an error message back as the reply.
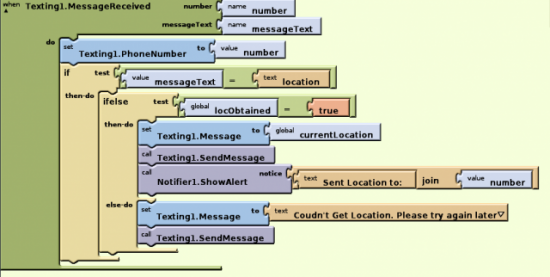
Figure 7. Action Taken When a Text Message Is Received
The complete application, along with others, can be downloaded from https://bitbucket.org/amitksaha/articles_code/src. You can upload the source (.zip) archives to App Inventor directly and try out the applications after packaging them. In this article, I have strictly concentrated on using an Android device for testing the applications. For basic uses, you also can use the emulator that is available in App Inventor and also use a live development methodology where you can install the application directly to your device. See the App Inventor Web site to try these out. I tested these applications on my Samsung Galaxy-SII running Android 2.3, but I hope there won't be any issues with running them on other devices running Android 2.2 and higher.
Looking Ahead
I started this article with the intention of having some fun programming for the Android platform, and I hope it has been so thus far. If you're interested in looking into App Inventor further, the first things that you might want to check out, apart from extending the projects to something more fun and useful, are the various other components. Of special note is the Data Store component that allows you to store data on the device, the Web components for interacting with remote Web content, other Sensor components and Media components.
App Inventor is fun, but you might feel that although it's good as a starting point, you would prefer a more traditional programming language as you become more familiar with Android development. Instead of completely throwing your App Inventor project away, consider using the App Inventor Java Bridge to use your App Inventor components while you write Android applications using the more traditional way of programming in Java.
If you feel the need to run your own App Inventor service, the MIT Center for Mobile Learning has made available the App Inventor JARs to enable you to host your own service (see Resources).
If you want to keep exploring App Inventor itself, two excellent books are available: David Wolber, Hal Abelson, Ellen Spertus and Liz Looney's App Inventor: Create your own Android apps (O'Reilly) and Jason Tyler's App Inventor for Android: Build Your Own Apps—No Experience Required! (Wiley).
If you enjoyed App Inventor, you might want to look at some other tools for programming your Android device visually, such as DroidDraw and Corona. And if you want to program Android visually on the device itself, check out Catroid.
Resources
MIT App Inventor: https://appinventor.mit.edu
Setting Up Your Computer: https://appinventor.mit.edu/learn/setup/index.html
App Inventor Reference: https://appinventor.mit.edu/learn/reference/index.html
APK File Format: https://en.wikipedia.org/wiki/APK_%28file_format%29
Under the Hood of App Inventor: https://googleresearch.blogspot.com/2009/08/under-hood-of-app-inventor-for-android.html
App Inventor Open-Source Project: https://code.google.com/p/app-inventor-releases
Activity Starter Component: https://appinventor.mit.edu/learn/reference/other/activitystarter.html
App Inventor Java Bridge Project: https://groups.google.com/group/app-inventor-instructors/browse_thread/thread/10a64e64b7886afb
Running Your Own App Inventor Service: https://appinventoredu.mit.edu/developers-blogs/andrew/2011/nov/running-your-own-app-inventor-service
App Inventor Course: https://sites.google.com/site/appinventorcourse
"Android App Development" presentation by Peter McNeil: https://www.cjugaustralia.org/September+2011
Catroid Project: https://code.google.com/p/catroid
Code for This Article (available in the appinventor_article subdirectory): https://bitbucket.org/amitksaha/articles_code/src


