Four Cool Ajax Plugins for WordPress
WordPress is probably the most popular free software solution for publishing and managing a dynamic personal Web site. It installs easily and quickly, it has a lot of plugins that extend its functionality, and it can be used with practically every Web hosting provider on the planet. Ajax (Asynchronous JavaScript and XML) is a mix of Web technologies used for building Web sites that respond much more quickly and smoothly to user input. Combining WordPress and Ajax to build a snappier Web site in a few minutes is much easier than it may seem at first, but you need to follow the instructions carefully to avoid a few little traps.
This article discusses four Ajax plugins that can make your WordPress-based Web site more dynamic, friendly and fun for visitors. The only prerequisite is that you have an already-working WordPress installation (we used version 2.1) and, of course, a complete backup of it just in case something goes wrong.
Let's start with a plugin that doesn't generate impressive snapshots, but makes your site less boring by making navigation faster. AjaxWp improves the responsiveness of your WordPress pages with a relatively simple trick; it dynamically replaces all the internal links to other parts of your Web site with onclick() JavaScript function calls.
When visitors click on these modified links, their browsers launch the scripts embedded in the AjaxWp code. These scripts then request the new page, all by themselves, in the background. In the meantime, the visitors' browsers will not go blank; the header, footer, sidebars—basically every part of your Web site that is common both to the current page and the one just requested—remain fully readable where they are.
The part to be replaced, and that only, gradually vanishes, and the block of new content takes its place as soon as the AjaxWp scripts have it ready. During this phase, to show that it is actually doing something, AjaxWp superimposes an animated GIF of a rotating wheel to the area it is replacing. The animation with which AjaxWp moves from the old page to the new one, courtesy of the Script.aculo.us library, can be set to appear, slide or blind.
How slowly or quickly all this happens depends on the speed of the Internet connection, the load on your Web server and the speed of your visitors' computers. If something goes wrong, after a programmable timeout, AjaxWp simply lets the browser load the page in the standard mode.
AjaxWp depends on a few JavaScript libraries that are included in the distribution. To use this plugin, download the latest tarball from the home page, unpack it, and move its JavaScript folder, the animated GIF and a PHP file called, you guessed it, ajax-wp.php, inside your WordPress installation. Then the fun begins.
AjaxWp can work in two modes: Quick, which is easier to configure and use, or Optimized. Whichever mode you choose, the home page and the README file describe in detail all the actual steps of the installation procedure, but I summarize the main points here.
In Quick mode, every AjaxWp call requests a whole new page from the server and then extracts from it the single area that must be refreshed in the browser window. Other than the steps described above, you need to add only a few lines of PHP code to the header file of your WordPress theme to start using Quick AjaxWp.
Optimized mode is faster and more efficient, because only the pieces of the pages that have to change are requested from the server and dropped as they arrive in the right part of the browser window. To make this work, however, you have to create an AjaxWp version of your theme—that is, add to each of its pages the snippets of PHP code described in the on-line documentation. Depending on your theme, this may take a bit of tweaking to get right.
Regardless of which mode you set up, once everything is in place, users who have JavaScript enabled in their browsers will enjoy a faster or at least much smoother navigation of your pages. Users without JavaScript enabled still will be able to load and read the pages in the old, pre-Ajax way.
Some advice: keep a copy of all the original WordPress files and restart from those if you configure Quick AjaxWp and decide to switch to Optimized mode later. If you mix or repeat installation steps or JavaScript calls in the code, strange things will happen.
Whether you choose Quick or Optimized mode, don't forget to spend a few minutes checking the configuration variables of AjaxWp to adapt them to your taste and, more important, to your theme and general WordPress setup. The two most important options are ajax_wp_blog_base_path, which is the relative path from the root of your Web server to your WordPress installation folder, and the list of pages (ajax_wp_ignore_links) that should be loaded normally rather than through AjaxWp.
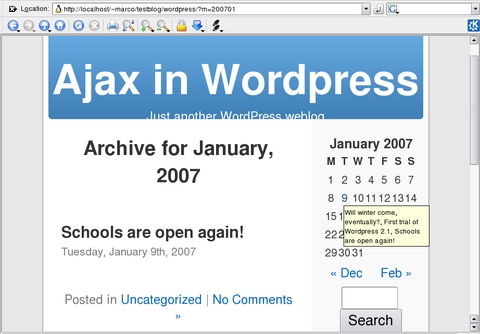
WordPress publishes and archives authors' posts in chronological order without any effort. It often comes naturally, both for you and your readers, to track and retrieve such posts through a calendar in the home page. WordPress does have a built-in calendar, but the Ajax-based one shown in Figure 1 is more dynamic and pleasant to use. The installation is simple, but not without a few issues. According to the README file distributed with the code, you must uncompress the tarball only in the WordPress plugins folder, activate it in the Administration pages, and add, in the index.php files of your WordPress theme, these three lines of code right where you want to place the calendar:
<div id="calendar">
<?php get_calendar(); ?>
</div>
After saving the file, you should configure the plugin only in the Options→AjaxCal Administration page. In practice, this may depend on your theme and WordPress version. The calendar you see in the screenshots for this article, for example, appeared by placing the get_calendar() function call, without the opening and closing <div> tags, inside the sidebar div element of the sidebar.php file.
Once the calendar appears, go to the Options→AjaxCal page in the Administration section to configure it. You can, for example, choose how to display the links to all the posts on a given day or give the whole calendar a completely different appearance from the rest of the Web site. Apart from eye candy, don't forget to set the display of Future and Draft posts according to your preference. The most important option of the calendar, however, may very well be the Load prototype.js tick box; this is a JavaScript library, and there is no need to load it twice, lest it confuse the browser. Therefore, if you place the call to the calendar in the PHP code after your WordPress theme or some other plugin already has loaded prototype.js, deselect that box.
The joy of reading a blog or any dynamic Web site is being able to add a comment to each page or, even more often, to read what other visitors had to say. The normal way to do this is to follow the link to the whole page or to its comment section, but Ajax comes to the rescue to speed up even this WordPress task.
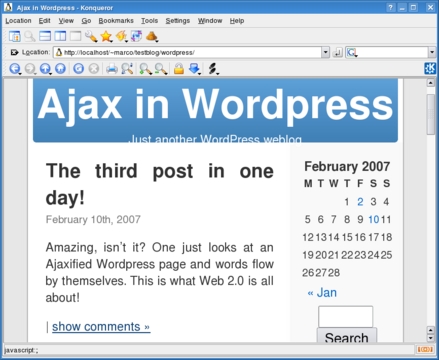
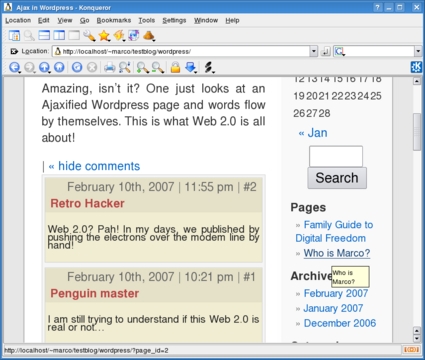
The Inline Comments plugin makes all the comments to a specific post appear or disappear in the home page, according to each visitor's preference. This happens in the usual Ajax fashion—that is, without freezing the browser or blanking the whole window. After you have installed and activated this plugin, the home page should look like the one shown in Figure 2. One click on the show comments link loads all the comments for that post and makes them slowly appear, right where you want them to be, as shown in Figure 3. After that, another click on hide comments returns the page to its original state. The beauty of the plugin is that all the comments to a post are downloaded only once and cached in the browser. If visitors hide them and then decide they want to read them again, they reappear instantly. The order in which comments are displayed (newest or oldest first) can be set in the Plugins→Inline Ajax Comments page. As with the calendar, the CSS styles for the comment box are customizable separately from the rest of the theme.
To add inline comments, download the plugin, place all its files in the plugins folder of your WordPress installation, and activate this function in the WordPress Plugins Administration page. After that, you need to add two new lines of code to the index.php file of your theme—one creates the link that opens or hides the comments box:
<?php ajax_comments_link(); ?>
The other instruction needs to go where the comment box itself must appear:
<?php ajax_comments_div(); ?>
WordPress and all other popular blogging packages have many features specifically designed to make conversations between authors and readers as easy as possible. If you are used to instant messaging, however, you may think nothing is better than instant messaging for a quick on-line conversation. Don't worry; there's no need to leave your beloved WordPress home page to have such conversations. The Ajax-based Wordspew/Shoutbox plugin adds real-time chat functionality to any WordPress Web site. Installation is possibly the simplest one of all the plugins described in this article: unpack the tarball in the WordPress plugins directory, and call Shoutbox with this line of code in the piece of the theme where you want it to appear:
<?php jal_get_shoutbox(); ?>
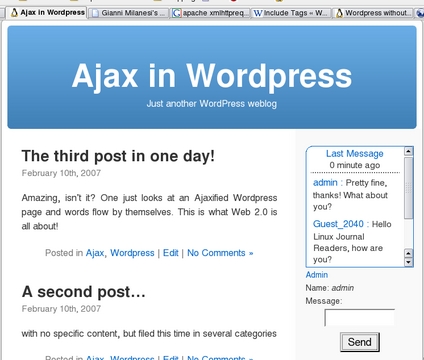
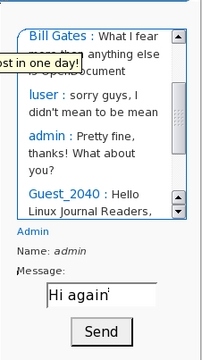
Figure 4 shows the result. Whenever anyone writes some text in the Message input field, everyone else who is visiting the home page at that moment will see it, without doing anything, the next time the Shoutbox area refreshes itself, and everyone will be able to answer in the same way. Shoutbox users also can add their name and home URL, if they choose, as well as use emoticons or links in the message text.
The scrollbar on the right allows newcomers to follow the whole conversation (Figure 5). The refresh interval is programmable. When it expires, new posts appear highlighted in a different color, which then fades away in the background after an equally programmable interval.
Almost everything else in the Shoutbox is configurable. You can set all the options from the Manage→Live Shoutbox page. The screenshots here show the vanilla version, but you can change the colors of user names, text and background of all comments. Even the one-line input area can be replaced with a larger field, but this obviously uses more space and may ruin the overall layout of your pages. One Shoutbox feature you might want to disable as soon as possible is the sound alert when new messages are loaded. You don't want your coworkers to know when you're chatting in your browser, do you?
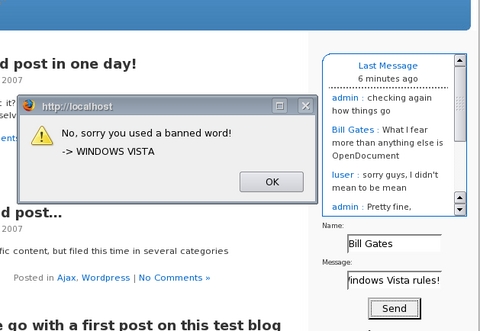
Security-conscious readers will immediately spot the potential for abuse here, but Shoutbox has two configurable mechanisms to prevent spammers from filling it with garbage. One is a place (Options→Discussion→Comments moderation) where you can enter a list of banned words, URLs and sentences. The package includes a sample word list; to add new ones, simply type them in the right place on the list. People trying to use banned words will see the alert box shown in Figure 6. The drawback in using the banned word list is that it requires continuous monitoring and maintenance. To avoid this burden, it is much better, without giving up the list itself, to set Shoutbox to accept comments only from registered users. Anonymous visitors still will be able to see the chat in progress.
Besides English, the Wordspew Shoutbox is also available in about ten other European languages. If your language is already supported, simply download the corresponding PO-MO files from the plugin home page, and place them in the Wordspew folder on the server. Otherwise, the author welcomes localizations in other languages.
Ajax still is a relatively new technology. Depending on which WordPress version you run, how you configured it and which theme you chose, you may experience messed-up internal links, misaligned blocks or similar problems if you download everything described in this article and simply drop it in your WordPress installation.
One reason for these issues is the simple fact that all these plugins are still under active development. In the Calendar version (0.8.3) we tested, for example, one php tag was missing (surely due to a typing mistake before packaging) from the source file called ajaxcalendarscript.php. To make it work, we had to replace <? with <?php on line 89 of that file. Surely all the plugins will have more stable interfaces by the time you read this article.
Another reason is that, at least at the time of this writing, several plugins are packaged with their own copies of the same (or different) versions of some JavaScript library. This spares you having to find those libraries, but it also might confuse some browsers. Install the plugins one at a time, starting from the one you need the most, and don't move to the next until you're sure everything works as you want, and be sure you have a backup of all your WordPress files.
Another trick that can spare you a lot of frustration, not only with these plugins but with any JavaScript-based Web application, is always to keep two windows open during the installation and testing phases. The first one should show, if you have access to it, the last lines of the error log file of your Web server. This will make it evident if things are going wrong because some file is not in the expected location. The other window should be the JavaScript console of Firefox or Mozilla, which is where these browsers report any problems they have with executing the code embedded in a Web page.
Resources
AjaxWp: www.giannim.com/blog/index.php?page_id=13
Shoutbox: pierre.sudarovich.free.fr
Ajax Calendar: dunamisdesign.net/?p=7
Inline Comments: kashou.net/blog/inline-ajax-comments
Marco Fioretti is a hardware systems engineer interested in free software both as an EDA platform and, as the current leader of the RULE Project, as an efficient desktop. Marco lives with his family in Rome, Italy.


