Extend OpenOffice.org
If you have a nifty macro or a nice Writer template you want to share with other OpenOffice.org users, publishing them on the Web along with detailed installation instructions is probably not the best way to go. Fortunately, OpenOffice.org supports extensions—small installable packages that provide added functionality. You easily can turn your templates, autotext entries, gallery art and macros into extensions that can be installed with a couple of clicks. Better yet, OpenOffice.org's extensions have an easy-to-understand and well-defined architecture, and you can start building your own extensions in no time.
Extending OpenOffice.org's functionality using extensions is nothing new. From the very beginning, users could add new features to the office suite by installing so-called UNO packages. Usually, these packages contained OOo Basic code, and they offered a more straightforward way of integrating macros into OpenOffice.org applications. With the release of OpenOffice.org 2.0.4, the idea of adding new features via installable packages has been rethought thoroughly and aligned with a concept that is more familiar to end users—namely the extension architecture of the Mozilla Firefox browser.
The technical implementation of the extension system in OpenOffice.org also has been reworked. Most notably, the new version of OpenOffice.org can handle so-called non-code extensions that can contain document templates, gallery items, autotext snippets and so on. The new version of OpenOffice.org also introduces the new .oxt file extension that allows users to identify installable extension packages easily.
An OpenOffice.org extension is essentially a zip file that includes both the installable contents and additional metadata required to install and register the extension properly. OpenOffice.org provides a simple-to-use tool called Package Manager that lets users install new extensions and manage existing ones. To install an extension, simply choose Tools→Package Manager, select My Packages, and press the Add button. Once the extension is installed, restart OpenOffice.org, and you are good to go. Unlike Firefox, some types of extensions don't require you to restart OpenOffice.org. For example, if you install non-code extensions, you can use them right away.
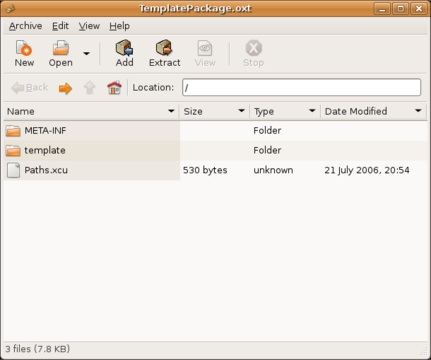
To better understand the anatomy of OpenOffice.org extensions, let's dissect an empty sample extension from the OpenOffice.org Wiki (wiki.services.openoffice.org/wiki/Non-code_extensions). In order to peek inside the package, you have to change its extension from oxt to zip. This allows you to treat the package as a regular zip archive. The package consists of three elements: the META-INF and template folders, as well as the Paths.xcu configuration file. The META-INF folder contains the manifest.xml file that, among other things, “points” to the Paths.xcu configuration file. The Paths.xcu file contains information that the Package Manager uses to add the templates to the appropriate location. This location is defined as %origin%/template, and the Package Manager replaces the %origin% variable with the full path to the internal template container. The fuse parameter adds the templates to the specified container or creates a new one if it doesn't exist. To create a new template extension, you don't need to tweak anything; the configuration file and the overall structure of the extension remain the same. All you have to do is copy your custom templates into the template folder. Change the file extension of the resulting package back to oxt, and install it via Tools→Package Manager. To check whether the extension has been installed properly, choose File→Templates→Organize; you should see your templates in the My Templates folder.
Although creating non-code extensions is rather trivial, building packages containing code (let's call them programmatic extensions) is a different matter. The programmatic extension includes not only the code itself, but also a more complex configuration file containing information about menus, submenus, commands and macros assigned to them, icons and so forth. Creating a configuration file manually, even for the most simple programmatic extension, requires some technical knowledge, and it can be rather time consuming. Fortunately, there is a tool that can automate the entire process of creating an extension. Although the Add-on Tool (documentation.openoffice.org/HOW_TO/various_topics/Addons1_1en.sxw) hasn't been updated since 2003, it still does a great job of generating extensions that can be used with the latest version of OpenOffice.org. To get to grips with the Add-on Tool and better understand the process of creating a programmatic extension, let's build a simple dummy text-generator extension from scratch. Once installed, the extension adds the Lorem ipsum command to the Tools→Add-Ons menu. This command runs an OpenOffice.org Basic macro that inserts a specified number of paragraphs with the Lorem ipsum dummy text. The following description assumes that you have a general knowledge of how to create and manage macros, modules and libraries in OpenOffice.org. The Add-on Tool uses the older term “add-on”, which you can consider a synonym of “extension”.
Start with creating a macro that generates the dummy text. To keep things tidy, create a separate library called LoremipsumLib, containing the LoremipsumModule. In this module, add the macro shown in Listing 1. (Replace the “Lorem ipsum dolor sit amet...” string with a paragraph of dummy text.)
Listing 1. loremipsummacro.txt
Option Explicit
Sub LoremipsumMacro()
Dim ThisDoc As Object
Dim Cursor As Object
Dim ParNumber As Integer
Dim InputMsg As String, InputTitle As String, InputReturn As String
ThisDoc=ThisComponent
InputMsg="Number of paragraphs"
InputTitle="Lorem Ipsum Generator"
InputReturn=InputBox (InputMsg, InputTitle)
ParNumber=InputReturn
Do While ParNumber>0
Cursor=ThisDoc.text.createTextCursor
Cursor.String="Lorem ipsum dolor sit amet..." & Chr(13)& Chr(13)
ParNumber=ParNumber-1
Loop
End Sub
Before you fire up the Add-on Tool, you need to do some preparatory work. First, create a separate folder for all your working files (for example, loremipsum). If you want to add icons to the menu items, make sure you have the necessary graphics files. According to the official documentation, you need a set of small (16x16) and big (26x26) icons in BMP format. However, you also can use 16x16 icons in PNG format (you can find some high-quality icons at www.famfamfam.com/lab/icons/silk). Next, copy the entire LoremipsumLib library into the loremipsum folder. To do this, navigate to .OpenOffice.org2/user/basic inside your home directory, and copy LoremipsumLib into the loremipsum folder. Finally, copy the icons into the LoremipsumLib folder. Now, open the Add-on Tool document, and make sure that macro execution is enabled. Scroll to the Create the configuration file chapter, and press the Create XML file button to launch the Addon Creator.
The process of creating an extension using the Addon Creator can be roughly divided into three stages. First, you define the general setting, including the top-level menu and its position. Then, you specify the menu items, and finally, you zip the created package.
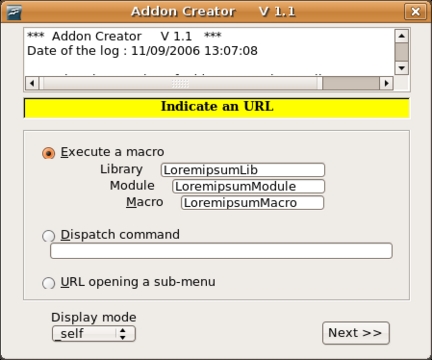
In the Basic Information window, specify the path to the main script file. Press the Browse button, and select the script.xlb file inside the LoremipsumLib folder. You also must specify a name for your extension in the Unique name for your addon field. Simply replace the example part in the org.openoffice.Office.addon.example string with the name you want (for example, org.openoffice.Office.addon.Loremipsum). Press Next to choose where to add the top-level extension menu. You have two choices here: you either can add a menu item to the Main menu or under the Tools menu. As a rule of thumb, if you have a simple extension containing only a couple of commands, tuck it under the Tools menu. A more complex extension deserves its own entry in the Main menu. Because the Lorem ipsum generator contains only one command, it makes sense to install it under the Tools menu. Next, enter a menu title, and press the Add this text button. If you want to make your extension available only for a particular language or country, you may do so by specifying the appropriate settings in the Language restrictions section. Press Finished when you are satisfied with the settings.
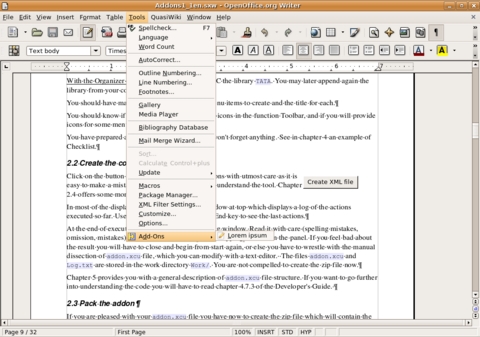
The next step is to link the LoremipsumMacro to the created menu item. To do this, you have to specify the library, the module and the macro itself. In our case, these are LoremipsumLib, LoremipsumModule and LoremipsumMacro, respectively. Once you have linked the macro to the command, you can add an icon to it. Because we've chosen to use an icon in PNG format, press the Other image type button, select the 16x16 normal contrast item from the Icon definition drop-down list, select the icon using the Browse button, and press OK to add it. When adding icons, you have two options: you either can link to an icon that will be added to the extension as an image file, or you can integrate it into the configuration file (this works only with icons in BMP format). Which option you choose is more or less a matter of taste, but linking to icons rather than embedding them produces a cleaner and easier-to-read configuration file. This can come in handy if you need to edit the file manually later. Use the Finished button to finalize the extension, and press the Addon zipping button to pack it. Now you can install the created extension by choosing Tools→Package Manager. Restart OpenOffice.org, and you should see the Lorem ipsum command in the Tools→Add-Ons menu.
The Addon Creator conveniently hides the technical part of the process, which is good if you don't want to spend time doing the donkey work manually. This is, however, less useful if you want to gain a better understanding of what makes extensions tick—not only to satisfy your curiosity, but also to be able to troubleshoot your extensions and tweak them without running the Addon Creator every single time.
If you look inside the zip package, you will notice that it contains the familiar META-INF folder, a folder with the macro files and the addon.xcu file (Listing 2). The latter is the key element of the extension, as it contains all the configuration data. The addon.xcu is based on XML, and even if you have only a basic knowledge of XML, you easily can figure out how it works simply by looking at its contents.
Listing 2. addonxcu.txt
<?xml version='1.0' encoding='UTF-8'?>
<oor:node
 oor:name="Addons"
oor:package="org.openoffice.Office">
  <node oor:name="AddonUI">
    <node oor:name="AddonMenu">
      <node oor:name="org.openoffice.Office.addon.Loremipsum"
oor:op="replace">
        <prop oor:name="Context" oor:type="xs:string">
          <value/>
        </prop>
        <prop oor:name="Title" oor:type="xs:string">
          <value>Lorem ipsum</value>
        </prop>
        <prop oor:name="URL" oor:type="xs:string">
 <value>macro:///LoremipsumLib.LoremipsumModule.LoremipsumMacro
 </value>
        </prop>
        <prop oor:name="Target" oor:type="xs:string">
          <value>_self</value>
        </prop>
        <prop oor:name="ImageIdentifier" oor:type="xs:string">
          <value/>
        </prop>
      </node>
    </node>
    <node oor:name="Images">
      <node oor:name="org.openoffice.Office.addon.Loremipsum.img01"
oor:op="replace">
        <prop oor:name="URL" oor:type="xs:string">
 <value>macro:///LoremipsumLib.LoremipsumModule.LoremipsumMacro
 </value>
        </prop>
        <node oor:name="UserDefinedImages">
          <prop oor:name="ImageSmallURL">
            <value>%origin%/LoremipsumLib/Icon.png</value>
          </prop>
        </node>
      </node>
    </node>
  </node>
</oor:node>
The XML file contains a number of nodes, and each node has properties, which, in turn, have values. For example, the top node <node oor:name="AddonMenu"> has multiple properties, such as <prop oor:name="Title" oor:type="xs:string">, that have a value containing the extension's menu title <value>Lorem ipsum</value>. The <prop oor:name="URL" oor:type="xs:string"> property has the <value>macro:///LoremipsumLib.LoremipsumModule.LoremipsumMacro</value> value, which contains the link to the appropriate macro. Knowing that, you can modify the extension by tweaking its addon.xcu file. For example, if you want to change the menu title, you simply can edit the <value>Lorem ipsum</value> value as follows:
<prop oor:name="Title" oor:type="xs:string">
  <value>Insert dummy text</value>
</prop>
In more complex macros, you even can add new menus and commands simply by cloning and modifying parts of the configuration file.
Now that you know the basics, you can start building your own OpenOffice.org extensions. If you want to share your creations with other users, you can add them to the official extension repository (wiki.services.openoffice.org/wiki/Extensions_repository). Most of the extensions there are released under the GPL, so you can dismantle them to see how they work and get new ideas.
Dmitri Popov is a freelance writer whose articles have appeared in Russian, British and Danish computer magazines. His articles cover open-source software, Linux, Web applications and other computer-related topics.


