Bricolage Templates
Over the past few months we have looked at Bricolage, an open-source content management system (CMS) based on PostgreSQL, mod_perl and Apache. Bricolage has gained a good deal of mind share in the last few years, partly because of its open-source license, partly because of the open-source technologies on which it is based and partly because its feature set is comparable to many proprietary CMS packages, to say nothing of the open-source CMS offerings.
This month, we conclude our tour of Bricolage with a look at its use of templates. To date, we have looked at a number of the administrative and editing capabilities that Bricolage brings to the table, but a CMS is useful only if you can customize its output and make the resulting Web sites appealing.
HTML templates have existed for quite a long time, and they are a nice compromise between static pages and putting HTML inside of a program, which makes it inaccessible to a designer. If you want an HTML page to change dynamically, using templates is a good way to go.
Of course, this raises the important question: which templates should you use? Hundreds of different templating systems exist, including several dozen written in Perl. Some of these, such as Text::Template, are not HTML templating systems per se, but they have been used with great success on a variety of Web-related tasks.
Which templating system you should use is a debate rivaled only by Linux/BSD and Emacs/vi discussions. Luckily, Bricolage rises above the debate, coexisting happily with both HTML::Mason and the Template Toolkit. It theoretically is possible to use another templating system, but these two are popular and powerful enough that they appear to satisfy many Bricolage users. I personally prefer HTML::Mason and demonstrate Bricolage templating with Mason, but if you are a Template Toolkit fan, feel free to use it instead.
A template is a generic outline for the content of a page of HTML. Everything is considered to be static, except for variables, whose values are filled in (interpolated, in the language of programmers) at runtime. For example, consider the following template:
<html>
    <head>
        <title><% $title %></title>
    </head>

    <body>
        <h1><% $headline %></h1>
        <p><% $body_text %></p>
    </body>
</html>
The above template, written using Mason syntax, always has a title, headline and paragraph. The contents of the title, headline and body text, however, are variable.
Mason also provides two global variables: $r, the standard mod_perl object that gives us access to the internals of our Apache server through its Perl API, and $m, the object that provides additional information about the overall Mason environment and the current, specific Mason template.
Bricolage introduces three new objects into this mix. The most important is $story, which contains information about the current story. Stories contain elements, which can themselves contain additional elements; the current element is available using the object $element. Finally, Bricolage sends pages to an output channel (normally, but not necessarily, to a Web site) using a mechanism known as a burner.
Before we continue, it's also important to understand Mason's autohandlers, which make it possible to give a site a unified look and feel. If an autohandler exists for a particular directory, then the autohandler always is going to be invoked instead of a file in that directory. That is, if you request /abc/def.html and /abc/autohandler already exists, /abc/autohandler is invoked instead of /abc/def.html. This might sound strange at first, and it is—except that the autohandler can invoke the originally requested template at any point by invoking $m->call_next().
A common strategy is to put as much common material as possible inside of the autohandler, including menus, images and headlines. The autohandler is a Mason template like any other, except for the way in which it is invoked. Inside the autohandler, between the various headlines, images and menus, you insert a call to $m->call_next(), which inserts the requested page. You thus get the benefits of a modular design using multiple templates, while simultaneously having the ability to redesign the site by changing a single file.
Autohandlers nest, meaning that Mason invokes all of the autohandlers it can find in all of its parent directories. So if we request /abc/def.html, Mason first looks for and invokes /autohandler, followed by /abc/autohandler, followed by /abc/def.html. This allows you to create a section-specific look and feel, as well as section-based menus and other information.
I'm going to assume you already have created and published at least one story on your system. If you're not sure how to create and publish a story, see my previous articles on Bricolage from the last few issues. Once you have published a story, it is sent to a particular output channel, either by copying a file on the filesystem or by using FTP to move it to a remote server.
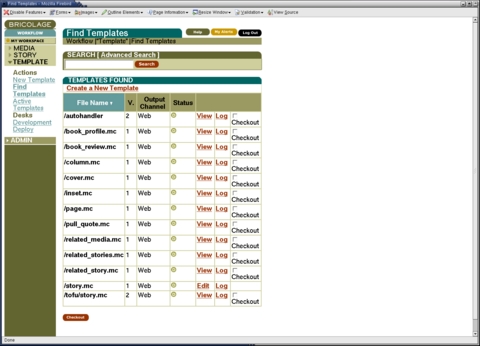
The look and feel of your story is determined by the template. So, before we create our own simple templates, let's look at the basic examples that come with the system. Go to the Find Template link in the Template menu on the left side of the Bricolage administrator screen (user name is administrator, password is change me now!), and click on the Search button without entering anything into the text field. You should see a list of templates, one for each element type in the system (Figure 1).
In many ways, Bricolage templates are like stories: they are created, edited and deployed at different desks; access to them is limited to certain users and groups; and Bricolage keeps track of changes (and avoids clashes) with a simple version-control system. Indeed, if you look at Figure 1, you can see that each template has a version number associated with it. Each can be checked out of the version-control system by clicking on the associated check box and then the Checkout button at the bottom of the page. Checked-out templates are available from the Active Templates link under the Templates menu.
In Bricolage, a story is only one type of publishable element. Further, each element may contain any number of additional elements. Bricolage comes with several predefined top-level elements, such as story, book review and column, plus several additional elements designed to be included in other elements, such as a pull quote.
If you think about a daily newspaper, you should realize that each section is styled differently, even for similar elements. For example, columns in the Metro section of the New York Times look different from columns in the Business section, which look different from the Op-ed page. That said, they are all columns. Bricolage resolves this problem by allowing you to assign a category to an element. So if you are writing a column for the Sports section, you indicate that it is part of the sports category. When Bricolage publishes the column to the Web, it looks for the /sports/column.mc template. If it exists, Bricolage applies that specific template. If not, Bricolage looks for a column.mc template at the top (root) category. In other words, if you have a top-level template for an element, it serves as a fallback, or default, for all the elements of that type on the system. You can give some or all sections of your site a different look and feel by defining category-specific templates.
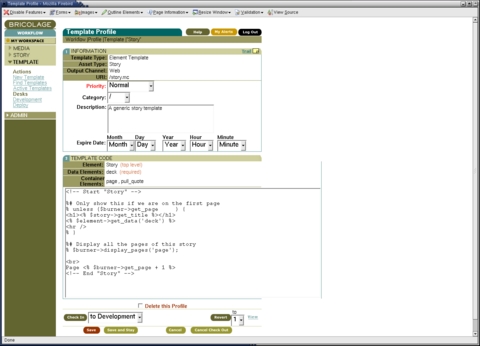
As you can see from Figure 2, I have checked out the /story.mc template, which is the top-level template for stories. Rather than having a view link, I have an edit link that allows me to modify the template. I also can edit the template by going to the active templates page, which provides me with a similar edit link. Open up the template for editing, which should give you a screen similar to Figure 2.
Editing a template is similar to editing a story or any other element type, except that you are modifying the container into which the story will be inserted. If you insert only static HTML, every element looks identical. Thus, the trick is to use the predefined $story, $element and $burner objects to fill in the page with dynamic content. For example, here is the default /story.mc template:
<!-- Start "Story" -->

%# Only show this if we are on the first page
% unless ($burner->get_page     ) {
<h1><% $story->get_title %></h1>
<% $element->get_data('deck') %>
<hr />
% }

%# Display all the pages of this story
% $burner->display_pages('page');

<br>
Page <% $burner->get_page + 1 %>
<!-- End "Story" -->
As you can see, the above template is rather simple. An actual site might insert a drop-cap, set some styles in CSS or include some additional static text to identify the site. The basic version of /story.mc does the following:
It gets the current page number from $burner->get_page(). The page numbering begins at 0; however, we display the story's title and the element's deck if we are on the first page. The title comes from the $story object, with $story->get_title(), and the deck (an abstract) comes from the element itself. Notice how $element->get_data() is a fairly generic-looking method; we can use $element->it to retrieve any field from within an element.
We display the story by requesting it from the burner, using $burner->display_pages('page').
Finally, we use $burner->get_page() once again to show the page number at the bottom of the page.
What happens if we remove the page number and insert some static HTML of our own at the top or bottom of this template? Our changes then are reflected for all stories on the system. But it's important to remember that not all elements are stories, so changes that we make to /story.mc do not affect columns, book reviews or other element types.
When you are done editing /story.mc, you can click on the Check-In button at the bottom of the page. When you check a template in, you can send it to the development template desk (the default) or you can deploy it right away. This option is particularly useful if you discover a mistake on a template that is affecting the entire site; you can modify the template, deploy it and see the results immediately.
Finally, notice how /story.mc does not contain any <html> or <title> tags. That's because such items are implemented within the autohandler. The /autohandler template, which you can view, check out and edit from the Templates menu, is defined by default to be the following:
<!-- Start "autohandler" -->
<html>
    <head>
        <title><% $story->get_title %></title>
    </head>
    <body>

    % $burner->chain_next;
    </body>
</html>
<!-- End "autohandler" -->
The autohandler, which is global to the entire site, places the title of a story within the appropriate HTML <title> tags. It also incorporates the appropriate page contents into the template by invoking $burner->chain_next().
If you want to include a global CSS stylesheet, add a standard menu to the top of each page or put your company's logo at the top of each page on the site, this autohandler is the place to do it. And because autohandlers nest, you can have a global autohandler for your overall site, with section-specific autohandlers in each category.
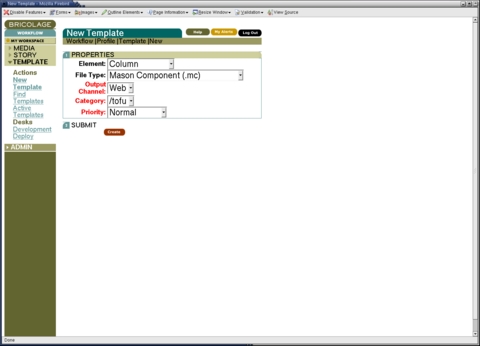
So far, we have looked only at existing templates. It's quite easy to create a new template, though. Simply go to the Template menu and click on New Template. You should see a screen that looks like the one shown in Figure 3, asking you to indicate the output channel and category to which your template should apply. Click on Next, and you are asked for the element type to which your template should apply.
The category-channel-element combination must be unique. You therefore can have multiple templates for an output channel, for a category or for a particular element. But for story elements in the Web output channel in the root (/) category, there can be only one template. If you try to violate this uniqueness constraint, Bricolage issues a warning, telling you that there already is a template for that combination. There are several solutions to this problem; one is to create a new element type, another is to create a new category and still another is to modify the existing template for that combination. The best course of action depends on your specific goals.
I'm going to create a new template for columns within the tofu category, which is represented as /tofu/column.mc in Bricolage. Once I click the Create button, I'm presented with an editing screen that allows me to create or modify my template. I'm going to make my template extremely simple:
<!-- Start "tofu/column" -->

%# Display this story
% $burner->display_pages('page');

<!-- End "tofu/column" -->
Notice how we put HTML comments around the definition. This makes it easier to debug the template when it is turned into HTML and sent to the user's browser. I can assure you from personal experience that the nested nature of Mason templates, especially with multiple autohandlers, can be maddening.
Once I select and deploy from the Check-In menu, and then click the Check-In button, my template is deployed. Any column with a category of tofu now is formatted with this template rather than the global, more general one for columns.
And, of course, if I want to go back and edit my template, I can do that in the way that we saw earlier—finding it, checking it out and editing it.
Bricolage, like any serious CMS, makes it easy to create a unified look and feel by using templates. Because Bricolage is based on standard open-source tools, such as mod_perl and Apache, it can take advantage of the existing templating systems for mod_perl, including HTML::Mason and the Template Toolkit. This month, we saw how we can create and modify templates associated with various element types and categories, giving us the flexibility we need to generalize a site's look and feel without being constrained.
Resources
The main source of information about Bricolage is the project's Web site, bricolage.cc. This site has pointers to downloadable source code (hosted at SourceForge), documentation and an instance of Bugzilla (bugzilla.bricolage.cc) for bug reports and feature requests.
SourceForge hosts several Bricolage mailing lists, in which the developers participate actively. If you have questions or want to learn about new releases, you can subscribe from the SourceForge page, sourceforge.net/projects/bricolage.
The Bricolage documentation generally is quite good, if technical. A more user-level introduction to the system was published by O'Reilly and Associates as an appendix to their recently published book about Mason. You can read that appendix on-line at www.masonbook.com/book/appendix-d.mhtml.
You can learn more about Mason from both the Mason book site, www.masonbook.com, and the Mason home page, www.masonhq.com.
Finally, you can learn more about David Wheeler (the primary author and maintainer of Bricolage) at david.wheeler.net, and about his company, Kineticode, at www.kineticode.com.
Reuven M. Lerner, a longtime consultant in Web/database programming, is now a graduate student in Learning Sciences at Northwestern University in Evanston, Illinois. You can reach him at reuven@lerner.co.il.


