Lighter Admin Fare with Depth
François, mon ami, I am impressed. When I asked you to select a wine with depth, I must admit that while I had complete confidence in you, this time I am truly pleased. The 1997 Volnay-Santenots du Milieu is a wonderful choice. Please make sure that you bring back enough for our guests. I am expecting them shortly. Vite, François.
But they are already here! Bienvenue, mes amis. Welcome to Chez Marcel, home of fine Linux cuisine. Please sit. François is down in the cellar fetching the wine. You know, mes amis, I constantly am amazed when I think of the parallels between good food and wine and cooking with Linux. Take this month's issue for instance...ah, François, you have made good time. Please open the wine and serve our guests. Merci.
Just as a good restaurateur becomes one with their wine cellar, so does a good administrator become one with their system. Every directory and every file is as familiar to the system administrator as their own hand. Of course, in terms of visualization, I have had an advantage with the wine cellar. From time to time, I wander its cool halls, letting its bottles, labels and smells fill my senses. However, as Linux system administrators, we have been forced to imagine this world. But today, mes amis, all that changes. Today, your Linux system becomes a place. With the help of a few open-source recipes, your filesystem is about to enter the third dimension.
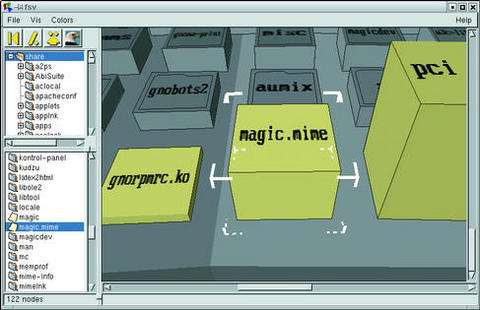
The first item on today's menu is a little something innocently called fsv (filesystem viewer), a concoction by Daniel Richard. When you fire up this little program, it scans your entire filesystem (relative to your position in the filesystem's hierarchy) and provides you with a new and unique view of what you will find there. Suddenly, files and directories appear as cubes of varying heights like buildings in a strange city. Click on a directory and you can zoom in to that directory and explore the “city” beneath it. It offers two different visualization modes: a map view and a tree view. The tree view is interesting in that directories now appear like skyscrapers in a fantastic, cyber city. Figure 1 shows fsv in action.
You can get fsv from fsv.sourceforge.net. You will need a couple of things to start, such as OpenGL or Mesa, GTK+ (both of which are probably already installed on your system or are as close as your distribution CD), as well as Janne Löf's GtkGLArea OpenGL widget set for GTK+, available at www.student.oulu.fi/~jlof/gtkglarea. If you are running an RPM-based distribution, you also can find various precompiled packages on www.rpmfind.net. But I digress, non?
Extract the source and build as follows:
tar -xzvf fsv-0.9.tar.gz
cd fsv-0.9
make
make install
In order to run the program, you simply type fsv. Depending on your starting directory, this may take a few seconds. You also can specify the starting directory on the command line if you wish. For instance, if you wanted to start at your Linux kernel source, you would type the following:
fsv /usr/src/linuxDaniel is not the only one with a three-dimensional vision of his Linux system. Another interesting project is aptly named 3dfile. Once again, the 3-D visualization comes to us courtesy of OpenGL or Mesa and Mircea Mitu.
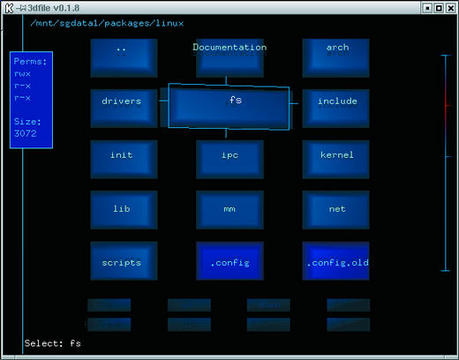
As Mircea Mitu is quick to point out, 3dfile is not quite a file manager, although it does do some pretty cool things (besides rocking representational icons back and forth). For instance, if you click on a red block (these represent executable files), you will launch that application. I fired up a game of Maelstrom that way and wasted far too much time. Here's something else to try: right-click on a filename and a small pop-up menu will appear. If you happen to be looking at a text file, you can view the file as text. The other viewing option is hex, a great way to impress your nontechnical friends. Open up a file in the hex viewer, study it carefully and say something like “Ah, there's the problem.” System administrators need to keep the magic alive, non?
Have a look at Figure 2, and then we shall toss this little recipe together and get 3dfile working for you.
You'll need to visit web.ss.pub.ro/~mms/3dfile to pick up your copy of the source. The installation is quite straightforward as well, but does have one interesting first step before the nearly traditional ./configure:
tar -xzvf 3dfile-0.1.8.tar.gz
cd 3dfile.0.1.8
./autogen.sh
./configure
make
make install
Running the program is as easy as typing 3dfile. I found working with 3dfile to be quite intuitive. The only thing that may not be immediately apparent is that row of buttons at the bottom. Run your crosshairs over these and you'll find navigation even easier.
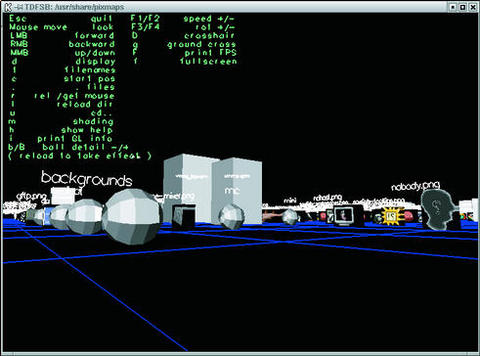
The next item on our menu offers another way of looking at the system. Leander Seige's TDFSB is interesting in that it lets you wander through an OpenGL-generated filesystem with a rather enjoyable twist. Directories hover as silver spheres upon a floating grid landscape. What I find really interesting here becomes apparent when you happen upon a graphic or image file. The image is rendered as a three-dimensional image around which you can move. Have a look at Figure 3 for a peek at TDFSB in action.
Building TDFSB is not complicated, but I warn you that Leander's source does not provide an elegant means of compiling the program. The README does contain just about everything you'll need to compile on your system, and it is very, very short. Please read it. In a moment, I will show you what I did to make it run on my system.
Start by visiting the TDFSB site and picking up the source. TDFSB's home is at www.hgb-leipzig.de/~leander/TDFSB. The only other thing I needed was the gdk-pixbuf image library (part of GNOME):
tar -xzvf tdfsb.tgz
cd tdfsb
This is where you have to look at your README. From that, I created the following, single-line install script. Please note that while the text wraps, it is one line. It essentially was created by cutting and pasting from that README file. Ah, yes, the system I tested this on was a notebook running Red Hat 7.1:
        gcc -L/usr/X11R6/lib -I./ -lGL -lGLU -lglut -lXmu
            -lXi -lXext -lX11 -lm -lgdk_pixbuf -march=i686
            -malign-loops=4 -malign-jumps=4 -malign-functions=4
            -fomit-frame-pointer -fno-strength-reduce
            -x c -o tdfsb tdb3.c -I/usr/include/gdk-pixbuf
            -I/usr/include/glib-1.2 -I/usr/include/gtk-1.2
            -I/usr/lib/glib/include
Now, run the program by typing ./tdfsb. To get a
little floating, heads-up display help menu, type
h. Since your mouse is the means by which you
navigate this world, you can toggle its release by typing the
letter r. The system on which I tested did not
have 3-D acceleration hardware, but there is little doubt that you
could benefit from a nice, fast video card when using TDFSB.
Ah, I see that closing time is approaching. But before you go, allow me to share a final and quite different way of looking at your systems. Those friends of ours who are new to Linux have, from time to time, been heard to remark that Linux is like a strange new world. The tools we have just explored demonstrate some of the many fascinating faces this world can have.
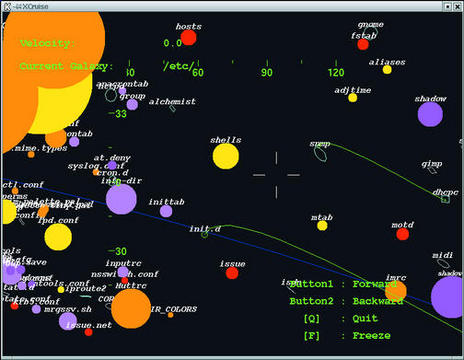
But “world”? How about solar system? How about galaxy? This is without a doubt what Yusuke Shinyama had in mind when creating XCruise. This great little package is a file manager of sorts, one that lets you navigate your disk as though it were a universe all its own. Each filesystem is a galaxy, files are stars (the bigger the file, the bigger the star) and symbolic links are wormholes. Your humble chef and his faithful waiter have been known to spend a great deal of time navigating their respective Linux systems in this way.
Anxious to launch into your own private universe? Have a look at Figure 4, then cruise on over to www.unixuser.org/~euske/pub/.
Building the package is simplicity itself. Just follow this basic recipe and you are almost ready for launch:
tar -xzvf xcruise-0.24.tar.gz
cd xcruise-0.24
xmkmf
make
The resulting binary is sitting there in the directory and can be copied to wherever you like. To run the program, type ./xcruise &. You may find that the default incarnation of XCruise is a bit large for your screen. Luckily, you also can use X geometry settings to change the size to something more suitable to your display. For instance, my notebook has an 1024 x 768 display, but I only want to have XCruise fill an 800 x 600 area. To do this, I start the program this way:
./xcruise -geometry 800x600+0+0Magnifique! Using my left mouse button, I travel forward at incredible speeds while the middle button (or both buttons on a two-button mouse) lets me move out and back. The scroll keys let me vary my angle and direction. Ah, this Linux universe is rich and exciting, non?
Ah, mes amis. Once again, it is closing time. Time for François to fill your glasses a final time and for us to return to the real world, a world, that after today, you may never see the same way again. Until next time; au revoir, mes amis. Your table will be waiting.
A votre santé! Bon appétit!
email: mggagne@salmar.com
Marcel Gagné (mggagne@salmar.com) is president of Salmar Consulting, Inc., a systems integration and network consulting firm and the author of Linux System Administration: A User's Guide, published by Addison-Wesley.


