Conix 3-D Explorer
Manufacturer: Conix Enterprises, Inc.
E-mail: info@conix3d.com
URL: https://www.conix3d.com/
Reviewer: Michael J. Hammel
Most likely, many of you know about the large number of graphical features available in Mathematica (see “Mathematica version 3.0 for Linux” by Patrick Galbraith, Linux Journal, December 1998), the Swiss army knife of mathematics software. While its features are fairly good for quite a few situations, I have always felt it would be nice to combine the power of Mathematica with an OpenGL-based 3-D interface. Such a connection would offer interesting possibilities for 3-D demonstrations.
Enter 3-D Explorer. This software, from Conix Enterprises, is an add-on package to Mathematica that allows you to use OpenGL 1.0-based rendering features directly from within the Mathematica environment. A simple installation process allows you to have the software up and running in only a few minutes and provides endless possibilities.
Since I am not a Mathematica expert, my goal for this review was to find out how easy it is to install and get started with both Mathematica and Conix 3-D Explorer. I also set out to verify that the examples provided were both understandable and functional. Finally, I wanted to see if it was possible to create anything interesting with these two pieces of software in the short amount of time I had to write the review.
3-D Explorer comes packaged on two 3.5 inch floppy diskettes. The first diskette is the 3-D Explorer add-on for Mathematica; the other is a set of OpenGL libraries for use with 3-D Explorer. Installation instructions with the software were pretty basic—a single sheet of paper. I checked the Conix web site at https://www.conix3d.com/, and although it contained many samples and other information, nothing was available on how to read the diskettes. Overall, the web site does not offer much help specific to the Linux user.
Since the format of the diskettes was not specified, I relied on my UNIX experience and the knowledge that many commercial distributors seem to like the DOS format. I mounted the floppies as DOS diskettes. It worked. You can mount the diskettes with a command that looks like this:
mount -t msdos /dev/fd0 /mnt/floppy
The device you use may differ (fd1 for a second floppy drive, for example) and the mount point, /mnt/floppy, can be any existing directory that is empty. Once mounted, you can list the contents of the diskettes to see what is contained in the gzipped tar file. The installation file name on the first diskette, 3dexp101.tgz, does not match the instructions (3-DExplorer_1.0.tar.gz), but since only one installation file (plus two text files) is on that diskette, it is not hard to figure out.
A quick check of contents of the installation file shows that relative paths are used. That is, the files within the gzipped tar file do not include absolute directory paths. Unpack this file using the commands:
cd /usr/local/mathematica/AddOns/Applications
tar xvzf /mnt/floppy/3dexp101.tgz
This will unpack the 3-D Explorer files under the default Mathematica AddOns directory. Doing this guarantees that Mathematica will be able to see 3-D Explorer when Mathematica starts up.
After you have installed the first diskette, you can start Mathematica to view the on-line documentation. Help on using GLExplorer is available from the Mathematica Notebook Help browser. Run Rebuild->Help Index to get access to this browser as the last step of the installation process. The on-line documentation states:
To install GLExplorer on a UNIX system, you must have a functional installation of OpenGL. On Linux systems, GLExplorer comes with OpenGL for Linux by Conix, but other OpenGL implementations may also be used.
Three things must be noted here: the first is that the on-line documentation does not refer to the package as 3-D Explorer but rather GLExplorer, so I will use the two terms interchangeably. Second, I am not sure GLExplorer works with other OpenGL implementations without installing the OpenGL package (the second diskette) from Conix. Third, since it does not appear that the Mesa libraries work (I did not try with my Xi Graphics OpenGL distribution), you must exit Mathematica and install the Conix OpenGL diskette before continuing.
In my first attempt to work with 3-D Explorer, I tried to use the Mesa libraries already installed on my system under /usr/local/lib, but these did not seem to work. The problem may be that my Mesa installation is not quite up to snuff; however, when I installed the Conix-supplied OpenGL package, I found a slew of files I would not have expected with a standard OpenGL distribution. For example, a directory called /GL was created under /usr/X11R6/lib which contained shared objects such as GLEngineClient.so.1 and GLRendererRGB565A8D32.so.1. A quick check with ldd on the executable under /usr/local/mathematica/AddOns/Applications/GLExplorer/GLLink.exe/Linux provided the following information:
libGLU.so.1 => /usr/local/lib/libGLU.so.1
libGL.so.1 => /usr/X11R6/lib/libGL.so.1.0
libXext.so.6 => /usr/X11R6/lib/libXext.so.6.3
libX11.so.6 => /usr/X11R6/lib/libX11.so.6.1
libdl.so.1 => /lib/libdl.so.1.7.14
libm.so.5 => /lib/libm.so.5.0.6
libc.so.5 => /lib/libc.so.5.3.12
libGLClientSys.so.1 => /usr/X11R6/lib/libGLClientSys.so.1.0
libXintl.so.6 => /usr/X11R6/lib/libXintl.so.6
Since libGLClientSys.so.1 is contained in the OpenGL distribution from Conix, it would appear you do indeed have to install that package in order to properly use 3-D Explorer.
The OpenGL diskette needs to be unpacked from the root directory, for example:
cd /
tar xvzf /mnt/floppy/cnxgl140.tgz
Again, the file name on the diskette does not match the written instructions on the single sheet of paper that comes with the diskettes. Additionally, the single sheet of instructions says to run ldconfig after you install the OpenGL files. However, the files in the gzipped tar file on the diskette use relative paths that start with usr/X11R6/lib, so you do not have to do this as long as you first change to the root (/) directory.
Registration and/or license IDs are not required in order to use this product. Once the OpenGL package has also been installed, you are ready to try out GLExplorer. Note that Mathematica uses Motif, but the version I received for this review was statically linked—Conix's package does not require Motif to work.
The only documentation for GLExplorer is the on-line manual. Even if you have never used Mathematica, their help system is quite easy to use and includes hypertext links with expandable/retractable sections. You can execute the example commands listed in the Help browser by clicking on the cell bracket (at the right of each cell) with the right mouse button and selecting Kernel->Evaluation->Evaluate Cells.
All example uses of GLExplorer covered in the on-line documentation require that you first run the command
Needs["GLExplorer`GLRenderer`"]
This command starts the GLExplorer rendering engine. Once started, a small icon (see Figure 1) will appear on your desktop. Although this command is listed at the start of each example, you need to run the command only once to start the engine. After that, you can skip this command in each of the subsequent examples you try.

Figure 1. GLExplorer Engine Icon
The first thing I noticed about running Mathematica, on its own, was the dialog box that pops open at start time. This box complained about the fonts not being installed correctly, but if I clicked on the Continue button in the dialog everything seemed to work fine. Fonts necessary to run Mathematica are installed under $MATHEMATICA/SystemFiles/Fonts/Type1 and $MATHEMATICA/SystemFiles/Fonts/X, where $MATHEMATICA is the top-level directory where you installed all the Mathematica files. The default for this is /usr/local/Mathematica. For everything to work right, the Type1 fonts should be listed prior to the X fonts in your X server's font path.
While looking at the GLExplorer Demos provided, you will find reference to GLShow, a GLExplorer command. Conversion of Mathematica's 2-D and 3-D graphics into OpenGL-based graphics is handled through this command. The command accepts standard Mathematica Show command syntax, making it fairly easy to make use of OpenGL for interactive graphics display without having to learn a lot about it.
GLShow immediately opens a new window. This window is small, about 256x256 pixels, but is interactive. You can immediately rotate any 3-D shape and translate (move around the window) any 2-D or 3-D graph.

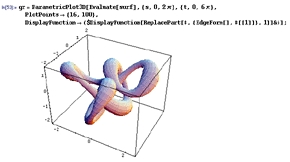
Figure 2. Snake Knot Demo
The Snake Knot demo shows how a complex set of formulas can be combined to produce interesting graphics with both Mathematica and GLExplorer. The command
gr=ParametricPlot3-D[Evaluate[surf],{s,0,2PI},{t,0,6PI},
PlotPoints->{16,100}, DisplayFunction ->
($DisplayFunction[ReplacePart[#,{EdgeForm[],#[[1]]},1]]&)];
produced the Mathematica graphic shown in Figure 2. Plugging this into GLShow and setting a number of optional parameters for it,
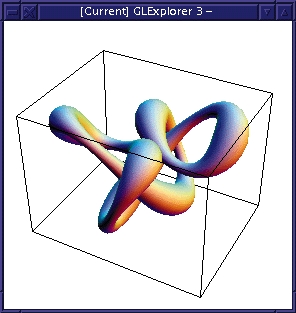
GLShow[gr,ShadeModel->Smooth,DepthCompression->False,
   Axes->False,AdditionalLights->
   {{{0,-1,-1},RGBColor[0,0,.8]},
   {{-.5,.5,-1},RGBColor[0,.8,0]}}];
produced the image in Figure 3. Note the values
PI and -> are used to
represent text that only Mathematica's special fonts can show.
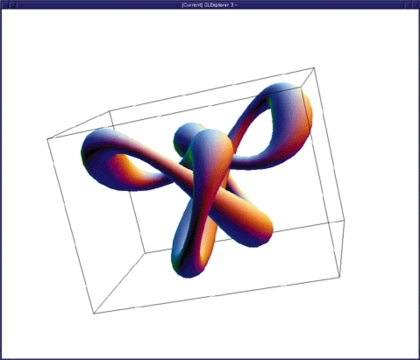
Figure 4 shows the same object rotated and enlarged in the
GLExplorer window. Rotations can be done using simple mouse-button
clicks and drags. Enlarging the window will automatically redraw
the object it contains to fit the new window size.

Figure 3. GLShow Display
Apparently, the windows opened by GLShow can be closed only by using the window manager's window menu Close option. If there is a more appropriate way to close the windows, I could not find it.
3-D Explorer is not a complete implementation of OpenGL. Rather, it offers an interface that allows direct access to a subset of OpenGL, plus a method of extending this access to encompass any OpenGL function. In order to use the existing or extended set of OpenGL primitives and directives, you need to understand the 3-D Explorer GLGraphics object.
Supported features of OpenGL are those expected for any good 3-D tool. They include drawing and color primitives, antialiasing, lighting and transformations. Accessing these primitives is done with the GLGraphics object. The GLGraphics object allows you to specify associations of points, lines, objects, colors, etc., all of which can then be viewed using GLShow.
Drawing primitives supported by GLExplorer include (but are not limited to) points, lines, triangles, polygons, surfaces and cuboids. Color primitives include RGB/RGBA, CMYK, HSL and gray-scale colors. All drawing primitives can have their sizes (thickness) and colors set using 3-D Explorer directives such as PointSize or EdgeForm. Antialiasing, hidden line removal and lighting are all supported. In fact, any OpenGL capability recognized by the OpenGL glEnable function can be set using the Enable directive of GLExplorer.
Transformations such as rotation, scaling and translating are supported locally by GLExplorer. These are handy when used with OpenGL display lists. Display lists are a method of grouping OpenGL primitives together so they can be rerun as a single object. This method of grouping provides better efficiency and is part of the OpenGL specification itself. GLExplorer offers complete access to this feature.
Texturing of OpenGL objects is supported; however, the demo showing a texture on a wave (from the on-line documentation) crashed GLExplorer. I was never able to run this example successfully.
You can extend GLExplorer to encompass any OpenGL function through the use of the Commands wrapper. This GLExplorer command allows you to call any OpenGL function from within the format of a Mathematica graphics expression.
OpenGL programs can be written directly within Mathematica with the help of GLExplorer. All of the OpenGL core functions are accessed with the prefix gl, such as glBegin[GlLineStrip] or glVertex[0,0]. Similarly, the OpenGL Utility library functions are accessed with the glu prefix. This is just as you would use them in any other OpenGL application written in C, for example (although C syntax differs from Mathematica's—the function names are the same). In the case of windowing commands, GLExplorer prefixes commands with glM, such as glMCreateWindow[] or glMGetWindowOptions[glwin,ErrorTrapping,ImageSize].
The section in the User's Guide on using these direct access commands to OpenGL is limited to defining their use. It leaves the explanation of what they are used for to the canonical texts on OpenGL from Addison Wesley, which are quite good. If you intend to become more familiar with OpenGL for use with Mathematica and GLExplorer, I highly recommend these books.
Overall, the speed of GLExplorer's rendering engine is very good. I use a Cyrix 200 with 64MB of memory and none of the examples in the on-line manuals took more than a few seconds to generate. They also reacted interactively quite well—interactive rotation and translation of the displayed images was smooth and immediate. This is all done with software acceleration; no 3-D hardware acceleration was used. It should be noted, however, that few lights were used in the examples and the distributed OpenGL libraries could not be compared to similar software-accelerated libraries from Mesa or Xi Graphics.
GLExplorer offers the user a method of building an OpenGL-based image from a command line, step by step. You can even use Mathematica to write an OpenGL program and run it directly from within Mathematica, then let GLExplorer handle the image display and interaction for you.
In setting out to write this review, I wanted to discover if a novice user such as myself could get up and running fairly quickly. As it turns out, with the fairly good 3-D Explorer documentation and Mathematica's terrific Help browser, I was able to find my way around both tools quite easily. If you are looking for a way to integrate your Mathematica notebook graphics with OpenGL, Conix 3-D Explorer may just be your ticket.


